



Contents: Four-cylinder petrol engines with…↡ 6-cylinder engines (SOHC and…↡ Six-cylinder DOHC petrol engines ↡ Other diesel engines ↡
Adjusting the length of the pressure control cable on models with a carburetor
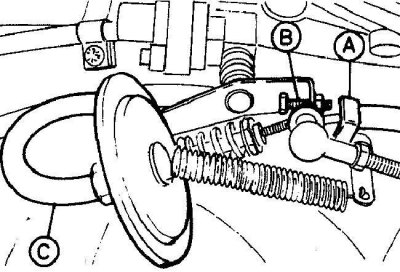
A – throttle lever;
B – idle speed adjustment screw;
C – vacuum hose
Removal the cable from the ball joint
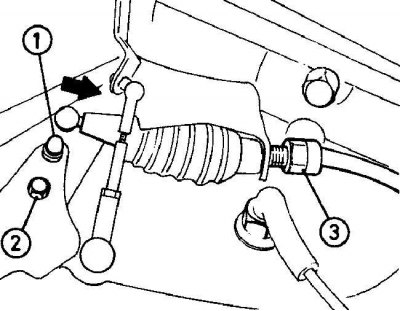
Remove the end of the cable (1) from the ball joint (2), then press it into the sheath and remove it again. If necessary, adjust the length of the cable by turning the adjuster on the cable sheath (3) (carburetor models).
1. Remove the air cleaner. Check that the carburetor throttle lever is positioned opposite the idle speed adjustment screw. If not, proceed as follows (see Fig. Adjusting the length of the pressure control cable on models with a carburetor):
- start the engine;
- pinch the throttle actuator vacuum hose until the throttle lever is positioned opposite the idle speed adjustment screw;
- turn off the engine.
2. Remove the pressure control cable from the ball joint on the throttle linkage.
3. Move the cable into the cable sheath, then pull it out of the sheath until you feel resistance.
4. In this position of the cable, secure it to the ball joint of the throttle linkage. If the length of the cable is too long or too short, turn the adjuster on the cable sheath to set the required cable length (see fig. Removing the cable from the ball joint).
5. After adjustment, install the air filter.
Four-cylinder petrol engines with fuel injection system
Models with connecting bar
Adjusting the length of the pressure control cable by changing the length of the connecting bar on 4-cylinder gasoline engines with fuel injection
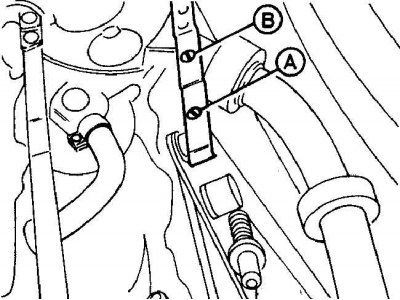
A – connecting strip;
B – screw
1. Remove the air filter.
2. Loosen the screw that secures the two parts of the pressure control cable connector plate (see fig. Adjusting the length of the pressure control cable by changing the length of the connecting bar on 4-cylinder gasoline engines with a fuel injection system).
3. Spread both parts of the connecting bar to their maximum length, then move them until you feel a noticeable resistance and secure them in this position with a screw.
4. Install the air filter.
Models with pointer and adjustment wheel
Adjusting the length of the pressure control cable by turning the adjusting wheel on 4-cylinder petrol engines with fuel injection system
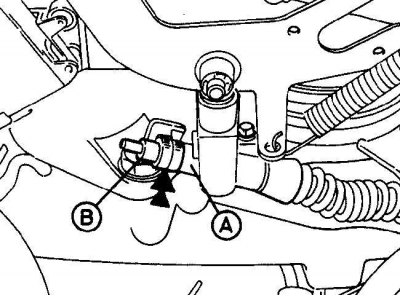
A – adjusting wheel;
B – regulator bushing
1. Rotate the adjuster wheel to set the adjuster to a position where the gap between the cable tip and the adjuster sleeve is 1 mm.
2. Turn the adjuster wheel in the opposite direction until the adjuster pointer aligns with the groove in the center of the wheel (see fig. Adjusting the length of the pressure control cable by turning the adjusting wheel on 4-cylinder gasoline engines with fuel injection system).
6-cylinder engines (SOHC and Turbocharged Diesel Engines)
Models with a regulator on the cable sheath
Adjusting the length of the pressure control cable on 6-cylinder SOHC gasoline engines and 6-cylinder turbocharged diesel engines
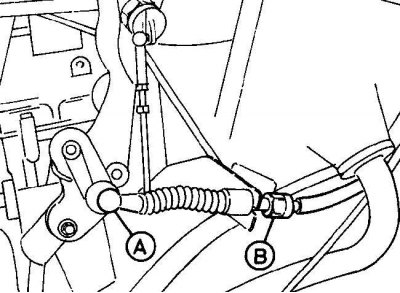
A – cable tip;
B – regulator on the cable sheath
1. Remove the end of the pressure control cable from the throttle linkage ball joint.
2. Pull the cable forward until you feel a noticeable resistance.
3. In this position, install the end of the cable onto the ball joint of the throttle linkage. If the length of the cable is too long or too short, rotate the cable sheath adjuster until the end of the cable is aligned with the ball joint (see picture).
Models with pointer and adjustment wheel
1. Rotate the adjuster wheel to set the adjuster to a position where the gap between the cable tip and the adjuster sleeve is 1 mm.
2. Turn the adjuster wheel in the opposite direction until the adjuster pointer aligns with the groove in the center of the wheel.
Six-cylinder DOHC petrol engines
Models with a regulator on the cable sheath
Adjusting the length of the pressure control cable with a regulator on the cable sheath on 6-cylinder DOHC gasoline engines
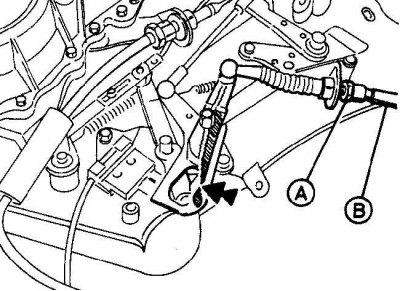
The arrow shows the location where the pointers coincide.
A – regulator on the cable casing;
B – pressure control cable
1. Remove the air filter.
2. With the accelerator pedal in the rest position, check that the pointers on the throttle linkage are aligned as shown in the illustration.
3. If necessary, rotate the adjuster on the cable housing to align the indicators.
Models with pointer and adjustment wheel
1. Rotate the adjuster wheel to set the adjuster to a position where the gap between the cable tip and the adjuster sleeve is 1 mm.
2. Turn the adjuster wheel in the opposite direction until the adjuster pointer aligns with the groove in the center of the wheel.
Other diesel engines
Adjusting the length of the pressure control cable by changing the length of the connecting bar on other diesel engines
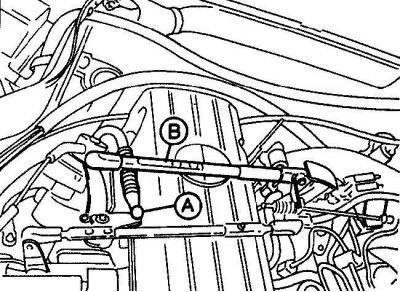
A – cable tip;
B – Throttle lever connecting bar
1. Remove the pressure control cable from the ball joint on the throttle linkage.
2. Loosen the screw that secures the two parts of the throttle lever connecting bar, then extend the connecting bar to its maximum length (see picture).
3. Move the pressure control cable forward until you feel resistance.
4. In this position, install the end of the cable on the ball joint of the throttle linkage. If necessary, adjust the length of the connecting bar so that the end of the cable is aligned with the ball joint.