
Note: New axle bolt nuts, new shock absorber bottom mount bolt nut and anti-roll bar link bolt nut are required for installation.
Removing
1. Place wedges under the front wheels, then jack up the rear of the vehicle and support it securely on jack stands (see "Jacking up the car and placing it on stands"). Remove the relevant wheel.
2. Turn away screws of fastening and remove a protective casing from the basis of the lower suspension arm.
3. Place a spring compressor on the spring and compress it to release the upper and lower cups (see paragraph 12).
4. Loosen and remove the nut and bolt securing the anti-roll bar link to the lower arm (see fig. 14.4).
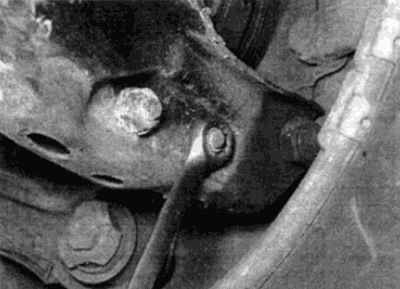
Pic. 14.4. Remove the mounting nut and bolt and separate the anti-roll bar link from the lower arm
5. Place a jack and block of wood under the lower arm and raise the jack to support the weight of the arm.
6. Working from below the vehicle, loosen and remove the lower support bolt nut and remove the bolt and washers.
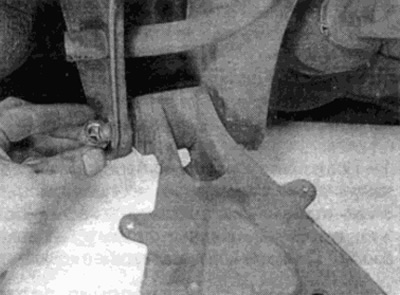
7. Turn away a nut of an external bolt of the bottom lever and take a bolt. Gently lower the lever so that it is possible to remove the spring and the upper spring cup (see fig. 14.7. a, b).
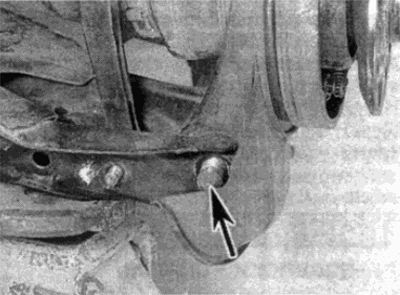
Pic. 14.7, a. Remove the lower arm outer bolt (shown by arrow)

Pic. 14.7, b. Gently lower the lever using a jack so that the spring and support cup can be pulled out
8. Unscrew the nut, then remove the inner bolt and washers and remove the lower arm from under the car (see fig. 14.8).
Pic. 14.8. Loosen the nut, remove the inner bolt, remove the washers and remove the lower arm from under the car
Disassembly
9. Thoroughly clean the lower arm and the area around the arm supports, removing all traces of dirt and mastic. Then check for cracks, deformation or other signs of wear or damage, paying special attention to the bearing bushings and ball joint. If a bushing or ball joint needs to be replaced, it should be done at a workshop. To press out and press in bushings or a ball joint, a hydraulic press and suitable shims must be used.
10. Attach the lower arm and insert the front and inner axle bolt and washers. Install the new nut, tightening it lightly at this stage.
11. Check that the lower arm spring cup is clean, then install the upper cup on the spring and install the spring in place.
12. Position the lower end of the spring against the stop on the lower arm cup. Align the upper spring cup with the support on the body and carefully lift the arm to align it with the hub retainer, anti-roll bar link and shock absorber.
13. Make sure the spring is correctly positioned, then insert the lower arm axle outer bolt. Install a new bolt nut and do not overtighten it.
14. Align the lower end of the shock absorber with the arm and insert the bolt (s) supports. Install new nut (And), tightening, at this stage, by hand.
15. Insert the connecting link bolt, then install the new nut and lightly tighten it.
16. Install the wheel, then lower the vehicle to the ground and torque the wheel bolts.
17. With the vehicle on the ground, rock the vehicle until all parts are in position, then tighten the lower arm axle bolts, lower shock absorber mount bolts, and stabilizer bar link bolt to the required torque. Install the protective cover on the lower arm and tighten the screws securing it.