



Note: Installation will require new upper shock absorber mount nuts, upper shock absorber bolt nut, and lower shock absorber to steering knuckle bolts.
Removal
1. Place chocks under the rear wheels, apply the parking brake and raise the front of the vehicle with a jack and securely support it on stands (see "Lifting the car with a jack and placing it on supports"). Remove the corresponding front wheel.
2. If the shock absorber is to be removed, the lower arm must be supported. Do this by placing a jack and a wooden block under the arm and lifting it up. Alternatively, you can compress the spring using a spring compressor (see paragraph 6).
3. Loosen and remove the two lower bolts securing the shock absorber to the steering knuckle, then remove the nut and washer. Remove the upper bolt (see fig. 5.3).
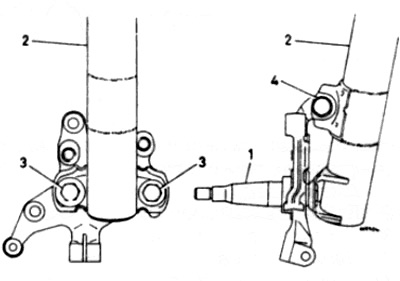
Fig. 5.3. Front shock absorber mounting parts to steering knuckle
1 Steering knuckle
2 Shock absorber
3 Lower support bolts
4 Upper support nut and bolt
4. Working in the engine compartment, unscrew the nuts of the upper support of the strut (see fig. 5.4), then carefully lower the stand down.
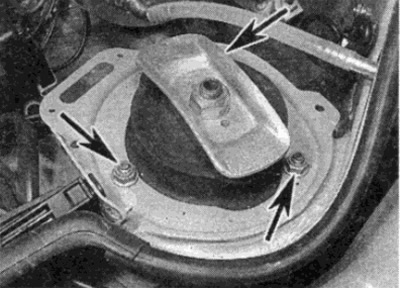
Fig. 5.4. Unscrew the nuts of the upper support of the rack (shown by arrows)
Disassembly
Note: A new backing plate nut will be required.
5. With the rack removed from the vehicle, clean off any dirt, then clamp it vertically in a vice
6. Loosen and remove the support plate nut while holding the shock absorber piston with an Allen key (see fig. 5.6).
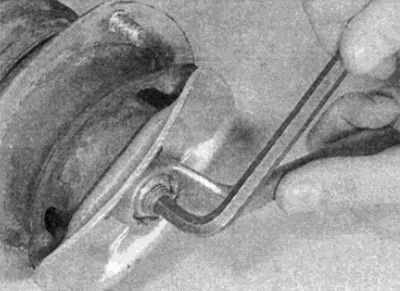
Fig. 5.6. Loosen and remove the upper support plate nut while holding the shock absorber piston with an Allen key
7. Remove the nut and washer and lift up the backing plate and upper support assembly.
8. Remove the rubber stop from the piston, then loosen the clamp and move the dust cover off the shock absorber (see fig. 5.8).
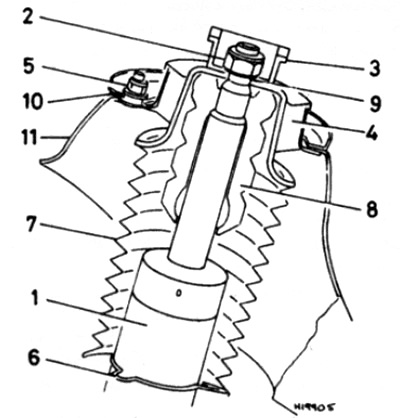
Fig. 5.8. Front shock absorber parts - assembly and support parts
1 Shock absorber
2 Upper support plate nut
3 Recoil limiter
4 Upper support
5 Upper support nuts
6 Mudguard clamp
7 Case
8 Rod buffer
9 Washer
10 Washer
11 Body tower
9. Check for leaks in the shock absorber. Check for pitting on the piston and damage to the housing. Holding the shock absorber vertically, check the piston movement throughout its entire stroke and then at short movements of 50 to 100 mm. In both cases, a smooth and continuous resistance should be felt. If the resistance is jerky or uneven, or there are signs of wear or damage to the shock absorber, it must be replaced.
Read more on the website mercedesman.ru
10. Check all other parts. If any damage or destruction is found, replace.
11. Install the mudguard onto the shock absorber. Make sure the lower end of the mudguard is correctly positioned and secure it with the clamp.
12. Slide the rubber buffer rod onto the shock absorber piston and install the upper support.
13. Install the upper support plate and washer, then tighten the new nut. Hold the shock absorber piston and tighten the support plate nut to the specified torque.
14. Align the top end of the mudguard with the edge on the base of the upper support.
Installation
15 Before installation, using a tap of the appropriate size, clean the threads of the holes for the lower bolts that secure the shock absorber to the steering knuckle.
Tip: If you don't have the required tap, go through the threads using an old bolt with a split groove on the thread.
16. Reinstall the shock absorber and install new upper support nuts.
17. Align the steering knuckle with the shock absorber, making sure that the protrusion on the knuckle fits into the hole.
18. Install the upper knuckle mounting bolt and washers, then install a new nut. Install the two new lower shock absorber-to-knuckle mounting bolts. Once all the bolts are installed, press the knuckle shaft down firmly to connect the upper knuckle to the shock absorber. While holding the knuckle in this position, tighten the upper bolt nut to the specified torque. Then tighten both lower bolts.
19. Remove the jack/spring compressor (depends on what you used) and tighten the upper support nuts to the required torque.
20. Install the wheel and lower the vehicle to the ground. Tighten the wheel mounting bolts to the required torque.