



Removal
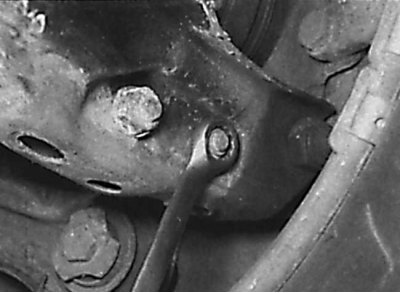
Unscrewing the nut securing the stabilizer bar link to the rear suspension lower arm
1. Raise the rear of the vehicle and secure it on stands. Remove the corresponding rear wheel.
2. Remove the screws and remove the protective cover from the base of the lower arm.
3. Using a special device, compress the spring so that it moves away from the top. When using a special device for compressing springs, make sure that the spring coils are firmly grasped and compress the spring from opposite sides. The spring has a very high compression force, so use only a very reliable tool. Never tie the spring with wire.
4. Remove the nut and bolt securing the stabilizer bar link to the lower arm (see picture).
5. Use a jack to support the lower arm of the rear suspension through a wooden block.
6. Unscrew the nut and remove the bolt securing the lower part of the shock absorber.
7. Remove the nut and the outer pivot bolt of the lower control arm. Carefully lower the rear lower control arm and remove the coil spring with the upper support cup.
8. Remove the nut, then remove the inner pivot bolt of the rear lower control arm and remove the arm.
Repair
1. Clean the lower arm of the rear suspension from dirt and anti-corrosion coating and check it for cracks or mechanical damage. Pay special attention to the arm mounting bushings. If it is necessary to replace the bushings, this work must be carried out at a service station, as this requires the use of a hydraulic press and appropriate mandrels.
Installation
1. Reinstall the lower rear control arm, insert the inner pivot bolt and washer, and thread on a new nut without fully tightening it.
2. Make sure the lower spring seat is clean, then install the upper spring seat onto the spring and reinstall the spring.
3. Rotate the coil spring so that its lower end is correctly positioned in the lower spring seat. Position the upper spring seat under the mount and carefully lift the lower rear control arm until it is aligned with the hub fastener, stabilizer bar eye and shock absorber.
4. Check that the spring is positioned correctly, then insert the outer pivot bolt that secures the lower arm, screw a new nut onto it, but do not tighten it completely.
5. Align the lower end of the shock absorber with the lever, insert the mounting bolt and screw a new nut onto it without tightening it completely.
6. Insert the stabilizer bar link mounting bolt, then screw a new nut onto the bolt without tightening it completely.
7. Install the rear wheel, then lower the vehicle to the ground and tighten the wheel bolts to the specified torque.
8. Rock the car to ensure that all rear suspension components are in place. Tighten all nuts on the bolts to the specified torque. Install the protective cover on the base of the lower arm and screw it in place.