
Note: New support yoke bolts and connecting link nuts are required for installation. If the rear subframe has to be unbolted, new subframe and clutch bolts will be required.
Removing
1. Place wedges under the front wheels, then jack up the rear of the vehicle and support it securely on jack stands (see "Jacking up the car and placing it on stands"). Remove the relevant wheel.
2. Loosen and remove the nuts securing each link to the anti-roll bar.
3. Apply alignment marks between the support bushings and the stabilizer bar, then loosen the two bolts of the stabilizer bar support clamp and remove the clamps (see fig. 15.3). Remove the rubber bushings from the stabilizer, remembering how they are installed. Try to pull the stabilizer out from under the car, considering that to improve access, it is better to perform the following work.
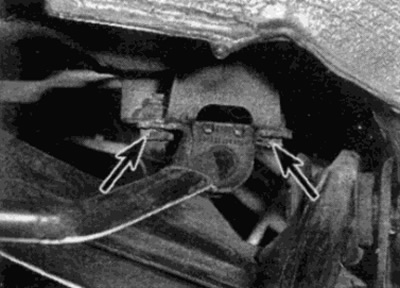
Pic. 15.3. Bolts of a collar of fastening of the stabilizer to a body (shown by arrows)
4. Referring to Chapter 8, disconnect the driveline from the final drive and loosen the driveshaft center bearing bolts to allow the assembly to be moved.
5. Support the rear subframe with a wooden jack under the final drive.
6. Make sure the subframe is securely held, then loosen and remove the mounting bolts and washers holding the subframe to the body. Carefully lower the subframe so that the stabilizer bar can be pulled out from under the vehicle.
Note: On ABS equipped models, be careful not to stretch the rear sensor wires when lowering the assembly. If necessary, unscrew the bolts and remove the sensor (And) from the final drive or disconnect the wires (see chapter 9).
Installation
7. Maneuvering, put the stabilizer in place and align it with the connecting links.
8. Where necessary, raise the subframe, then install new mounting bolts and washers. Tighten the bolts to the required torque. Connect the driveline to the final drive and tighten the middle bearing bolts as described in Chapter 8.
9. Install the rubber bushings on the stabilizer bar, positioning them so that the cuts are facing forward and align them with the marks made before removal. Position the flat surface of each bushing against the vehicle body, then install the support clamps and install new clamp bolts.
10. Screw new nuts onto the connecting links and tighten them to the required force, then wrap the clamp bolts.
11. Install the rear wheels and lower the vehicle to the ground. Tighten the wheel bolts.