



Contents: Examination ↡ Replacement ↡
Examination
1. Wear in the support bearing will cause noise and vibration when the car is moving. It is best to check the bearing with the driveshaft removed (see paragraph 7).
2. Rotate the bearing and check that it rotates smoothly without any signs of play; if it is difficult to turn or if it sticks, replace it. Also check the rubber parts. If they are cracked or damaged, replace the bearing.
Replacement
Note: Bearing replacement requires the use of a puller and a hydraulic press as well as suitable linings. If you do not have access to these tools, it is best to have the bearing replaced at a service station.
3. Remove the driveshaft as described in paragraph 7.
4. Apply alignment marks between the front and rear sections of the driveshaft, keeping in mind that on some models the alignment marks are already applied; the raised mark on the front section should be located between the two marks on the rear section of the universal joint.
5. Remove the rubber boot from the threaded sleeve nut, then loosen the nut completely and separate the two halves (see fig. 9.5).
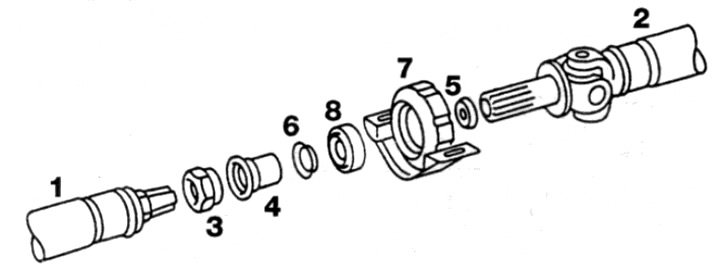
Fig. 9.5. Cardan transmission central bearing parts
1 Cardan shaft
2 Cardan shaft
3 Bushing nut
4 Rubber cover
5 Protective cover
6 Protective cover
7 Central Opera
8 Bearing
6. Remove the rubber boot from the rear section of the propeller shaft.
7. Using a puller, pull the center support assembly off the end of the shaft, making a note of the way the bracket is installed. Remove the front and rear bearing caps.
8. Support the bearing bracket assembly and gently press out the bearing using a pipe.
9. Check all parts. If any wear or damage is found, replace them. We remind you that the bearing caps and rubber boot must be replaced regardless of their condition.
10. Securely fasten the support bracket and press the new bearing until it stops using a pipe that rests only on the outer race of the bearing.
11. Remove all traces of dirt from the drive shaft and install a new protective rear cover.
12. Make sure the support bracket is positioned correctly and press the assembly firmly onto the shaft using a pipe that only rests against the inner race of the bearing.
[Publication reprinted from this resource www.mercedesman.ru]
13. Install the front protective cover onto the shaft and install the new rubber boot, making sure it is securely located in the grooves of the shaft.
14. Apply molybdenum disulfide grease to the shaft splines. Carefully connect the two halves of the driveshaft together, checking that the alignment marks are correctly positioned (see item 4).
15. Place the rubber boot on the threaded bushing nut and install the cardan shaft as described in paragraph 7.