
Cars BMW Cars Volkswagen Cars Chevrolet Cars Land Rover Cars Lada Cars Honda Cars Peugeot
English Русский
Български
Беларускі
Український
Српски
Hrvatski
Română
Polski
Slovenský
Magyar
Bookmark News and articles Sitemap Feedback Site search
MercedesMan.ru


A-Class C-Class E-Class G-Class M-Class S-Class Others
Sprinter (1995-2000, diesel) Vito 1 (1996-2003) Vito 2 (2003-2014, diesel) Vario 814D (1996-2003, diesel)
  • Main
  • Mercedes-Benz
  • Sprinter (1995-2000)
  • Chassis
  • Tires and wheels
  • Wheel replacement

Wheel replacement (Mercedes-Benz Sprinter 903)

0
The wheel must be replaced in the following order:
  • apply the parking brake and engage first or reverse gear;
  • place a block under the wheel located diagonally from the one being removed;
  • loosen all wheel bolts;
  • lift the car with a jack from the desired side;
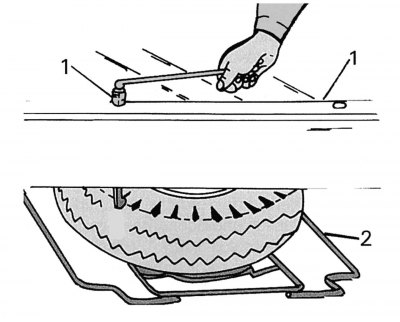
Figure 340a. Spare wheel position on a minibus (installed under the frame from the rear side): 1 -…

Figure 340a. Spare wheel position on a minibus (installed under the frame from the rear side): 1 - holder bolts; 2 - wheel holder

  • remove the spare tire. Its location is shown in the operating manual. Used car owners often do not have a manual. Therefore, below is a description of three possible locations for the spare tire (figure 340a, 340b and 341). If you are doing this for the first time, please keep the following in mind:
  • figure 340a shows the spare wheel mount in minibuses. To remove it, open the rear doors, use a wheel brace to unscrew the bolts 1 of the supporting element of the wheel holder 2 and lower the holder. Move the supporting element to the side and remove the wheel;
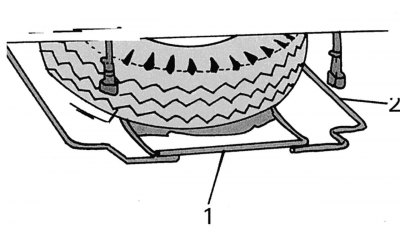
Figure 340b. Spare wheel position on a vehicle with a cargo platform (installed under the frame…

Figure 340b. Spare wheel position on a vehicle with a cargo platform (installed under the frame from the rear side): 1 - spare wheel holder; 2 - locking bracket


  • figure 340b shows the spare wheel mount on a flatbed truck - it is located under the frame at the rear. To remove, unscrew the wing nuts by hand and the fastening nuts with a suitable wrench. Raise holder 1 slightly, move supporting element 2 to the side and remove the wheel;
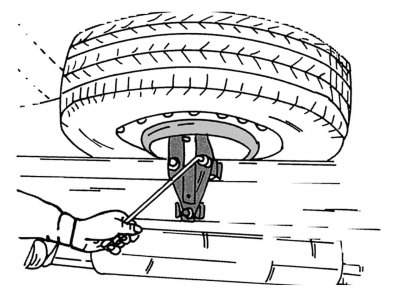
Figure 341. Spare wheel position on a flatbed truck (installed under the platform)

Figure 341. Spare wheel position on a flatbed truck (installed under the platform)

  • figure 341 also shows the mounting of the spare wheel located under the platform on a flatbed truck. To remove, unscrew the mounting bolts, move the wheel to the side and unscrew the holder.

Text republished from the website MercedesMAN.ru

Note: When installing a damaged wheel in the spare wheel storage location, place the wheel with the disc facing down. For safety reasons, the spare wheel mounting should be checked regularly.


Further replacement of the wheel is carried out as follows:
  • unscrew the wheel bolts;

Attention! It is often necessary to remove a wheel on the road near drain holes, so be careful not to lose the unscrewed bolt. If possible, move the car forward a little.

  • remove the wheel and install the spare wheel on the hub;
  • tighten the bolt closest to the wheel valve by hand until the wheel is in place. Tighten the remaining bolts;
  • tighten the bolts tightly in a cross pattern, turning the wheel until it is properly centered on the hub;
  • lower the vehicle and tighten the bolts to 160–180 N·m. Do not overtighten to avoid dislodging the brake drum or pads, which can cause uneven braking and tire wear;
  • in any case, check the tightening of the bolts after a few kilometers.
This article is available at: russian, bulgarian, belarusian, ukrainian, serbian, croatian, romanian, polish, slovak, hungarian
The article has been verified: Levin Kirill Glebovich
Share with friends:
◀ Previous
Mercedes Sprinter / Tires and wheels
Next ▶

Extending the life of your tires
Checking tire pressure
Wheel rotation
Speed and age designation of tires
Tire size
Checking the condition of the tires
More similar articles for repairing other models

☛ Adjusting the position of the steering wheel Mercedes W168 (1997-2004)
☛ Checking the steering wheel free play Mercedes W202 (1993-2000)
☛ Removal and installation the rear wheel drive shaft Mercedes W123 (1976-1985)
☛ Checking the condition of tires and their pressure, designating tires… Mercedes W463 (1999-2019)
☛ Checking the condition of tires and their pressure, designating tires… Mercedes W163 (1997-2005)
☛ Checking the condition of tires and their pressure, designating tires… Mercedes W140 (1991-1998)
Link in different formats to this article
Comments and feedback from visitors
No comments yet


How much will 50 + 39 ?


Vario 814D (1996-2003, diesel) 
  • General information
  • Maintenance
  • Power unit
  • Engines 602.984/985
  • Engines 904.908/914/923/936
  • Transmission
  • Clutch
  • Manual gearbox 711.613
  • Manual gearbox 710.64/66
  • Manual gearbox 715.051
  • Automatic gearbox 723.345
  • Power take-off box
  • Chassis
  • Front suspension
  • Rear suspension
  • Steering
  • Brake system
  • Body and electrical equipment
  • Interior (internal elements)
  • Exterior (external elements)
  • Heater and air conditioner
  • Electrical diagrams
Vito 2 (2003-2014, diesel) 
  • General information
  • User manual
  • Maintenance
  • Diesel engine OM646
  • Engine repair
  • Cooling and lubrication system
  • Power and exhaust system
  • Transmission
  • Clutch
  • Car gearbox
  • Chassis
  • Front suspension
  • Rear suspension
  • Steering
  • Brake system
  • Body
  • Body elements
  • Electrical equipment
  • Equipment and devices
  • Security systems
  • Electrical circuits
Vito 1 (1996-2003) 
  • General information
  • User manual
  • Maintenance
  • Petrol engines 2.0 l
  • Engine repair
  • Lubrication system
  • Cooling system
  • Power and control system
  • Petrol engines 2.8 l
  • Engine repair
  • Lubrication system
  • Cooling system
  • Power and control system
  • Diesel engines 2.3 l
  • Engine repair
  • Cooling system
  • Lubrication system
  • Turbocharging and recycling
  • Power and control system
  • Diesel engines 2.2 l
  • Engine repair
  • Cooling system
  • Lubrication system
  • Turbocharging and recycling
  • Power and control system
  • Transmission
  • Clutch
  • Mechanical gearbox
  • Automatic gearbox
  • Chassis
  • Front suspension and wheels
  • Rear suspension
  • Steering
  • Brake system
  • Body
  • Exterior (external elements)
  • Interior (internal elements)
  • Electrical equipment
  • Equipment and devices
  • Heater and air conditioner
  • Electrical circuits
Sprinter (1995-2000, diesel) 
  • General information
  • Introduction to the guide
  • Maintenance
  • Power unit
  • Engine repair
  • Lubrication system
  • Cooling system
  • Power and exhaust system
  • Transmission
  • Clutch
  • Mechanical gearbox
  • Automatic gearbox
  • Front axle
  • Rear axle and cardan
  • Chassis
  • Car suspension
  • Steering
  • Brake system
  • Tires and wheels
  • Electrical equipment
  • Equipment and devices
  • Headlights and lighting
  • Power devices
  • Electrical circuits
 
MercedesMan.ru © 2017–2026 · Mobile version · Read about Mercedes · Sitemap: EN BG BY UA RS HR RO PL SK HU · Feedback · Site search · Bookmark A-Class (W168) · C-Class (W201) · C-Class (W202) · C-Class (W203) · E-Class (W123) · E-Class (W124) · E-Class (W210) · G-Class (W463) · M-Class (W163) · S-Class (W116, petrol) · S-Class (W126, petrol) · S-Class (W140) · S-Class (W220) · Sprinter · Vito 1 · Vito 2 · Vario 814D ·
 
We only use cookies without which some of the site's features may not be available.