
Replacing the drive gear oil seal
To replace the final drive gear oil seal, you need a torque wrench with a fixture for mounting on the drive gear flange and a socket wrench 115 589 00 07 00 for loosening the flange mounting nut. A sign that the oil seal needs to be replaced is an oil leak at the front of the final drive housing.
Remove the protective mudguard of the exhaust system, and the exhaust system.
Loosen the clamping nut of the driveline and unscrew the fastening of the intermediate support to the floor of the body.
Disconnect driveline flange from final drive flange.
Measure and record the moment of resistance to rotation of the rear wheel drive. To do this, connect a torque wrench to the flange of the drive gear through the fixture, install, by changing the height of the supports under the rear suspension arms, the drive gear and axle shafts horizontally. Rotate the drive gear with a torque wrench, mark the readings on the wrench scale and record them.
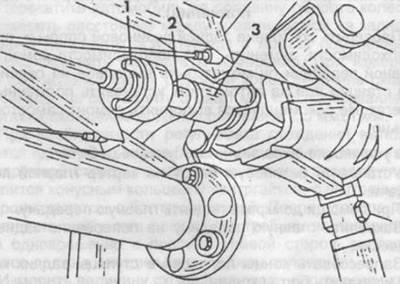
Pic. 224. Measurement of the moment of resistance to rotation of the drive of the rear wheels.
1 - torque wrench,
2 - a device for the drive gear,
3 - socket wrench.
In an accessible way, secure the drive gear flange from turning and unscrew the flange fastening nut with a socket wrench.
Remove the flange, if necessary, use an oil seal suitable for the gear.
Using a screwdriver, carefully remove the oil seal from the final drive housing.
Check the sealing surface on the flange and replace the flange if worn.
Apply sealant to the outer surface of the new oil seal and carefully, without damaging the surface of the oil seal, press it all the way into the final drive housing.
Put on the flange and slide it all the way along the gear shaft.
Screw in a new self-locking flange fastening nut and, alternately tightening the nut and measuring the moment of resistance to rotation, bring the value of the moment to the previously recorded one. It is unacceptable to tighten the fastening nut tightly. this will lead to deformation of the spacer sleeve on the driven gear and, as a result, to the need for a final drive bulkhead.
Attach driveline.
Screw in the bolts securing the intermediate support to the base of the body, do not fully tighten them.
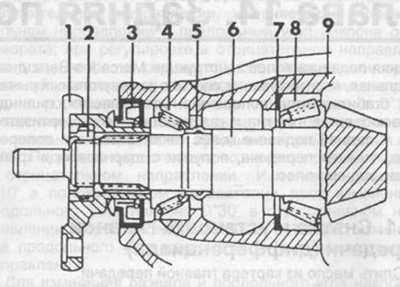
Pic. 225. Section of the drive gear.
1 - flange,
2 - self-locking nut,
3 - stuffing box,
4 - roller tapered bearing,
5 - spacer sleeve,
6 - leading bevel gear,
7 - adjusting ring,
8 - roller tapered bearing,
9 - main gear housing.
Fill the final drive housing to the lower edge of the filler hole with oil.
Roll the assembled car several times in two directions.
Tighten the driveline clamping nut.
Tighten the mounting bolts of the intermediate support.
Install the exhaust system.