
Cars BMW Cars Volkswagen Cars Chevrolet Cars Land Rover Cars Lada Cars Honda Cars Peugeot
English Русский
Български
Беларускі
Український
Српски
Hrvatski
Română
Polski
Slovenský
Magyar
Bookmark News and articles Sitemap Feedback Site search
MercedesMan.ru


A-Class C-Class E-Class G-Class M-Class S-Class Others
W116 (1972-1980, petrol) W126 (1979-1991, petrol) W140 (1991-1998) W220 (1998-2005)
  • Main
  • S-Class
  • W116 (1972-1980)
  • Chassis
  • Rear suspension
  • Removal and installation the axle shafts as a whole

Removal and installation the axle shafts as a whole (Mercedes-Benz S-Class W116)

0
Drain the oil from the final drive.

Loosen the mounting bolts, remove the brake caliper and secure it to the suspension with a wire hook without stretching the brake hose.

Loosen the bolt securing the axle shaft to the rear wheel hub and press the axle shaft out of the hub, as shown in Fig. 222.

If necessary, unscrew the fastening of the upper end of the shock absorber and lower the suspension arm onto the spring stop.

Place a jack under the main gear housing and lift the main gear. Loosen the rear rubber support of the main gear to the body base and lower the main gear.

Thoroughly clean the surfaces of the final drive housing.

Loosen the mounting bolts and remove the bearing caps.

Using pliers, remove the mounting ring from the inner end of the axle shaft, as shown in Fig. 227.
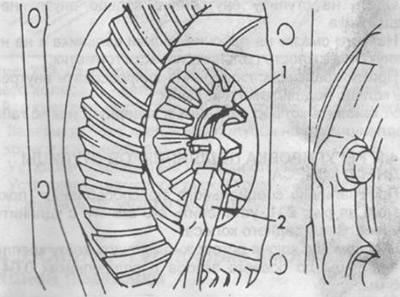
Fig. 227. Removing the mounting ring.

Fig. 227. Removing the mounting ring.
1 - forceps with bent ends,
2 - mounting ring.


Remove the axle shaft from the axle shaft gear and remove the spacer ring. The axle shaft joints are of the floating type; in the installed axle shaft, the axial movement of the joints is 15-20 mm; when the suspension arm is positioned on the spring stop, the axial movement of the joints is 30 mm.


Since there is an oil drain groove in the seal, it is necessary to pay attention to the designation of the axle shafts during installation. The designations "R" (right) and "L" (left) are applied to the end of the inner end of the axle shaft. The locations of the designations are shown in Fig. 228.
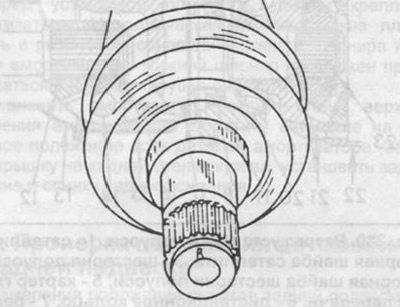
Fig. 228. Designation on the axle shaft.

Fig. 228. Designation on the axle shaft.


When installing the axle shaft, perform the following work:

If a new axle shaft is being installed, before installation, put on the spacer ring removed from the old axle shaft (Fig. 229).
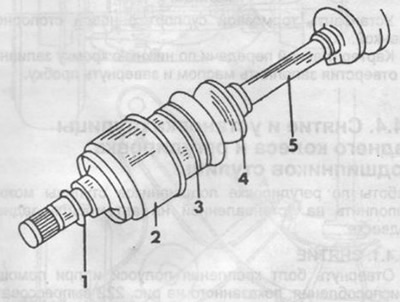
Fig. 229. Rear suspension axle shaft.

Fig. 229. Rear suspension axle shaft.
1 - spacer ring,
2 - rubber cuff,
3 - support sleeve,
4 - rubber cuff,
5 - half-shaft.


Install the half-shaft assembly into the half-shaft gear and place a new installation ring into the groove at the end of the half-shaft. Fig. 230 shows a section of the installation of the inner end of the half-shaft, the position of the spacer ring and the designation of the parts.
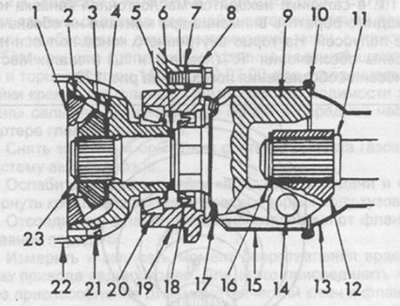


Fig. 230. Sectional view of axle shaft installation.

Fig. 230. Sectional view of axle shaft installation.
1 - satellite,
2 - satellite support washer,
3 - axle gear,
4 - axle gear support washer,
5 - main gear housing,
6 - spacer ring,
7 - adjusting ring,
8 - bearing cover,
9 - inner shaft of the hinge,
10 - sealing ring,
11 - axle shaft,
12 - outer hinge housing,
13 - support sleeve,
14 - ball,
15 - protective sleeve,
16 - mounting ring,
17 - sealing ring,
18 - oil seal,
19 - sealing ring,
20 - tapered roller bearing,
21 - differential housing,
22 - satellite axis,
23 - mounting ring.


Check the axial clearance between the inner end of the axle shaft and the differential housing. As already described in section 14.2.2. the axial clearance should not be noticeable.

Finally install the axle shaft and, using the device shown in Fig. 222, press the outer end of the axle shaft into the rear wheel hub.

Screw the axle shaft mounting bolt into the hub and tighten.

Raise the final drive.

Install the bolts securing the rear rubber support to the body base and tighten them.

Lower the jack.

Install the brake caliper with a new retaining plate.

Fill the main gear housing with oil up to the lower edge of the filler hole and tighten the plug.
This article is available at: russian, bulgarian, belarusian, ukrainian, serbian, croatian, romanian, polish, slovak, hungarian
The article has been verified: Panova Maya Vladimirovna
Share with friends:
◀ Previous
S-Class W116 / Rear suspension
Next ▶

Replacing seals in main gear bearing caps
Replacing the pinion seal
Removal and installation the main gear (differential)
Removal and installation the rear wheel hub and adjusting the hub bearings
Adjusting the rear wheel hub bearings
Removal and installation the rear shock absorber
Checking the position of the car by the rear suspension
Replacing rear brake pads
More similar articles for repairing other models

☛ Differential, primary and secondary shafts — removal and installation Mercedes W168 (1997-2004)
☛ Checking the rubber seals of the axle shafts Mercedes W202 (1993-2000)
☛ Disassembling the primary and intermediate shafts Mercedes W123 (1976-1985)
☛ Removal and installation front axle drive shafts Mercedes W463 (1999-2019)
☛ Removal and installation drive shafts Mercedes W163 (1997-2005)
☛ Removal and installation of drive axle shafts Mercedes Sprinter (1995-2000, diesel)
Link in different formats to this article
Comments and feedback from visitors
No comments yet


How much will 30 + 41 ?


W220 (1998-2005) 
  • General information
  • Introduction to guide
  • User manual
  • Maintenance
  • Power unit
  • Engine repair
  • Cooling and heating systems
  • Power and exhaust systems
  • Ignition and control system
  • Charge and launch systems
  • Transmission
  • Automatic gearbox
  • Drive shafts
  • Chassis
  • Brake system
  • Front suspension
  • Rear suspension
  • Steering
  • Body
  • Body elements
  • Electrical equipment
  • Equipment and devices
  • Electrical circuits
W140 (1991-1998) 
  • User manual
  • Controls and instruments
  • Driving and operation
  • Maintenance
  • Power unit
  • Petrol engine V6
  • Petrol engine V8
  • Petrol engine V12
  • Diesel engine OM603
  • Diesel engine OM606
  • Cooling system
  • Power supply and injection system
  • Control system HFM-SFI
  • Control system LH-SFI
  • Control systems ME-SFI
  • Diesel control system
  • Ignition system
  • Charge and launch system
  • Transmission
  • Mechanical gearbox 717.438
  • Mechanical gearbox 717.454
  • Automatic gearbox 722.5
  • Automatic gearbox 722.6
  • Clutch and drive shafts
  • Differential
  • Chassis
  • Brake system
  • Steering
  • Front suspension
  • Rear suspension
  • Body
  • Exterior (external elements)
  • Interior (internal elements)
  • Electrical equipment
  • Equipment and devices
  • Electrical circuits
W126 (1979-1991, petrol) 
  • Power unit
  • Engine repair
  • Ignition system
  • Lubrication system
  • Cooling system
  • Fuel system
  • Fuel injection system
  • Transmission
  • Clutch and cardan
  • Mechanical gearbox
  • Automatic gearbox
  • Chassis
  • Front suspension
  • Rear suspension
  • Steering
  • Brake system
  • Electrical equipment
  • Power devices
  • Electrical circuits
W116 (1972-1980, petrol) 
  • General information
  • Introduction to guide
  • Power unit
  • 8-cylinder V8 engine
  • 6-cylinder I6 engine
  • Cooling and lubrication system
  • Power system (carburetor)
  • Fuel injection system
  • Ignition system
  • Transmission
  • Clutch and cardan
  • Car gearbox
  • Chassis
  • Front suspension
  • Rear suspension
  • Steering
  • Brake system
  • Electrical equipment
  • Power devices
  • Electrical circuits
 
MercedesMan.ru © 2017–2026 · Mobile version · Read about Mercedes · Sitemap: EN BG BY UA RS HR RO PL SK HU · Feedback · Site search · Bookmark A-Class (W168) · C-Class (W201) · C-Class (W202) · C-Class (W203) · E-Class (W123) · E-Class (W124) · E-Class (W210) · G-Class (W463) · M-Class (W163) · S-Class (W116, petrol) · S-Class (W126, petrol) · S-Class (W140) · S-Class (W220) · Sprinter · Vito 1 · Vito 2 · Vario 814D ·
 
We only use cookies without which some of the site's features may not be available.