
Oil pump
Removing
1. Remove the drip tray as described in paragraph 11.
2. Turn away a bolt of fastening of an asterisk of the oil pump and remove a washer. Remove the sprocket from the oil pump shaft together with the drive target.
3. On a 5-cylinder engine, unscrew the bolt securing the oil intake pipe from the support bracket.
4. Turn away three bolts of fastening of the oil pump to the block of cylinders and remove washers (see fig. 12.4). If required, remove the mounting bolts and remove the oil pump screen.
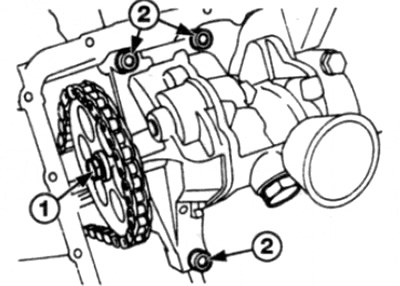
Pic. 12.4 Oil pump sprocket bolt (1) and oil pump bolts (2)
5. Remove the oil pump from the block of cylinders, considering that it settles down on two adjusting pins.
Inspection
6. Except for the bypass valve parts, the oil pump is a sealed unit. The procedure for removing the bypass riveting is as follows.
7. Remove the valve plug. Be careful as it can be forced out by spring pressure as the thread comes to an end.
8. Remove spring, guide pin and piston (see fig. 12.8).
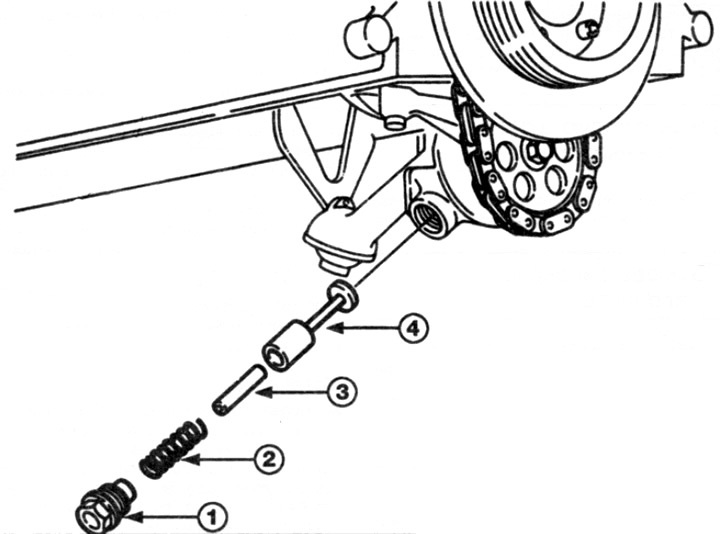
Pic. 12.8 Parts of the oil pressure relief valve
1 Cork
2 spring
3 Guide pin
4 piston
9. Wipe all parts thoroughly and check their condition. If there are signs of severe wear or damage, replace the corresponding part, pay special attention to the spring.
10. Reassemble the parts in the reverse order of disassembly and tighten the plug to the correct torque.
11. On models with an oil pump screen attached to the cylinder block, it is advisable to clean the screen when removing the oil pump. Simply unbolt, remove, clean and re-attach.
12. Install in the reverse order of removal, taking into account the following points.
- A) Prime the oil pump by filling it with clean engine oil.
- b) Make sure the pump is properly seated on the dowel pins.
- V) Tighten the pump mounting bolts to the required torque.
- G) Install the sprocket with the convex side towards the pump.
- d) Install the pallet as described in paragraph 11.
Drive chain - replacement
Caution: Removing the chain as described below will require the use of a portable electric grinder to cut one of the chain links. Before starting work, make sure that such a tool is available, as well as a new chain and connecting link to it. When replacing the oil pump drive chain, the oil pump sprocket must also be replaced.
13. Remove the pallet as described in paragraph 11.
14. Loosen the oil pump sprocket bolt.
15. Using a grinder, grind the protruding axles on one of the chain links on the sprocket - be very careful not to damage the sprocket.
16. Remove the plate from the axle and push the chain link back.
17. Turn out a bolt of fastening of an asterisk of the oil pump, remove a washer, then remove an asterisk from an axis of the pump.
18. Using a new link, connect the end of the new chain to the end of the old one so that when turning the engine clockwise) the new chain would go up, wrap around the crankshaft sprocket, and show up from the bottom on the other side. Insert the link from the back of the sprocket and make sure the link is properly in place, do not place the plate on the link at this point.
19. After that, you should skip the new chain along the sprockets and guides. During this operation, it is essential to observe the following points:
- A) Maintain tension on the new chain, making sure the links remain engaged with the crankshaft sprocket.
- b) Push the old chain forward to prevent it from slipping off the crankshaft sprocket or getting stuck in the housing.
20. Using a socket wrench that fits the pulley/damper-to-crankshaft hub bolt, slowly turn the crankshaft clockwise while following the steps above.
21. When the horses of the new chain appear, remove the connecting link (making sure that the new chain is taut and that the remaining links are caught on the teeth of the sprocket) and disconnect the new circuit from the old one. Remove the old chain.
22. Align both ends of the chain with the connecting link, inserting it from the back of the sprocket
23. Install the connecting plate and secure it by riveting the end of the connecting rods. There is a special tool for this, but a satisfactory result can be achieved using a hammer and a metal bar (or second hammer), pressed against the reverse side of the chain - great care must be taken not to damage the chain or sprocket.
24. Check that the chain link is fastened at the junction without metal flows and burrs.
25. Put the chain on the teeth of the new oil pump sprocket.
26. Install the sprocket on the shaft with the convex side towards the pump.
27. Tighten the sprocket mounting bolt to the required torque
28. Install the pallet as described in paragraphparagraph 11.