
Examination
1. Remove the camshaft cover, in accordance with paragraph 4.
2. Putting a wrench on the pulley/damper bolt to the crankshaft hub, rotate the engine so that the chain can be inspected along its entire length on the camshaft sprocket.
3. The chain must be replaced if the sprocket is worn or if the chain is worn (this is determined by too much lateral play of the links and noise during operation). It is wise to replace the chain whenever the engine is taken apart for a detailed inspection. Please note that the rollers on a heavily worn chain may have slight dents. To avoid problems in the future and not to doubt the quality of the chain at all, replace it.
Replacement
Caution: Removing the chain as described below will require the use of a portable electric grinder to cut one of the chain links. Before starting work, make sure that such a tool is available, as well as a new chain and connecting link to it.
4. Disconnect the negative battery terminal.
5. If it has not already been removed, remove the camshaft cover as described in paragraph 4.
6. Remove the nozzles as described in chapter 4.
7. Remove the radiator fan and shroud as described in chapter 3.
8. Remove the chain tensioner as described in paragraph 8.
9. Cover the camshaft and chain with a clean cleaning cloth so that the camshaft sprocket remains exposed.
10. Using a grinder, grind down the protruding connecting rods on one of the chain links found on the sprocket - be very careful not to damage the sprocket.
11. Pull the connecting plate off the rods and push the link back behind the chain.
12. Remove the rag, making sure that the sawdust does not fall down on the target and near it.
13. Using a new link, connect the end of the new chain to the end of the old one in such a way that when turning the engine! clockwise) the new chain would go down, wrap around the sprocket and guides, and show up from the other side. Insert the connecting link from the back of the sprocket and make sure the link is properly seated. At this point, do not place the connecting plate on the link yet.
14. Now you need to skip the new chain along the sprockets and guides. During this operation, you must follow the following points:
- A) Maintain tension on the new chain, making sure the links stay engaged with the sprocket, otherwise valve timing will be lost.
- b) Pull the old chain forward to prevent it from jumping off the crankshaft sprocket.
15. Using a socket wrench suitable for the bolt securing the pulley/damper to the crankshaft hub, slowly turn the crankshaft clockwise while following the steps above.
16. When the horses of the new chain appear, remove the connecting link (making sure that the new chain is taut and that the remaining links are caught on the teeth of the sprocket) and disconnect the new circuit from the old one. Remove the old chain.
17. Put a new chain on the camshaft sprocket. then align both ends of the chain with the connecting link by inserting it from the back of the sprocket (see fig. 7.17).
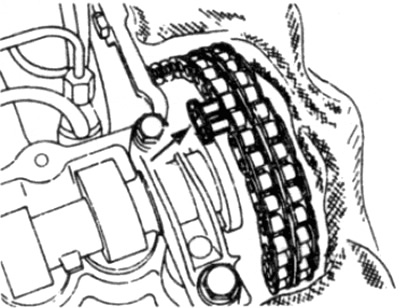
Pic. 7.17 Press in the connecting link (shown by arrow) from the back of the chain
18. Put on the connecting plate and secure it by riveting the end of the connecting rods. There is a special tool for this, but a satisfactory result can be achieved using a hammer and a piece of metal (or second hammer), pressed against the reverse side of the chain - great care must be taken not to damage the chain or sprocket.
Advice. Temporarily secure the end of the new chain to the camshaft sprocket using a piece of wire or wire tie through the hole in the sprocket and around the chain.
19. Check that the chain link is fastened without nicks and burrs at the junction.
20. Install the camshaft timing chain tensioner as described in paragraph 8.
21. Crank the engine (clockwise), to bring cylinder #1 to TDC. Make sure the marks on the crankshaft and camshaft are aligned correctly as described in paragraph 3.
22. It may turn out that the chain during the last operation has shifted one tooth of the camshaft sprocket. If this happens, it can be corrected by removing the camshaft sprocket (see paragraph 8) and changing the position of the camshaft and sprocket by one tooth in relation to the chain. At the same time, also check the timing of the high pressure fuel pump, as described in chapter 4.
23. Install fan shroud as described in chapter 3.
24. Install the camshaft cover in accordance with paragraph 4.
25. Connect the negative battery terminal.