



Cars with engines 111.948 and 601.970
Removal
1. Disconnect the negative cable from the battery.
2. Remove the front wheels.
3. Remove the wiring bracket 4 (see figure 6.8a).
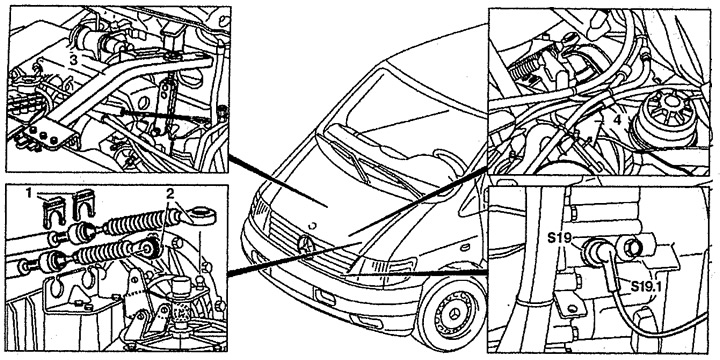
Figure 6.8a. Removing and installing the gearbox (cars with engines 111.948 and 601.970):
1. Fixators,
2. Gear shift cables,
3. Lifting device,
4. Wiring mounting bracket,
S19. Reversing light switch,
S19.1. Reverse light switch wiring connector.
4. Disconnect the S19.1 wiring connector from the reversing light switch.
5. Disconnect gear shift cables 2 from the gearbox.
6. Unscrew the starter and remove it without disconnecting the electrical wiring from it.
7. Insert the lifting device 3 onto the engine and remove the gearbox supports (on vehicles with diesel engines, remove the power steering fluid reservoir).
8. Remove the lower engine guard.
9. Disconnect the left half shaft 5 from the flange (see figure 6.8 b).
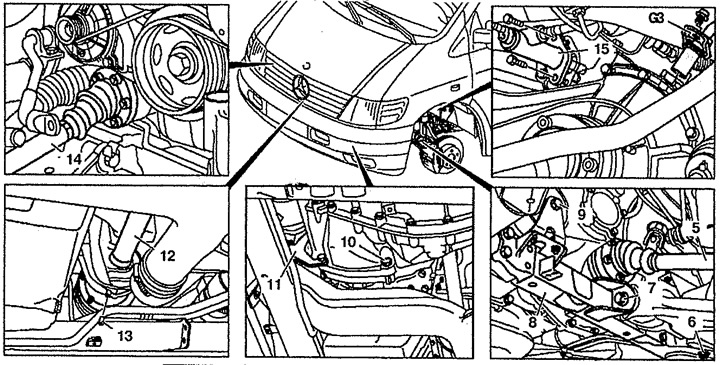
Figure 6.8 b. Removing and installing the gearbox:
5. Left axle shaft,
6, 7, 9, 10. Bolts,
8. Longitudinal arm,
11. Bracket,
12. Intermediate shaft,
13. Spring finger,
14. Right axle shaft,
15. Clutch slave cylinder,
G3. Vehicle speed sensor.
10. Disconnect the left tie rod from the subframe.
11. Remove the clutch slave cylinder 15 without disconnecting the hydraulic line and secure it to the side.
12. Remove the speed sensor G3. Replace the seal.
13. Unscrew bolt 9 securing the gearbox housing. The gearbox must be lifted with lifting device 3 so that bolt 9 can be removed straight and also inserted.
14. Disconnect the longitudinal arm 8 from the subframe.
15. Remove the intermediate shaft with bearing 12.
16. Install the gearbox on the lift.
17. Unscrew the bolts 10 securing the gearbox and remove it.
18. Remove the left gearbox flange (only if the gearbox is going to be replaced).
Installation
19. Installation is carried out in the reverse order of removal. When removing and installing the gearbox, make sure that its components are not damaged. The mounting clamp must be installed before connecting the delivery tube. Check the clutch and replace it if necessary. Check the gearbox oil level and adjust it if necessary.
Cars with engine 611.980
Removal
20. Disconnect the negative cable from the battery.
21. Remove the front wheels.
22. Drain the oil from the gearbox.
23. Disconnect the axle shafts from the gearbox.
24. Disconnect the electrical wiring from the gearbox.
25. Unscrew the nut securing the wires in the junction box.
26. Disconnect the junction box from the windshield washer reservoir.
27. Disconnect the gear shift cables from the gearbox.
28. Disconnect the pressure line from the clutch release unit.
29. Unscrew the nut securing the pressure pipe clamp from the gearbox.
30. Unscrew the central shaft from the gearbox and remove it.
31. Disconnect the left fork 7 in the area of the longitudinal beam 3 from the subframe until the rubber bushing 8 is disconnected from the kingpin (see figure 6.9).
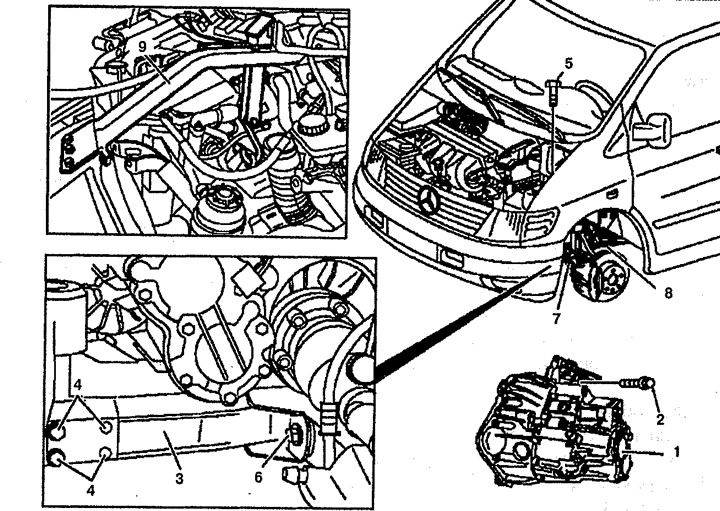
Figure 6.9. Removing and installing the gearbox (cars with engine 611.980):
1. Clutch,
2, 4, 5, 6, 8. Bolts,
3. Longitudinal beam,
7. Fork.
9. Lifting device.
32. Unscrew the power steering fluid reservoir bracket.
33. Disconnect the tube from the left windshield washer spray.
34. Insert the lifting device, attach it to the engine brackets and tighten it slightly.
35. Unscrew bolt 5 of the gearbox mount.
36. Lower the engine using a lifting device. When lowering, be careful not to damage the steering hydraulic lines between the subframe and the pan.
37. Remove the exhaust manifold together with the catalytic converter.
38. Unscrew the 2 bolts securing the gearbox housing.
39. Remove gearbox 1.
40. Disconnect the left gearbox flange (only if the gearbox is going to be replaced).
Installation
41. Installation is carried out in the reverse order of removal. The mounting clamp must be installed before connecting the delivery tube.