
Vehicles with engines 111.948 and 601.970
Removing
1. Remove the gearbox.
2. Remove the left flange 10 (see fig.6.10).
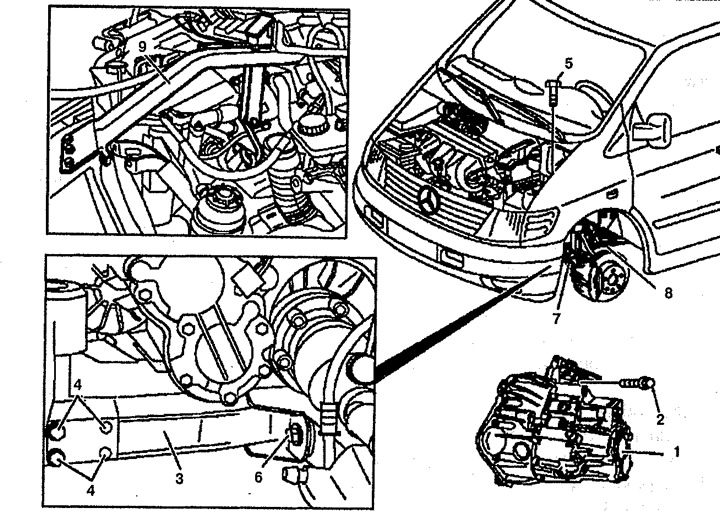
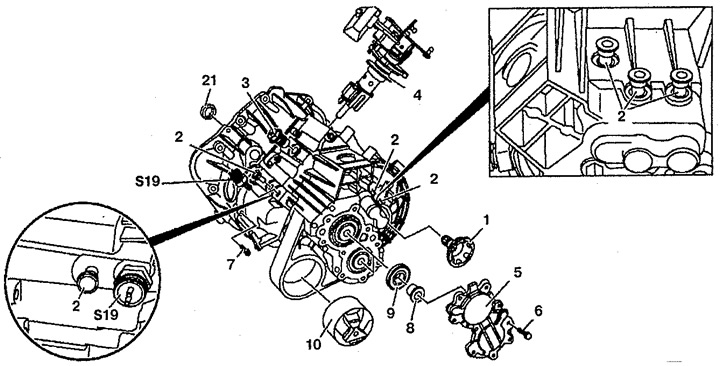
Pic. 6.10. Disassembly and assembly of the gearbox (vehicles with engines 111.948 and 601.970):
1.Reverse shaft cover,
2. guide tube,
3. Retainer,
4. Clutch housing,
5. Gearshift unit,
6, 16. Ball,
7, 17. Spring,
8. Gear shift lock cover,
9, 13, 15, 19. Bolt,
10. Outlet flange,
11. Retaining ring,
12. Bearing cover,
14. Gearbox housing,
18. Locking bolt of the gearshift lock,
S19. The switch of lanterns of a backing.
3. Remove the clutch.
4. Remove guide tube 2.
5. Remove the rear cover 1 of the gearbox.
6. Remove the shift lever 5.
7. Unscrew bolt 19.
8. Unscrew cover 8 and remove spring 7 with balls 6.
9. Unscrew plug 18, remove spring 17 and ball 16.
10. Remove the reversing light switch S19.
11. Remove bearing cover 12.
12. Remove bolts 15.
13. Remove the blocking ring 11.
14. Disconnect the gearbox housing (if necessary, with a screwdriver), pre-heating it to a temperature of 80-100°C.
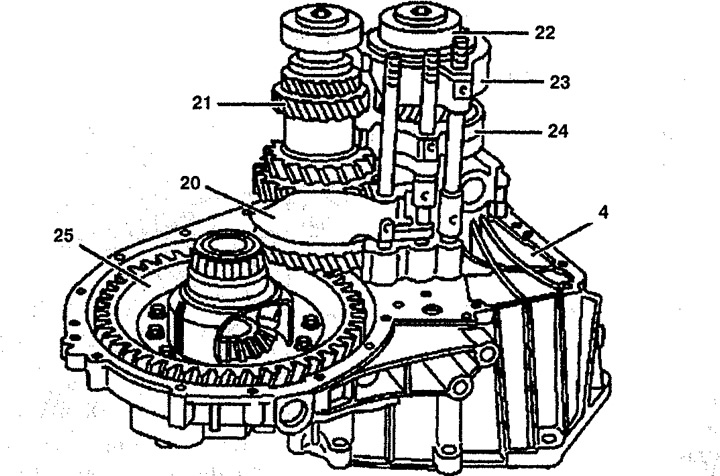
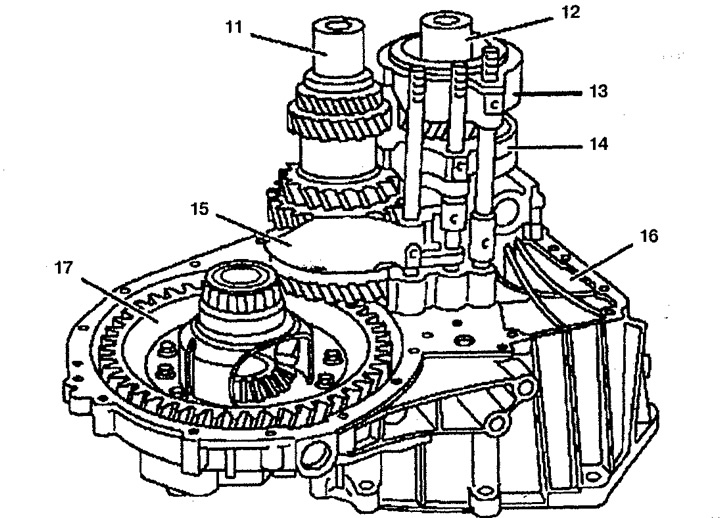
15. Remove the drive shaft 22 and output shaft 21 together with the shift forks 20, 23 and 24 together with the clutch housing (see fig.6.11). Fork 27 must be in neutral position (see fig.6.12). Insert a 40mm spacer.
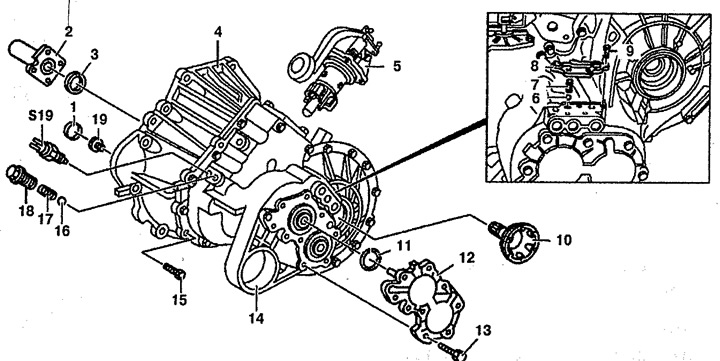
Pic. 6.11. Disassembly and assembly of the gearbox (vehicles with engines 111.948 and 601.970):
20. Fork of inclusion of 1st and 2nd gears,
21. Output shaft,
22. Drive shaft,
23. 5th gear engagement fork,
24. 3rd and 4th gear engagement fork,
25. Differential.
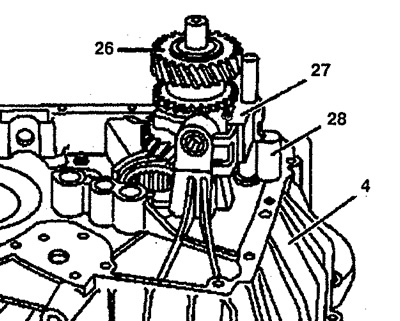
Pic. 6.12. Disassembly and assembly of the gearbox:
26. Reverse shaft,
27. Fork of inclusion of transfer of a backing,
28. Separator.
16. Disconnect the fork 24 from the guide on the fork 20.
17. Remove yokes 20, 23 and 24 from drive shaft 22 and output shaft 21.
18. Check the axial play of the gears.
19. Disconnect the drive shaft 22.
20. Disconnect the output shaft 21.
21. Check the condition of the splines and gear bearings.
22. Remove differential 25 from clutch housing 4.
23. Disassemble differential 25.
24. Check the condition of the splines and bearings of the reverse gear shaft 26.
25. Remove the reverse gear cover on the clutch housing.
26. Remove the reverse gear shaft 26 from the clutch housing 4 using a punch. Remove plug 27.
27. Disassemble the reverse gear shaft 26.
28. Check the condition of the bearings in the clutch housing 4 and disassemble it if necessary.
29. Check up a condition of bearings in the case of a transmission 14 and dismantle it if it is necessary.
Installation
30. Installation is made in an order, the return to removal.
Vehicles with engine 611.980
Removing
31. Remove a transmission.
32. Remove support 10 gearbox (see fig.6.13).
Pic. 6.13. Disassembly and assembly of the gearbox (vehicles with engine 611.980):
1. Left flange,
2. Locking pin,
3. Locking bolt,
4. Gearshift unit,
5. Bearing cover,
6, 7, 8. Bolts,
9. Roller bearing,
10. Gearbox support,
21. Rotating shaft seal,
S19. The switch of lanterns of a backing.
33. Remove the left flange 1.
34. Remove the clutch and plug.
35. Remove the blocking pins 2 from the shift forks. Replace lock pins 2.
36. Remove the gearshift assembly 4.
37. Remove the reversing light switch S19.
38. Remove bearing cover 5.
39. Remove bolts 8 and 7. Disconnect gearbox housing 16.
40. Remove drive shaft 12, output shaft 11 together with shift forks 13, 14 and 15 together with clutch housing 16 (see fig.6.14).
Pic. 6.14. Disassembly and assembly of the gearbox (vehicles with engine 611.980):
11. Output shaft,
12. Drive shaft,
13. 5th gear engagement fork,
14. Fork of inclusion of 3rd and 4th gears,
15. Fork of inclusion of 1st and 2nd gears,
16. Gearbox housing,
17. Differential.
41. Disconnect the shift forks 13, 14 and 15c of the drive 12 and output 11 shafts.
42. Check the axial play of the gears.
43. Disassemble the drive shaft 12.
44. Disassemble the output shaft 11.
45. Check the condition of the splines and gear bearings.
46. Remove differential 17 from clutch housing 16.
47. Disassemble differential 17.
48. Remove the fork 20 reverse gear.
49. Remove the reverse shaft 18.
50. Check the condition of the splines and bearings of the reverse gear shaft 18.
51. Disassemble the reverse gear shaft 18.
52. Check the condition of the bearings in the clutch housing 19 and, if necessary, disassemble it.
53. Check the condition of the bearings in the gearbox housing 16 and, if necessary, disassemble it.
Installation
54. Installation is made in the reverse order of removal.
Pic. 6.15. Disassembly and assembly of the gearbox (vehicles with engine 611.980):
18. Reverse shaft,
19. Clutch housing,
20. Fork of inclusion of transfer of a backing.