
Cars BMW Cars Volkswagen Cars Chevrolet Cars Land Rover Cars Lada Cars Honda Cars Peugeot
English Русский
Български
Беларускі
Український
Српски
Hrvatski
Română
Polski
Slovenský
Magyar
Bookmark News and articles Sitemap Feedback Site search
MercedesMan.ru


A-Class C-Class E-Class G-Class M-Class S-Class Others
W116 (1972-1980, petrol) W126 (1979-1991, petrol) W140 (1991-1998) W220 (1998-2005)
  • Main
  • S-Class
  • W140 (1991-1998)
  • Power unit
  • Diesel engine OM603
  • Timing Drive — General Information, Component Maintenance

Timing Drive — General Information, Component Maintenance (Mercedes-Benz S-Class W140)

0
Contents: General information ↡ Servicing Timing Drive Components ↡
Note: The timing chain can be replaced without disassembling the engine. Using the tools listed below, the new chain can be connected to the old one, threaded around the sprockets and calked.


Attention! If assembled incorrectly, the valves may collide with the piston crowns!


General information
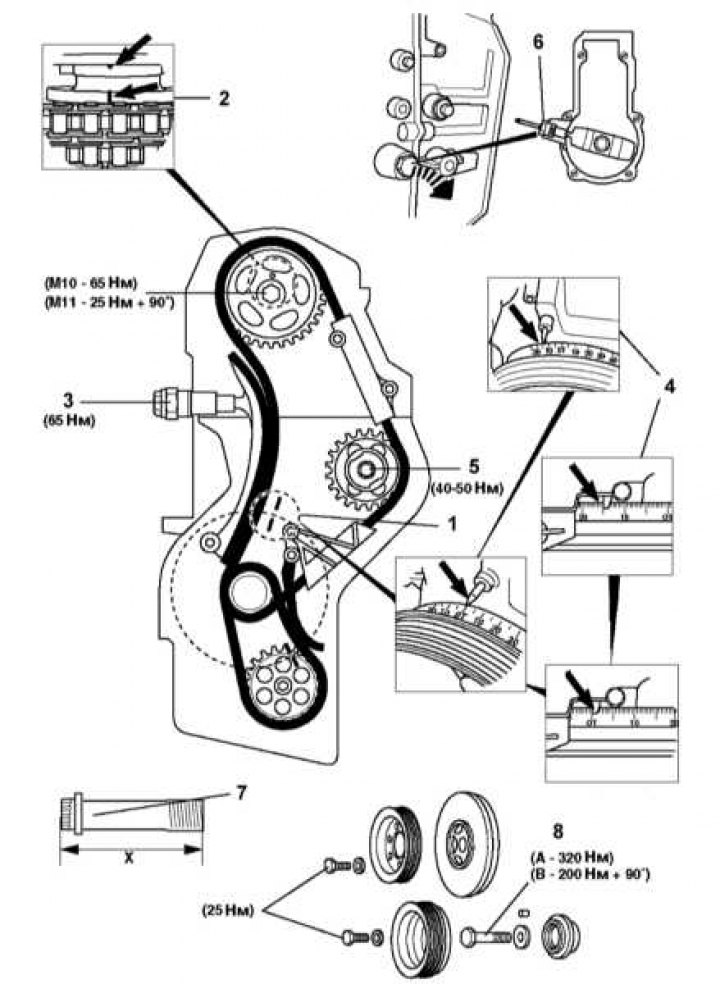


Timing drive components installation details

Timing drive components installation details
1 - Timing marks for bringing the engine to the TDC position of the end of the compression stroke of the first cylinder; 2 - Check the correct alignment of the timing marks on the camshafts; 3 - Assembling the chain tensioner; 4 - When removing/installing the high-pressure fuel pump, the crankshaft should be set to a position of 15° after TDC of the piston of the first cylinder; 5 - The fuel injection pump sprocket bolt has a left-hand thread; 6 - Locking bolt; 7 - The M11 bolt of the camshaft sprocket must be replaced if its installation length "X" exceeds the maximum permissible value (53.6 mm); 8 - Crankshaft pulley bolt


To perform the procedures for removing and installing timing drive components, you will need the following special tools:


  • Crankshaft Hub/Pulley Puller - #103589003300;
  • Crankshaft Sprocket Puller - No.102589053300;
  • Flywheel/Drive Disc Locking Tool - #601589024000;
  • Bolts M6ґ90 mm for locking the flywheel/drive disc;
  • Fuel injection pump locking tool - No.601589052100;
  • Fuel injection pump separation tool - No.601589000800;
  • Fuel injection pump sprocket centering tool - No.601589051400;
  • Timing chain link kit - No.602589024000;
  • Timing chain link puller (item 1) - No.602589023300;
  • Timing chain link puller (item 2) - No.602589046300;
  • Timing chain link puller (item 3) - No.602589046301;
  • Timing Chain Link Installation Tool - No.602589003900;
  • Set of 1 stamp holders for installing timing chain links - No.602589026300;
  • Set of 2 stamp holders for installing timing chain links - No.602589036300;
  • Device for fixing the chain on the camshaft sprocket - No.602589014000;
  • Toolbox - No.602589009800;
  • Viscous coupling holder (series 129/140) - № 120589140700;
  • Viscous coupling key - No.111589020100;
  • Pulley holder - No.603589004000.

Please note the following points:
  • Unless otherwise stated, rotate the engine in the normal direction only;
  • Observe the specified tightening forces for fasteners;
  • If equipped, do not forget to mark the installation position of the CKP sensor before removal;
  • Do not turn the crankshaft by the camshaft sprockets or other timing drive sprockets;
  • Do not turn the crankshaft or camshafts with the timing chain removed;
  • After setting the valve timing, do not forget to check the fuel injection pump settings.

Servicing Timing Drive Components
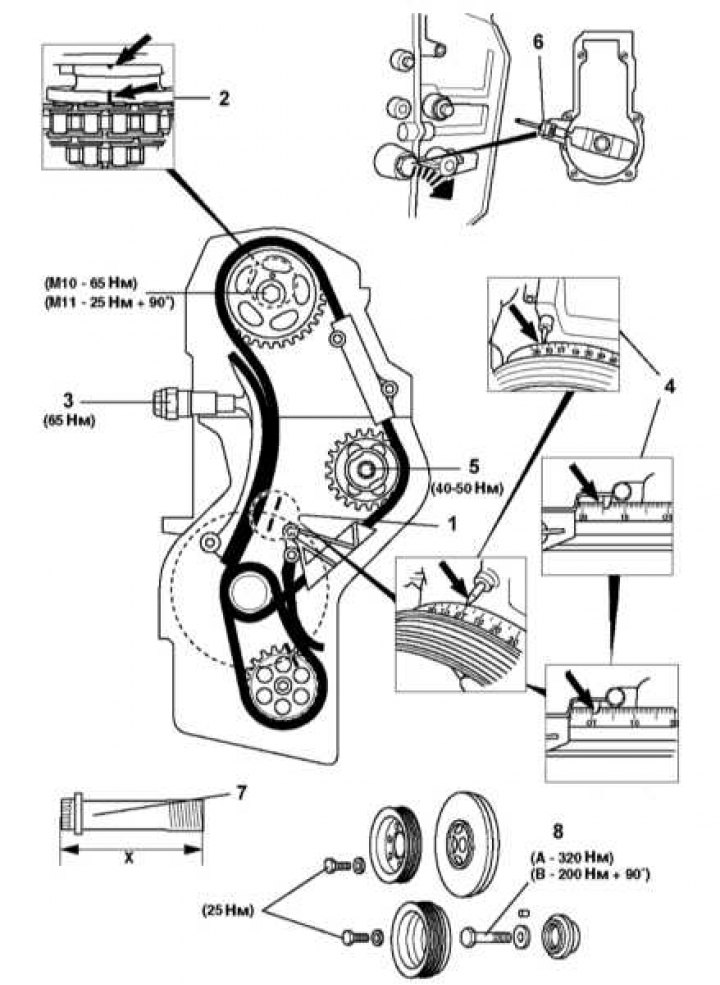


Timing drive components installation details

Timing drive components installation details
1 - Timing marks for bringing the engine to the TDC position of the end of the compression stroke of the first cylinder; 2 - Check the correct alignment of the timing marks on the camshafts; 3 - Assembling the chain tensioner; 4 - When removing/installing the high-pressure fuel pump, the crankshaft should be set to a position of 15° after TDC of the piston of the first cylinder; 5 - The fuel injection pump sprocket bolt has a left-hand thread; 6 - Locking bolt; 7 - The M11 bolt of the camshaft sprocket must be replaced if its installation length "X" exceeds the maximum permissible value (53.6 mm); 8 - Crankshaft pulley bolt


1. Disconnect the negative cable from the battery.

2. To make it easier to turn the engine, remove all glow plugs.

3. Bring the crankshaft to the TDC position of the piston of the first cylinder (1).

4. Check the correct alignment of the timing marks on the camshafts (2).

5. Before performing repair procedures, remove the tensioner assembly (3).

6. When removing/installing the high-pressure fuel pump, the crankshaft should be brought to a position 15° after TDC of the piston of the first cylinder (4).

7. Before unscrewing the bolt (5), install the sprocket centering tool No.601589051400.

Note: The fuel injection pump sprocket bolt has a left-hand thread.


8. After removing the fuel injection pump, install the lock bolt (6) - tool No.601589052100.

9. When installing the camshaft sprocket, ensure that the guide pin is positioned correctly.

10. Before installation, fill the tensioner by lowering it plunger down into a container with SAE 10 engine oil and pressing the plunger 7-10 times. Check the smoothness of the plunger and the adequacy of its resistance to compression.

11. After completing the necessary repairs, install the tensioner (3) in its regular place.

Note: The M11 camshaft sprocket bolt must be replaced if its installation length "X" exceeds the maximum permissible value (53.6 mm) (7) (see illustration 78.1).


12. Tighten the crankshaft pulley bolt (8) to 320 Nm (bolt A classification 10.9) or 200 Nm + 90° (bolt B classification 8.8).
This article is available at: russian, bulgarian, belarusian, ukrainian, serbian, croatian, romanian, polish, slovak, hungarian
The article has been verified: Polyakov Zakhar Grigorievich
Share with friends:
◀ Previous
S-Class W140 / Diesel engine OM603
Next ▶

Timing chain replacement
Checking the camshaft reference position
Removal and installation the cylinder head
Camshaft — Removal and Installation
Timing Chain Cover — Removal and Installation
Timing Chain Tensioner — Installation Details
Removal and installation pistons
Checking the condition and replacing the connecting rods
Measuring cylinder diameters
Removal and installation of cylinder liners
More similar articles for repairing other models

☛ Indication of maintenance period Mercedes W168 (1997-2004)
☛ Periodic care and maintenance Mercedes W202 (1993-2000)
☛ Design and specification of the valve timing mechanism Mercedes W123 (1976-1985)
☛ Routine care and maintenance — general information Mercedes W463 (1999-2019)
☛ Removal and installation of timing drive components Mercedes W163 (1997-2005)
☛ Maintenance and care — general information Mercedes Sprinter (1995-2000, diesel)
Link in different formats to this article
Comments and feedback from visitors
No comments yet


How much will 11 + 30 ?


W220 (1998-2005) 
  • General information
  • Introduction to guide
  • User manual
  • Maintenance
  • Power unit
  • Engine repair
  • Cooling and heating systems
  • Power and exhaust systems
  • Ignition and control system
  • Charge and launch systems
  • Transmission
  • Automatic gearbox
  • Drive shafts
  • Chassis
  • Brake system
  • Front suspension
  • Rear suspension
  • Steering
  • Body
  • Body elements
  • Electrical equipment
  • Equipment and devices
  • Electrical circuits
W140 (1991-1998) 
  • User manual
  • Controls and instruments
  • Driving and operation
  • Maintenance
  • Power unit
  • Petrol engine V6
  • Petrol engine V8
  • Petrol engine V12
  • Diesel engine OM603
  • Diesel engine OM606
  • Cooling system
  • Power supply and injection system
  • Control system HFM-SFI
  • Control system LH-SFI
  • Control systems ME-SFI
  • Diesel control system
  • Ignition system
  • Charge and launch system
  • Transmission
  • Mechanical gearbox 717.438
  • Mechanical gearbox 717.454
  • Automatic gearbox 722.5
  • Automatic gearbox 722.6
  • Clutch and drive shafts
  • Differential
  • Chassis
  • Brake system
  • Steering
  • Front suspension
  • Rear suspension
  • Body
  • Exterior (external elements)
  • Interior (internal elements)
  • Electrical equipment
  • Equipment and devices
  • Electrical circuits
W126 (1979-1991, petrol) 
  • Power unit
  • Engine repair
  • Ignition system
  • Lubrication system
  • Cooling system
  • Fuel system
  • Fuel injection system
  • Transmission
  • Clutch and cardan
  • Mechanical gearbox
  • Automatic gearbox
  • Chassis
  • Front suspension
  • Rear suspension
  • Steering
  • Brake system
  • Electrical equipment
  • Power devices
  • Electrical circuits
W116 (1972-1980, petrol) 
  • General information
  • Introduction to guide
  • Power unit
  • 8-cylinder V8 engine
  • 6-cylinder I6 engine
  • Cooling and lubrication system
  • Power system (carburetor)
  • Fuel injection system
  • Ignition system
  • Transmission
  • Clutch and cardan
  • Car gearbox
  • Chassis
  • Front suspension
  • Rear suspension
  • Steering
  • Brake system
  • Electrical equipment
  • Power devices
  • Electrical circuits
 
MercedesMan.ru © 2017–2026 · Mobile version · Read about Mercedes · Sitemap: EN BG BY UA RS HR RO PL SK HU · Feedback · Site search · Bookmark A-Class (W168) · C-Class (W201) · C-Class (W202) · C-Class (W203) · E-Class (W123) · E-Class (W124) · E-Class (W210) · G-Class (W463) · M-Class (W163) · S-Class (W116, petrol) · S-Class (W126, petrol) · S-Class (W140) · S-Class (W220) · Sprinter · Vito 1 · Vito 2 · Vario 814D ·
 
We only use cookies without which some of the site's features may not be available.