



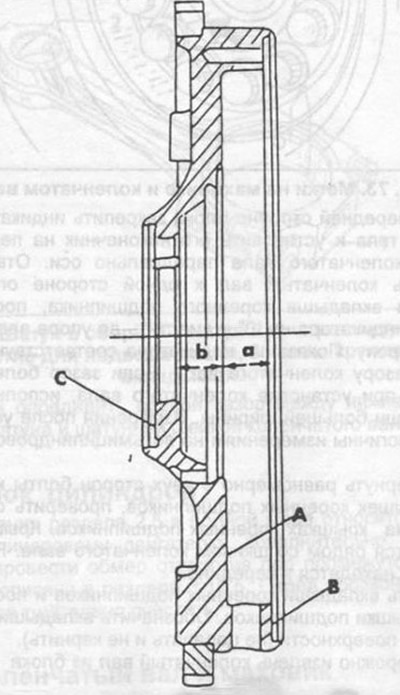
Fig. 77. Main dimensions of the flywheel (see text),
a - see text,
b - see text,
A - clutch support surface,
B - supporting surface of the clutch housing,
C - bearing surface of the crankshaft.
The drive disks are interchangeable for engines of all series. The flywheel or drive disks together with the toothed ring can be replaced without balancing the crankshaft. Replacement can be done on the engine installed in the car.
Remove the gearbox.
While holding the flywheel or drive disks from turning with a screwdriver or other means, unscrew the mounting bolts. There are holes drilled between the mounting bolts in the drive disks and in the crankshaft, which must be aligned during assembly. Fig. 78 shows the location of the holes in the drive disks.
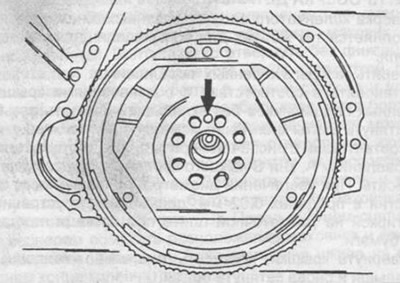
Fig. 78. Location of the mounting pin in the drive discs.
Remove the flywheel or drive discs. Remove the drive disc mounting spacers.
Measure the minimum diameter of the mounting bolts. If the dimension is less than 8.1 mm for the flywheel mounting bolts or less than 7.3 mm for the drive disc mounting bolts, the bolts must be replaced. Measure with a caliper as described for the connecting rod cap mounting bolts. For the 110 series engines, the mounting bolts are different and have a different bolt head shape, this must be taken into account when replacing the bolts. Modified bolts can be used on early engines.
If the working surface is worn or burnt through, the flywheel can be turned. Mercedes workshops have repair sizes. To replace the toothed crown, a heat source is required that provides heating up to 220°C.
Mark the relative positions of the flywheel and the ring gear and secure the flywheel in a vice.
Drill a toothed ring between two teeth.
Observing safety precautions, use a chisel to break the toothed ring.
Thoroughly clean the seating surfaces on the flywheel.
Heat the new ring gear to the above temperature and quickly place it on the flywheel using pliers. Fit the ring gear using a soft metal mandrel.
To replace the toothed ring on the drive disks, unscrew the bolts securing the toothed ring and steel disk to the drive disks. Install a new toothed ring and tighten the bolts.
When installing, please note:
Place the flywheel or drive discs on the crankshaft, aligning the mounting holes. When installing the drive discs, first install the spacer rings.
Tighten the mounting bolts and tighten them to a torque of 30...40 Nm, then turn the bolt heads 90°...100°, i.e. a quarter turn. Turning the head is necessary for the mounting bolts to work properly.
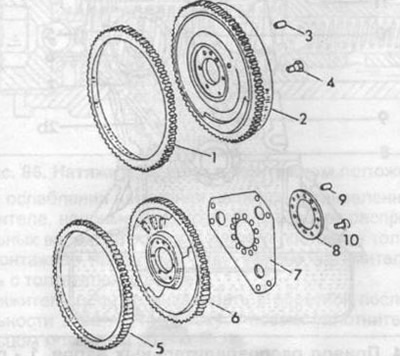
Fig. 79. Flywheel and drive disks.
1 - starter drive ring gear,
2 - flywheel,
3 - mounting pin,
4 - flywheel mounting bolt,
5 - toothed ring of the starter drive,
6 - flywheel for automatic transmission,
7 - drive disk,
8 - spacer washer,
9 - mounting pin,
10 - drive disc mounting bolt.