



Sequence of works


1. Apply the parking brake.
2. If you are stopped on the road, turn on the hazard warning lights and put up a warning sign.
3. Engage first gear (for manual transmission) or move the selector lever to position "P" (for automatic transmission).
4. Place a stone or wooden block under the wheels on the other side of the car to prevent rolling away.
5. On a car with steel wheels, use a screwdriver to pry the cap off and remove it.
6. Loosen the wheel mounting bolts by one turn.
7. Using a screwdriver, pry up the protective cover of the hole (eye) for installing the jack from the corresponding side and remove it.
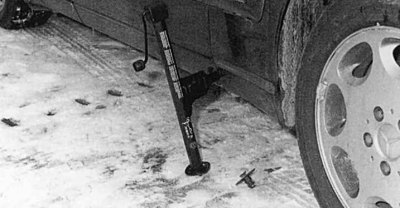
Fig. 7.32. Insert the jack into the eye as far as possible
8. Insert the jack into the eye as far as possible (Fig. 7.32). Prepare the spare wheel.
9. Only after you have checked once again that the car is secured against rolling back and the jack is securely inserted into the eye, lift the car and completely unscrew the wheel mounting bolts.
10. Remove the wheel.
11. To simplify the installation of the spare wheel, you can screw the centering pin from the standard set into the upper hole for the wheel bolts.
[Article based on data from the website mercedesman]
12. Mount the spare wheel. Be careful not to drop it, as this may damage the protective coating, especially on alloy wheels.
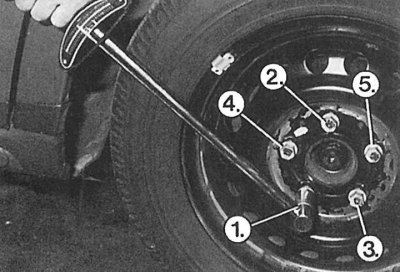
Fig. 7.33. Tighten the wheel mounting bolts in the order shown to a torque of 110 N·m
13. Tighten the wheel mounting bolts evenly and crosswise (Fig. 7.33). At the same time, turn the wheel so that it sits precisely on the hub.
14. Lower the vehicle, tighten the bolts and tighten them to a torque of 110 Nm.
15. Install the cap. First hook it onto the inflation valve and, holding it with your foot, press firmly on the opposite side. This works best when the valve is at the bottom after installation.
16. After 200 km of driving, tighten the wheel mounting bolts again to a torque of 110 Nm.