
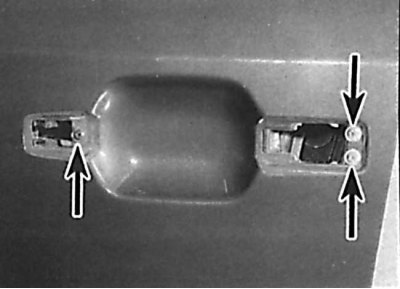
Internal door opening handle
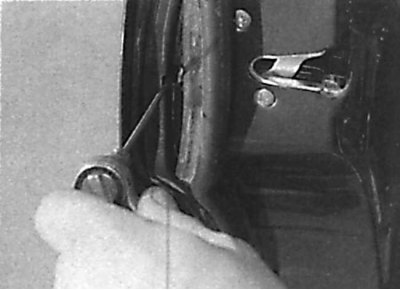
1. Raise the inner door opening handle and remove the decorative trim of the handle, for which pry it with a screwdriver from the underside. Unscrew the screw securing the inner door opening handle, then move the handle forward and remove it. At the same time, unhook the rod from the handle.
Front door lock cylinder
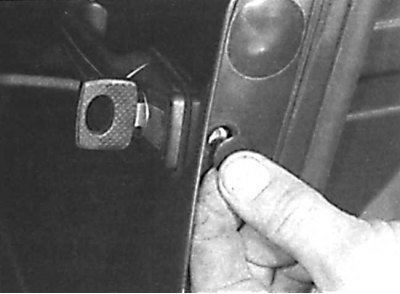
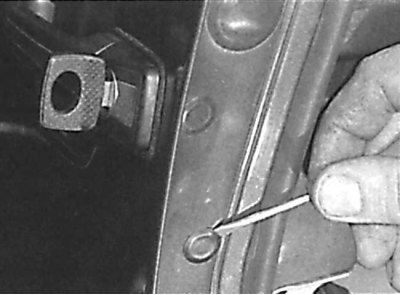
Removing the rubber plug from the end of the front door
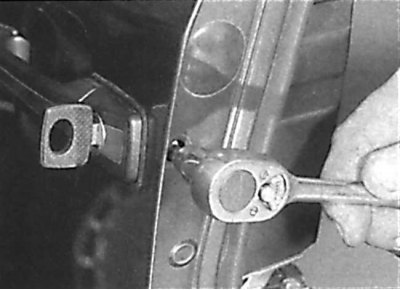
Unscrewing the screw securing the casing of the cylinder of the lock of the casing of the front door
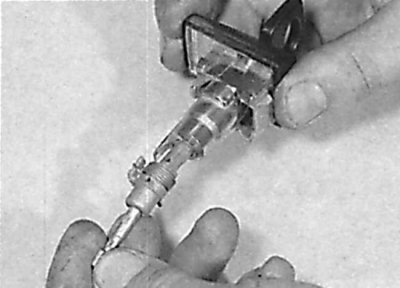
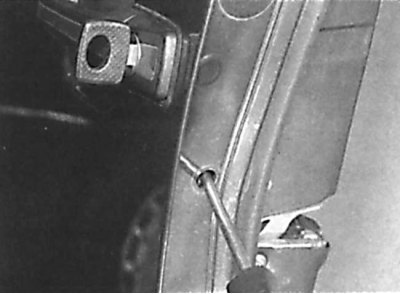
Removing the lock cylinder from the door
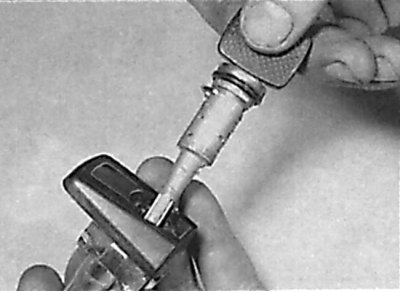
Removing the roll pin holding the rod and spring
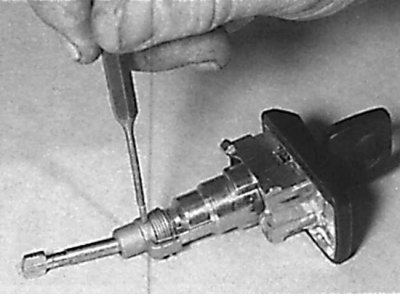
Removing the rod and spring from the lock cylinder
Removing the lock cylinder from the casing
1. To access the screw securing the lock cylinder casing, open the door and remove the rubber plug from the end of the door. Loosen the lock cylinder cover screw four turns (see fig. Removing the rubber plug from the end of the front door, Unscrewing the screw securing the casing of the lock cylinder of the casing of the front door).
2. Insert the key into the door lock and, while pressing the lock cylinder, turn the key 60°clockwise. This releases the casing of the lock cylinder, and it can be removed from the door. To replace the lock cylinder, knock out the roll pin, remove the rod and spring, and remove the lock cylinder from the casing (see fig. Removing the lock cylinder from the door, Removing the roll pin that secures the rod and spring, Removing the rod and spring from the lock cylinder, Removing the lock cylinder from the casing).
External handle for opening the front door
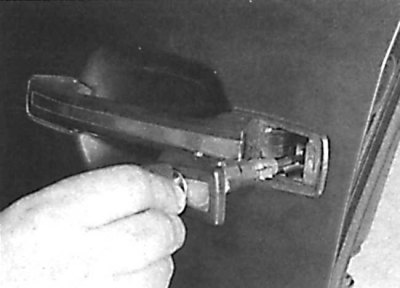
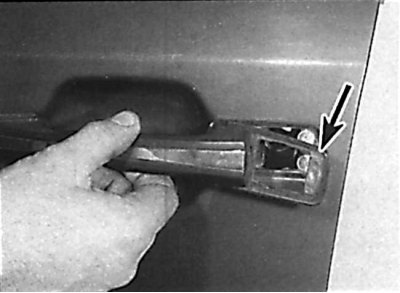
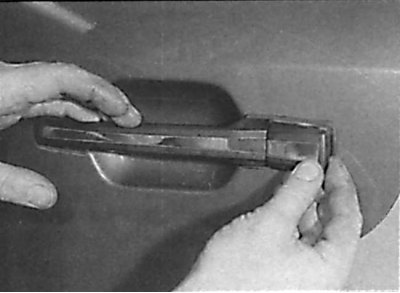
Removing the outside handle of the front door
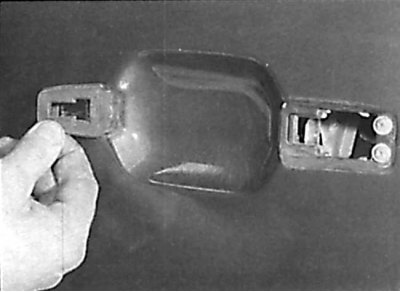
Removing the door handle seal
An arrangement of screws of fastening of an arm of the external handle of a forward door
1. Remove the lock cylinder.
2. Move the outer front door handle back, then remove its front end from the mounting bracket and remove the handle from the door. Remove the door handle seal (see fig. Removing the outer handle of the front door, Removing the sealing gasket of the door handle).
3. If it is necessary to remove the mounting bracket for the outer handle of the front door, remove the door trim. Carefully remove the protective film from the inside of the door. Unscrew the screws securing the bracket and remove it from the inside of the door (see fig. An arrangement of screws of fastening of an arm of the external handle of a forward door).
Front door lock
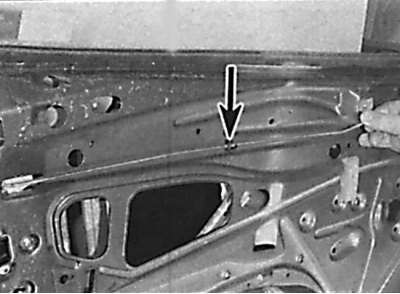
Location of the guide for the pull rod of the inner door opening handle
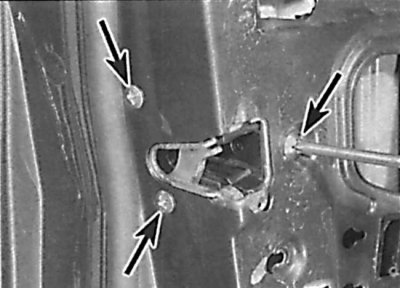
Location of door lock screws
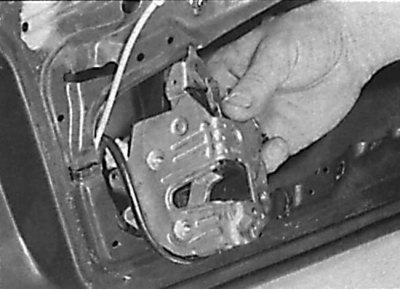
Removing the lock from the front door
1. Remove the upholstery from the front door. Carefully remove the protective film from the inside of the door. If the protective film is damaged when removed, it must be replaced.
2. Remove the lock cylinder. If available, remove the protective casing of the lock through the openings on the inside of the door.
3. On models with central locking, remove the actuator.
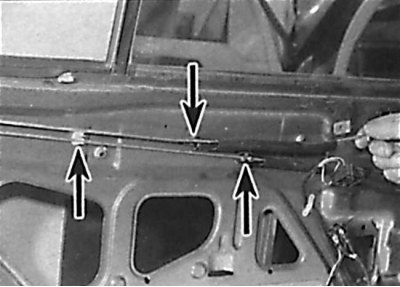
4. Remove the inner door handle linkage from the guide, then disconnect the linkage from the door lock (see fig. Location of the guide for the pull rod of the inner door opening handle).
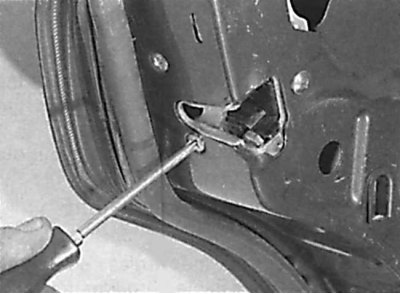
5. Unscrew the screws securing the lock, then disconnect the lock from the rod of the outer door opening handle and remove it from the door. If available, disconnect the electrical connector from the lock (see fig. The location of the screws for securing the door lock, Removing the lock from the front door).
External handle for opening the rear door
Removing the seal from the end of the rear door to access the screw securing the stop of the handle
Removing the rear door opening handle
1. To access the handle stop screw, open the door and remove the seal from the rear end of the door. Unscrew the screw securing the door handle stop four turns and remove the handle stop from the door (see fig. Removing the seal from the end of the rear door to access the screw securing the handle stop, Removing the stop of the rear door opening handle).
2. Move the outer front door handle back, then remove its front end from the mounting bracket and remove the handle from the door. Remove the door handle seal.
3. If it is necessary to remove the mounting bracket for the outer handle of the front door, remove the door trim. Carefully remove the protective film from the inside of the door. Unscrew the screws securing the bracket and remove it from the inside of the door.
Rear door lock
Arrangement of guides for drafts of a back door
Location of rear door lock screws
1. Remove the outer tailgate opening handle and the handle mounting bracket. If equipped, remove the rear door lock guard.
2. Remove the pull rods of the inner door opening handle and the lock button from the guides. Mark the location of the rods and disconnect them from the lock. Unscrew the lock screws and remove it from the door (see fig. Arrangement of guides for rods of a back door, Arrangement of screws of fastening of the lock of a back door).
Installation
Internal door opening handle
1. Installation is made in sequence, return to removal.
Front door lock cylinder
1. Insert the lock cylinder into the casing, then install the rod and spring and secure them with the fixing pin. Check the operation of the lock cylinder.
2. Check that the seal is in the correct position, then push the lock cylinder cover into place, aligning the lock cylinder rod with the door lock. Check the correct position of the lock and the lock cylinder, then screw in the lock cylinder fixing screw and install the plug on the end of the door.
External handle for opening the front door
1. Installation is made in sequence, return to removal. Check that the handle gasket is correctly positioned on the door. Check that the handle lever is correctly aligned with the lock rod, then install the lock cylinder. Check the operation of the lock and handle. Install the protective film and door upholstery on the door.
Front door lock
Removing the plug to adjust the gap between the lock rod and the outer handle lever
Turning the eccentric screw to adjust the gap between the lock rod and the outer handle lever
1. If equipped, connect the electrical connector to the lock, then reinstall the lock. In this case, the lock lever must be installed behind the handle lever. Screw in the screws securing the lock and tighten them to the required torque.
2. Install the lock cylinder.
3. Check up a backlash between draft of the lock and the lever of the external handle. The gap should be within 0 - 1 mm. To adjust the gap, remove the plug from the end of the door and, turning the eccentric screw, adjust the gap (see fig. Removing the plug to adjust the gap between the lock rod and the outer handle lever, Turning the eccentric screw to adjust the gap between the lock rod and the outer handle lever). After adjusting the gap, reinstall the plug.
4. Connect the rod to the lock and fix it in the guide on the door. On models with central locking, install the actuator.
5. Check the operation of the lock, then install the protective film and door trim on the door.
External handle for opening the rear door
1. Install the handle bracket on the door, screw in the fastening screws and tighten them to the required torque.
2. Install the gasket and handle on the door. In this case, the handle lever must be aligned with the lock rod.
3. Install the handle stop and secure it with the screw, then reinstall the door seal.
4. Check the operation of the rear door lock, then install the protective film and door trim on the door.
Rear door lock
1. Install the rear door lock in place and secure with screws, tightening them to the required torque.
2. Connect the rods to the lock and fix them in the rails on the door.
3. Install the rear door outside handle and check the operation of the lock. Install the protective film and door upholstery on the door.