
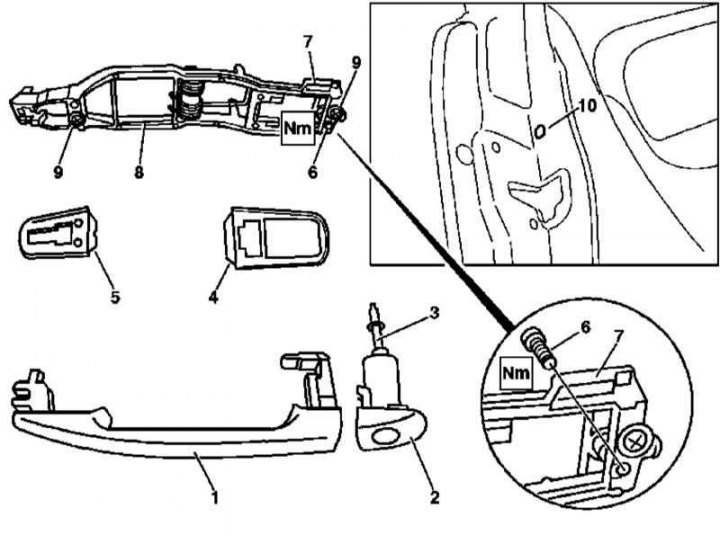
Details of installation of the outer handle of the front door
9 — Screws
10 - Screw hole
1. Details of installation of the outer handle of the front door are shown in the illustration, to which all references in the text refer.
2. Loosen the fixing screw (6).
3. Remove and remove the lock cylinder guide (2).
4. Pull back the handle (1) complete with base (4) back and release it from the carrier bracket (8).
5. Remove the base (5).
6. If necessary, remove the inner upholstery and sealing film (see Section Removal and installation of panels of an internal upholstery of door assemblies) and through the service window in the door frame remove the supporting bracket (8) outside handle.
7. Installation is carried out in the reverse order - make sure that the base is properly seated (5) on carrier bracket (8). When installing the locking cylinder guide (2) check the correct insertion of the rotary stem (3) engaged with the lock actuator.
Rear doors
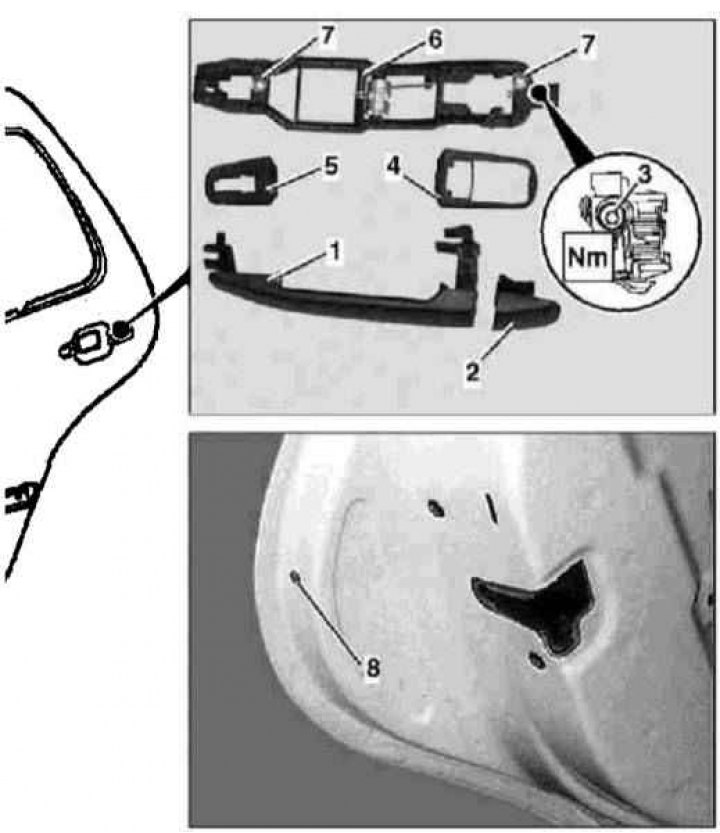
Details of installation of the outer handle of the rear door
7 - Screws
8 - Screw hole
1. Details of installation of the external rear door handle are shown in the illustration, to which all references in the text refer.
2. Loosen the fixing screw T25x100 (3).
3. Remove the guide (2).
4. Pull back the handle (1) complete with base (4) back and release it from the carrier bracket (6).
5. Remove the base (5).
6. If necessary, remove the inner upholstery and sealing film (see Section Removal and installation of panels of an internal upholstery of door assemblies) and through the service window in the door frame remove the supporting bracket (6) outside handle.
7. Installation is carried out in the reverse order - make sure that the base is properly seated (5) non-support bracket (6).
Tailgate

Details of installation of the external handle of a door of a back
1. The installation details of the tailgate outer handle are shown in the illustration, to which all references in the text refer.
2. Remove the inner upholstery of the door assembly (see Section Removal and installation of panels of an internal upholstery of door assemblies).
3. Give nuts (2) from the inside of the door.
4. Disconnect the license plate light wiring (E19/3 and E19/4).
5. Remove the screws (3) from the outside of the door and remove the handle (1), - be careful not to damage the paintwork.
6. Installation is carried out in the reverse order.