
Front door installation details (on the example of the left door)
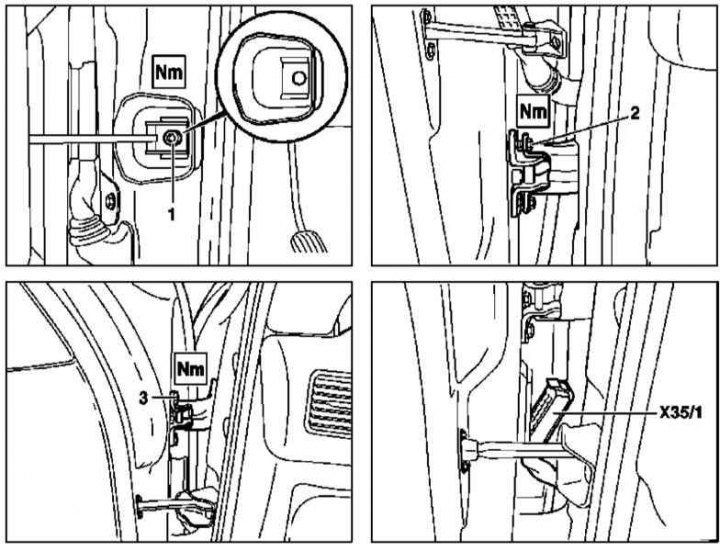
1. Front door installation details are shown in the illustration, to which all references in the text refer.
2. Disconnect the terminal block (X35/1 or X35/2).
3. Remove the screw (1) fastening the door opening limiter to the A-pillar.
4. Remove from a rack And anther.
5. Mark the position of the lower hinge plate on the door frame, then remove the bolts (2) its attachments.
6. Ask an assistant to hold the door and remove the bolts (3) fixing the top hinge bar, - also pre-mark its position on the door frame.
7. With the help of an assistant, remove the door assembly from the car - try not to damage the paintwork.
8. If any of the hinges needs to be replaced, remove it from the A-pillar.
9. Installation is carried out in the reverse order - follow the correct alignment of the landing marks applied during the dismantling process and the correct fastening of the rack boot, by the size of the edge gaps (see Specifications) make sure that the position of the door in the body opening is correct, if necessary, make the appropriate adjustments. Make sure that the latch of the lock is working properly.
Rear doors
Tailgate Installation Details (on the example of the left door)
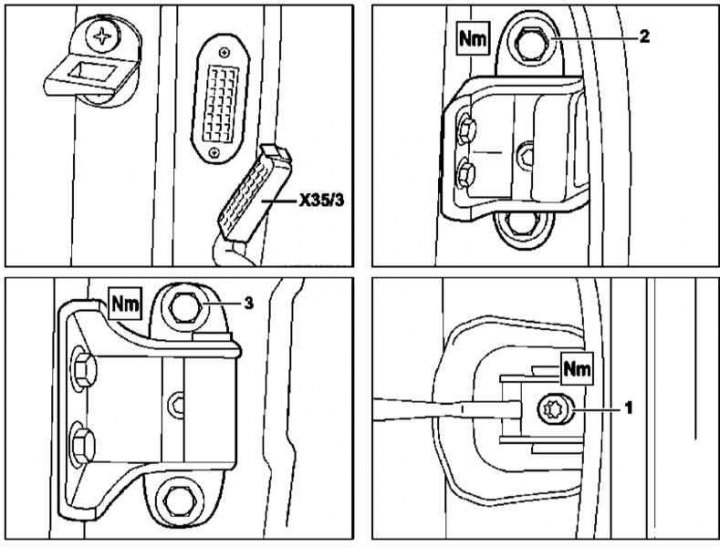
1. Details of the installation of the rear door are shown in the illustration, to which all references in the text refer.
2. Disconnect the terminal block (X35/3 or X35/4).
3. Remove the bolt (1) fastening the door opening limiter to the B-pillar.
4. Remove from a rack In anther.
5. Mark the position of the lower hinge plate on the B-pillar, then remove the bolts (2) its attachments.
6. Ask an assistant to hold the door and remove the bolts (3) fixing the top hinge bar, - also pre-mark its position on the rack.
7. With the help of an assistant, remove the door assembly from the car - try not to damage the paintwork.
8. If any of the hinges needs to be replaced, remove it from the A-pillar.
9. Installation is carried out in the reverse order - follow the correct alignment of the landing marks applied during the dismantling process and the correct fastening of the rack boot, by the size of the edge gaps (see Specifications) make sure that the position of the door in the body opening is correct, if necessary, make the appropriate adjustments. Make sure that the latch of the lock is working properly.
Tailgate
Tailgate Installation Details
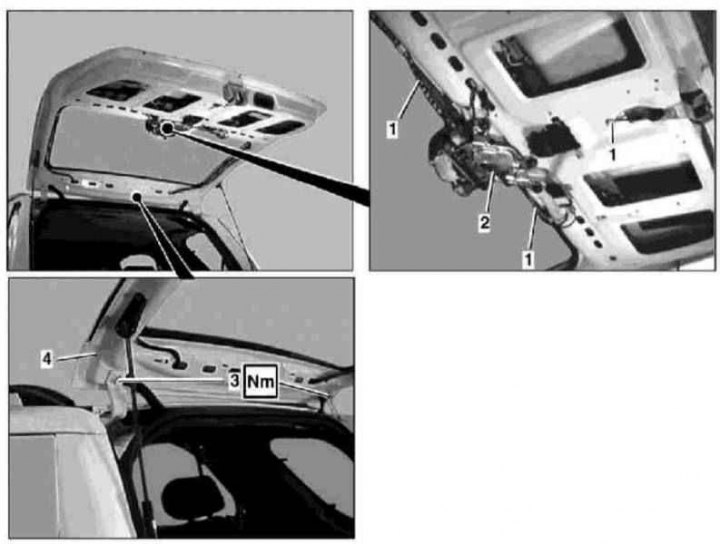
1. The tailgate installation details are shown in the illustration, to which all references in the text refer.
2. Remove the inner upholstery of the door assembly (see Section Removal and installation of panels of an internal upholstery of door assemblies).
3. Disconnect the electrical wiring connectors (1) and push them into the cable duct.
4. Disconnect the wiring (2) from the rear wiper motor assembly. Release the harness from the door frame.
5. Lock the door in the open position and remove the sliding stop.
6. Having previously marked the position of the hinge bars, unscrew the screws (3) their attachment to the door frame.
7. With the help of an assistant, remove the door assembly (4).
8. Installation is carried out in the reverse order - follow the correct alignment of the landing marks applied during dismantling, according to the size of the edge gaps (see Specifications) make sure that the position of the door in the body opening is correct, if necessary, make the appropriate adjustments. Make sure that the latch of the lock is working properly.