
Cars BMW Cars Volkswagen Cars Chevrolet Cars Land Rover Cars Lada Cars Honda Cars Peugeot
English Русский
Български
Беларускі
Український
Српски
Hrvatski
Română
Polski
Slovenský
Magyar
Bookmark News and articles Sitemap Feedback Site search
MercedesMan.ru


A-Class C-Class E-Class G-Class M-Class S-Class Others
W163 (1997-2005)
  • Main
  • M-Class
  • W163 (1997-2005)
  • Body
  • Doors and locks
  • Removal and installation door rear view mirrors

Removal and installation door rear view mirrors (Mercedes-Benz M-Class W163)

0
Removal/installing the outer cover of the door rearview mirror

Removal/installing the outer cover of the door rearview mirror


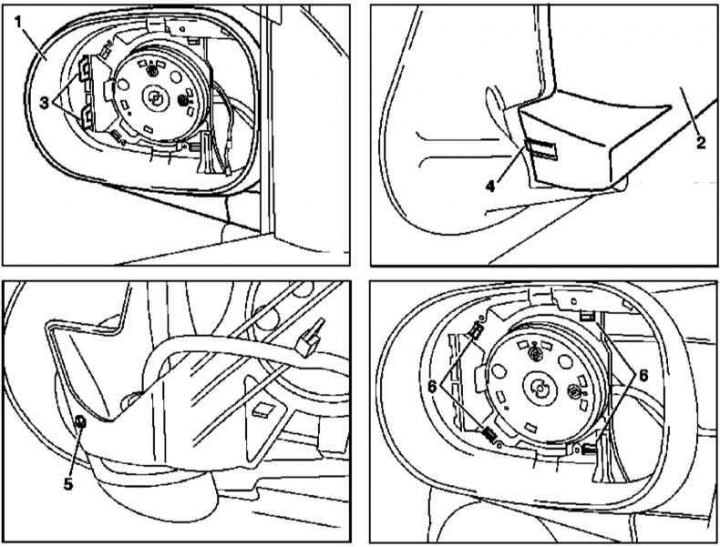
1. The relevant illustrative material is presented in the illustration, to which all references in the text refer.

2. Remove the mirror glass.

3. Gently push the casing away from the frame and release the clamps (3).

4. Fold the mirror, release the latch (4) and remove the cover (2) from the frame (1).

5. If necessary, unscrew the bolt (5) and, releasing the clamps (6), separate the frame (1) from the drive electric motor, having first returned the mirror to its working position.

6. Installation is carried out in reverse order.

Article text obtained from the website (mercedesman.ru)

Mirror assembly


Removal/installing the outer cover of the door rearview mirror

Removal/installing the outer cover of the door rearview mirror
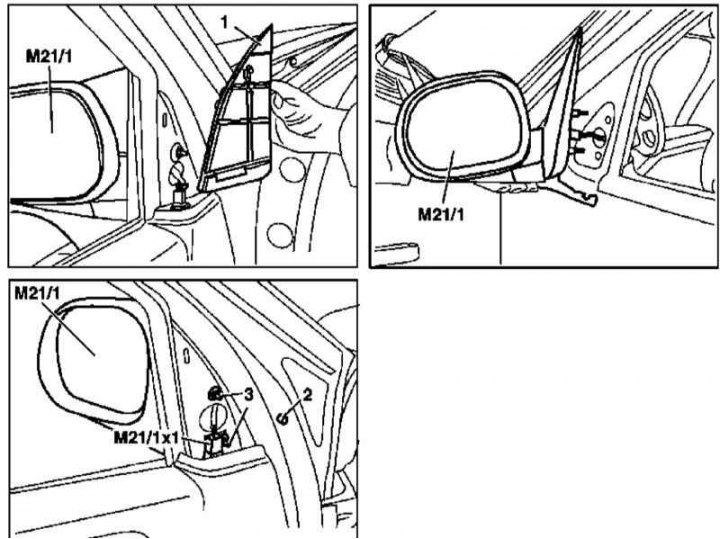
1 - Triangular overlay; 2 - Screw; 3 - Nuts; M21/1 - Left electrically operated and heated rear view mirror; M21/1x1 - Mirror wiring connector


1. The installation details of the door mirror assembly are shown in the illustration, to which all references in the text refer.

2. Using a suitable wedge, remove the triangular trim panel (1) of the mirror base in the front corner of the door window opening.

Note: On models with VIN A289565, X754620, if equipped, disconnect the door speaker wiring connector.


3. Holding the mirror, unscrew the screw (2) and loosen the nut (3).

4. Disconnect the electrical wiring connector (M21/1x1 or M21/2x1) and finally remove the mirror assembly.

5. Installation is carried out in the reverse order - make sure that the contact connector is securely fixed.
This article is available at: russian, bulgarian, belarusian, ukrainian, serbian, croatian, romanian, polish, slovak, hungarian
The article has been verified: Panova Maya Vladimirovna
Share with friends:
◀ Previous
M-Class W163 / Doors and locks
Next ▶

Removal and installation door locks
Removal and installation interior trim panels of door assemblies
Removal and installation exterior door handles
Removal and installation the gas-filled sliding tailgate stop
Removal and installation tailgate hinges
 
More similar articles for repairing other models

☛ Interior rear view mirror Mercedes W168 (1997-2004)
☛ Rear view mirrors Mercedes W202 (1993-2000)
☛ Rear view mirrors Mercedes W124 (1984-1995)
☛ Removal and installation door rear view mirrors Mercedes W463 (1999-2019)
☛ Memory for adjustable rear view mirrors and telescopic steering column Mercedes W140 (1991-1998)
☛ Scheme 18. Electric drive of rear view mirrors Mercedes Sprinter (1995-2000, diesel)
Link in different formats to this article
Comments and feedback from visitors
No comments yet


How much will 41 + 31 ?


W163 (1997-2005) 
  • General information
  • Introduction to the guide
  • Controls and instruments
  • Driving and operation
  • Maintenance
  • Power unit
  • Gasoline engines
  • Diesel engines
  • Cooling system
  • Heating and ventilation
  • Power system (gasoline)
  • Fuel system (diesel)
  • Exhaust system
  • Ignition and control system
  • Charging and starting system
  • Transmission
  • Mechanical gearbox
  • Automatic gearbox
  • Clutch
  • Drive shafts and cardan
  • Transfer case
  • Chassis
  • Brake system
  • Front suspension
  • Rear suspension
  • Steering
  • Suspension geometry
  • Body
  • Exterior (external elements)
  • Interior (internal elements)
  • Doors and locks
  • Electrical equipment
  • Equipment and devices
  • Drive motors
  • Lighting and signaling
  • Audio system
  • Electrical circuits
 
MercedesMan.ru © 2017–2026 · Mobile version · Read about Mercedes · Sitemap: EN BG BY UA RS HR RO PL SK HU · Feedback · Site search · Bookmark A-Class (W168) · C-Class (W201) · C-Class (W202) · C-Class (W203) · E-Class (W123) · E-Class (W124) · E-Class (W210) · G-Class (W463) · M-Class (W163) · S-Class (W116, petrol) · S-Class (W126, petrol) · S-Class (W140) · S-Class (W220) · Sprinter · Vito 1 · Vito 2 · Vario 814D ·
 
We only use cookies without which some of the site's features may not be available.