



4-cylinder petrol engine
Removal
1. Remove the air cleaner cross pipe.
2. Disconnect the ground (–) cable from the battery terminal.
Attention! This will erase the radio's anti-theft code.
3. Disassemble the fuel distributor with valve injectors.
4. Unscrew the well with wires.
5. Unscrew and set aside the windshield washer fluid container.
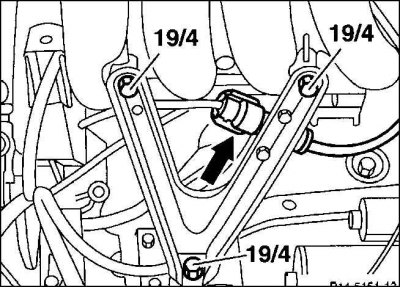
6. Disconnect the plug connection (arrow) to the actuator of the idle speed control system. To do this, open the fastening clamp and remove the wire from the spring clamp.
7. Unscrew the intake manifold stand (19/4).
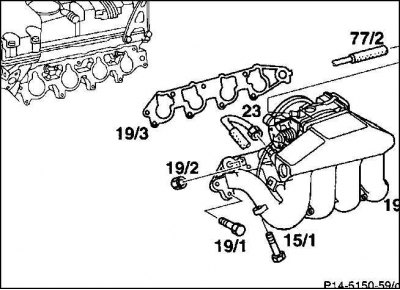
8. Disconnect the plug connection engine/ignition coils. Unscrew the ignition coils.
9. Remove the line (77/2) going to the regeneration valve.
10. Unscrew the vacuum line (23) leading to the brake booster.
11. Remove and tape all lines on the intake manifold that are under vacuum.
12. Unscrew the bolt (15/1) from the power steering pump stand on the intake manifold.
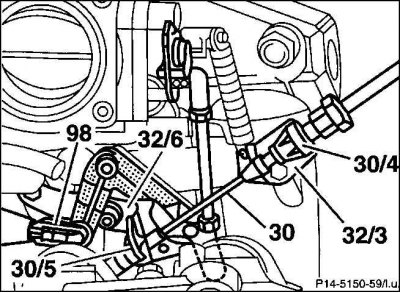
13. Remove the guide piece (30/5). First remove the plastic nipple from it.
14. Unhook the gas control cable (30). To do this, insert the cable drive through the slot in the rocker arm (32/6). Squeeze the plastic spring clamp (30/4) and pull the Bowden cable out on the support (32/3) (steel wire in a flexible twisted sheath).
15. Automatic transmission: Disconnect the Bowden cable that regulates the control pressure.
16. Tempomat: Disconnect the connecting rod.
17. Unscrew the bolts (19/1) and nuts (19/2).
18. Remove the intake manifold.
Installation
1. Clean the sealing surfaces and check them with a ruler for distortion.
2. Screw on the intake manifold with a new seal (19/3). Tighten the bolts alternately to 20 Nm (approximate value).
3. Tempomat: hang up the connecting rod.
4. Automatic transmission: Attach the Bowden cable that regulates the control pressure and adjust this cable.
5. Insert the throttle control cable through the hole in the support, press it into the support and secure it.
6. Hang the gas control cable together with the guide part. Make sure that the plastic nipple is fixed in the guide part.
7. Loosen the power steering pump stand, then insert the bolt (15/1) to the intake manifold and screw it in. Tighten the power steering pump stand firmly.
8. In accordance with the previously made markings, place all pipelines under vacuum on the inlet gas line.
9. Screw on the brake booster line under vacuum.
10. Fit the pipe (77/2) leading to the regeneration valve.
11. Install the ignition coils.
12. Screw on the intake manifold stand.
13. Connect the electrical wires to the idle speed control actuator. Secure the clamp and secure the wires in the spring clip.
14. Install and screw on the windshield washer reservoir.
15. Screw on the well with wires.
16. Install the fuel distributor together with the injector valves.
17. Install the air filter cross pipe.
18. Adjust the throttle control cable.
19. Connect the ground (–) cable to the battery terminal. Set the clock time. 38. Enter the radio anti-theft code.
20. Start the engine and check all connections for leaks.
21. Check the idle system (work for a car repair shop).
Diesel engine 2.0 l
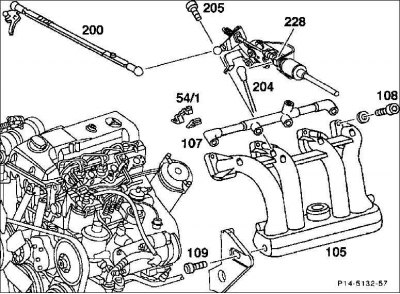
54/1. Clamp; 105. Intake gas line; 107. Engine ventilation device; 108. Bolt, N.m.; 109. Bolt 200. Pressure regulating valve rod; 204. Injector pump tag; 205. Bolt; 228. Throttle cable
Removal
1. Remove the air cleaner cross pipe.
2. Disconnect the ground cable from the battery.
Attention! This will erase the radio's anti-theft code.
3. Automatic transmission: On the control unit, unhook the Bowden cable to adjust the control pressure.
4. Disconnect the pressure regulating valve connecting rod (200).
5. Disconnect the connecting rod (204) of the injector pump.
6. Unhook the plastic spring clip from the throttle cable (228).
7. Remove 4 bolts (205) and move the adjusting rod to the side.
8. Unscrew the vacuum line on the vacuum pump.
9. Remove the engine ventilation line (107).
10. Unclip the high-pressure fuel line retaining clips (54/1) on the intake manifold.
11. Remove the bolts (109) on the left and right side of the intake manifold bracket.
12. Remove the bolts (108).
13. Unscrew the intake manifold.
Installation
1. Clean the sealing surfaces and check them for flatness using a ruler and feeler gauge.
2. Screw on the intake manifold with new O-rings. Tighten the bolts alternately to 25 Nm (approximate value).
3. Screw on the intake manifold bracket.
4. Take the high pressure fuel line with spring clamps.
5. Install the engine vent line.
6. Screw the vacuum line onto the vacuum pump.
7. Screw on the adjusting rod.
8. Screw the plastic spring clamps onto the gas inlet line.
9. Attach the connecting rod of the injector pump.
10. Attach the gas connecting rod.
11. Automatic transmission: Attach and adjust the Bowden cable to regulate the control pressure.
12. Install the air filter cross pipe.
13. Check the installation of the intake manifold.
14. Connect the ground wire to the battery terminal. Set the time on the clock. Enter the radio anti-theft code.
15. Start the engine, check the tightness of all connections.
16. Check the car's idle speed (auto repair shop work).
Attention! For a 2.2/2.5 L engine, only the parts shown in the figure need to be removed.