
Cars BMW Cars Volkswagen Cars Chevrolet Cars Land Rover Cars Lada Cars Honda Cars Peugeot
English Русский
Български
Беларускі
Український
Српски
Hrvatski
Română
Polski
Slovenský
Magyar
Bookmark News and articles Sitemap Feedback Site search
MercedesMan.ru


A-Class C-Class E-Class G-Class M-Class S-Class Others
190 (W201) (1982-1993) W202 (1993-2000) W203 (2000-2007)
  • Main
  • C-Class
  • W202 (1993-2000)
  • Power unit
  • Fuel system
  • Fuel level sensor — removal and installation

Fuel level sensor — removal and installation (Mercedes-Benz C-Class W202)

0
Contents: Gasoline engine ↡ Diesel engine ↡

Gasoline engine


Each compartment of the fuel tank contains a fuel level indicator sensor.

Removal
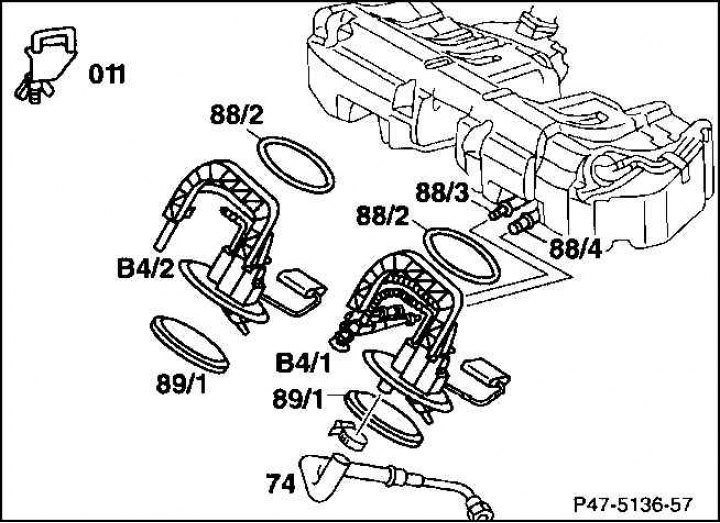


Removal


1. Drain the fuel from the tank. If only one sensor is removed, then only that compartment needs to be drained.

2. Remove the fuel drain line (74) with the standard clamp (011).

3. Remove the fuel drain line on the fuel level sensor support plate (B4/1) by loosening and sliding the hose clamp back.

Attention! Collect any leaked fuel with rags or drain into a suitable container. Close the connecting pipe inlet with a suitable plug, or insert a clean bolt with a suitable thread diameter into the hose.


4. Unscrew the round nut (89/1). In the auto repair shop, a special trunnion key is used for this. If you do not have such a key, insert a suitable plastic wedge into the slot of the safety ring and loosen the ring with light hammer blows.

Caution: Do not use metal due to the risk of sparking.


5. Remove the fuel level sensor.

6. Remove the pipes (88/3) and (88/4) from the jet suction pump on the fuel level sensor.

Installation


1. Place the pipes (88/3) and (88/4) on the fuel level sensor.


2. Install the fuel level sensor, fitting it with a new profile seal so that the sensor pins engage in the grooves (88/2) of the fuel tank.

3. Tighten the round nut with a trunnion wrench to a torque of 55 Nm.

4. Attach the drain hose and secure it with a hose clamp, remove the hose clamp.

5. Fill with fuel and, with the engine running, check the tightness of all connection points.

Diesel engine


There is one fuel level sensor in each compartment of the fuel tank.

Removal
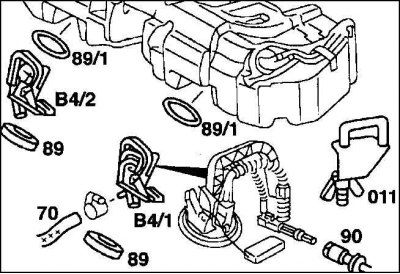


Removal


1. Drain the fuel from the tank. If the sensor is only removed, then it is only necessary to release its clamps.

2. Disconnect the standard clamp (011) from the fuel drain line (70).

3. Remove the drain line from the fuel level sensor seal plate by loosening and sliding the hose clamps back.

Caution! Collect any leaking fuel residue with rags or catch it in a suitable container. Close the pipeline flange with a plug, for example, a clean bolt with a suitable thread diameter, which you insert into the pipeline.


4. Unscrew the nut (89). In a car repair shop, a special trunnion wrench is used for this. If you don't have such a wrench, then place a suitable plastic wedge in the groove of the safety ring and loosen the ring with light hammer blows.


Warning! Do not use metal: risk of sparking!


5. Remove the fuel level sensor.

6. Remove the pipes (90) from the ejector pump on the fuel level sensor.

Installation


1. Place the pipe (90) onto the fuel level sensor.

2. Install the fuel level sensor with a new profile sealing ring (89/1) so that the sensor pins engage in the grooves of the fuel tank.

3. Tighten the eye nut with a trunnion wrench to a torque of 55 Nm.

4. Attach the fuel drain hose and secure it with a hose clamp. Remove the clamp from the hose.

Full article available on the resource MERCEDESMAN

5. Fill with fuel and check all connections for leaks while the engine is running.
This article is available at: russian, bulgarian, belarusian, ukrainian, serbian, croatian, romanian, polish, slovak, hungarian
The article has been verified: Khromov Roman Mikhailovich
Share with friends:
◀ Previous
C-Class W202 / Fuel system
Next ▶

Fuel tank — design description
Safety precautions and refueling
Fuel pump — removal and installation
Fuel filter — removal and installation
Air filter — removal and installation
Air Filter Cross Pipe — Removal and Installation
Intake manifold — removal and installation
More similar articles for repairing other models

☛ Oil level sensor — removal and installation Mercedes W168 (1997-2004)
☛ Fuel level sensor — removal and installation Mercedes W124 (1984-1995)
☛ Removal and installation the fuel level sensor Mercedes W463 (1999-2019)
☛ Removal and installation the fuel level sensor Mercedes W163 (1997-2005)
☛ Oil Level Switch Sensor — Installation Details, Test Data Mercedes W140 (1991-1998)
☛ Fuel level indicator Mercedes Sprinter (1995-2000, diesel)
Link in different formats to this article
Comments and feedback from visitors
No comments yet


How much will 27 + 42 ?


W203 (2000-2007) 
  • General information
  • Introduction to guide
  • User manual
  • Maintenance
  • Power unit
  • Gasoline engines
  • Diesel engines
  • Cooling system
  • Ventilation and heating
  • Supply system
  • Injection system (gasoline)
  • Injection system (diesel)
  • Exhaust system
  • Ignition and control system
  • Charge and launch systems
  • Transmission
  • Mechanical gearbox
  • Automatic gearbox
  • Clutch and drive shafts
  • Differential
  • Chassis
  • Brake system
  • Car suspension
  • Steering
  • Body
  • Exterior (external elements)
  • Interior (internal elements)
  • Electrical equipment
  • Equipment and devices
  • Lighting system
  • Electrical diagrams (2000)
  • Electrical diagrams (since 2001)
W202 (1993-2000) 
  • General information
  • User manual
  • Driving a car
  • Car care
  • Maintenance
  • Power unit
  • Gasoline engines
  • Diesel engines
  • Lubrication system
  • Cooling system
  • Heating and ventilation
  • Ignition system
  • Fuel system
  • Injection system (gasoline)
  • Injection system (diesel)
  • Exhaust system
  • Transmission
  • Clutch
  • Car gearbox
  • Chassis
  • Suspension, wheels and tires
  • Steering
  • Brake system
  • Body
  • Exterior (external elements)
  • Interior (internal elements)
  • Doors and windows
  • Electrical equipment
  • Equipment and devices
  • Power devices
  • Lighting system
  • Electrical circuits
190 (W201) (1982-1993) 
  • General information
  • Introduction to the guide
  • Operation and care
  • Maintenance (gasoline)
  • Maintenance (diesel)
  • Troubleshooting
  • Power unit
  • Petrol engine I4
  • Petrol engine V6
  • Diesel engines
  • Engine overhaul
  • Cooling and heating
  • Power system (carburetor)
  • Injection system (gasoline)
  • Injection system (diesel)
  • Exhaust system
  • Charge and start system
  • Ignition system (I4)
  • Ignition system (V6)
  • Diesel heating system
  • Transmission
  • Clutch
  • Mechanical gearbox
  • Automatic gearbox
  • Cardan shaft and axle shafts
  • Chassis
  • Brake system
  • Car suspension
  • Steering
  • Body
  • Exterior (external elements)
  • Interior (internal elements)
  • Doors, locks and windows
  • Electrical equipment
  • Equipment and devices
  • Electrical circuits
 
MercedesMan.ru © 2017–2026 · Mobile version · Read about Mercedes · Sitemap: EN BG BY UA RS HR RO PL SK HU · Feedback · Site search · Bookmark A-Class (W168) · C-Class (W201) · C-Class (W202) · C-Class (W203) · E-Class (W123) · E-Class (W124) · E-Class (W210) · G-Class (W463) · M-Class (W163) · S-Class (W116, petrol) · S-Class (W126, petrol) · S-Class (W140) · S-Class (W220) · Sprinter · Vito 1 · Vito 2 · Vario 814D ·
 
We only use cookies without which some of the site's features may not be available.