
Cars BMW Cars Volkswagen Cars Chevrolet Cars Land Rover Cars Lada Cars Honda Cars Peugeot
English Русский
Български
Беларускі
Український
Српски
Hrvatski
Română
Polski
Slovenský
Magyar
Bookmark News and articles Sitemap Feedback Site search
MercedesMan.ru


A-Class C-Class E-Class G-Class M-Class S-Class Others
W116 (1972-1980, petrol) W126 (1979-1991, petrol) W140 (1991-1998) W220 (1998-2005)
  • Main
  • S-Class
  • W116 (1972-1980)
  • Electrical equipment
  • Power devices
  • Rechargeable battery

Rechargeable battery (Mercedes-Benz S-Class W116)

0
The battery voltage is 12 V, the nominal capacity is 55 or 65 Ah. The battery consists of 6 elements, each with positive and negative plates. The elements are filled with sulfuric acid-based electrolyte. The battery provides engine starting, vehicle lighting, and operation of other consumers.

To ensure the durability and performance of the battery, periodically perform the following work:

Keep the battery and connecting cables clean. The top of the battery should always be dry to avoid leakage currents in the battery cells, which can lead to discharge.

The battery should always be filled with electrolyte to the level of the mark at the bottom of the case. To restore the electrolyte level, add only distilled water.

In cold weather, do not leave the battery in a discharged state, as this may cause the electrolyte to freeze. The electrolyte in a discharged battery freezes at a higher temperature than in a charged one.

Checking the battery


Electrolyte level


The battery is filled with electrolyte from a mixture of sulfuric acid and distilled water. Due to the evaporation of water, it is necessary to periodically check the electrolyte level and, if necessary, add distilled water to the battery. When adding, unscrew the battery compartment plugs and pour distilled water to the mark.

Electrolyte density


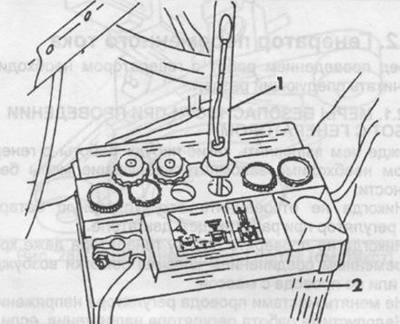
To check the density of the electrolyte, you need a densimeter. Unscrew the plug and lower the tip of the densimeter into the compartment (see fig. 264). Using a rubber bulb, suck the electrolyte into the densimeter until the float rises, read the density readings on the float. A density of 1.28 corresponds to the density of a charged battery, a density of 1.12 means the battery is completely discharged. Intermediate density values characterize the degree of contamination of the battery.


Article text obtained from the website: Mercedesman.ru

Fig. 264. Checking the density of electrolyte in the battery.

Fig. 264. Checking the density of electrolyte in the battery.
1 - densimeter,
2 - electrolyte level mark.


Battery charge


In a very discharged battery, add distilled water after charging. When charging, the density of the electrolyte increases and the battery may "boil". The initial charging current of the electrolyte should not exceed 10% of the capacity (5.5 A or 6.5 A). During the charging process, the current is automatically reduced. The battery is fully charged if the electrolyte density does not change within two hours of charging.

When charging, the plugs must be unscrewed to facilitate the passage of oxygen and hydrogen released during the charging process and the detonating gas formed from their mixture. During intensive charging, electrolyte may splash, so safety precautions must be observed. Never bring an open flame to the holes in the battery.

When using a regular charger for charging, the wires from the battery can be left connected. When using a charger with an accelerated charging process, the wires must be disconnected from the battery to avoid damage to the diodes in the generator, electronic devices, radio, etc.


Removal and installation


The battery is secured to a bracket in the engine compartment on the left side. Before removing the battery, disconnect the wires, always disconnect the negative wire first. To unscrew the battery mounting nuts, you will need a socket wrench with an extension.

When installing the battery, clean the terminals and lubricate. Install and secure the positive wire.

Starting the engine with a discharged battery


The easiest way is to use large-section wires to connect to the battery of another car. Copper wires are expensive, aluminum wires are cheaper, but they heat up a lot, which can damage the insulation, and when removing the wires, you can burn your fingers. First, connect the positive terminals of the batteries with a wire, and then connect the negative terminals. On the second car, start the engine and increase the speed to ensure the generator works.

Other well-known methods of starting an engine with a dead battery include towing with a second vehicle or accelerating the car with the help of several people.
This article is available at: russian, bulgarian, belarusian, ukrainian, serbian, croatian, romanian, polish, slovak, hungarian
The article has been verified: Panova Maya Vladimirovna
Share with friends:
◀ Previous
S-Class W116 / Power devices
Next ▶

Electrical equipment — general information
Safety precautions when working with a generator
Checking the generator on the car
Removal and installation the generator
Generator repair
Checking, removing and installing the starter
More similar articles for repairing other models

☛ Starting the engine using an auxiliary battery Mercedes W168 (1997-2004)
☛ Starting the engine from an auxiliary battery Mercedes W202 (1993-2000)
☛ Rechargeable battery-care Mercedes W124 (1984-1995)
☛ Battery — General information, maintenance recommendations Mercedes W463 (1999-2019)
☛ Battery — General information, maintenance recommendations Mercedes W163 (1997-2005)
☛ Disconnecting the battery Mercedes Sprinter (1995-2000, diesel)
Link in different formats to this article
Comments and feedback from visitors
No comments yet


How much will 17 + 13 ?


W220 (1998-2005) 
  • General information
  • Introduction to guide
  • User manual
  • Maintenance
  • Power unit
  • Engine repair
  • Cooling and heating systems
  • Power and exhaust systems
  • Ignition and control system
  • Charge and launch systems
  • Transmission
  • Automatic gearbox
  • Drive shafts
  • Chassis
  • Brake system
  • Front suspension
  • Rear suspension
  • Steering
  • Body
  • Body elements
  • Electrical equipment
  • Equipment and devices
  • Electrical circuits
W140 (1991-1998) 
  • User manual
  • Controls and instruments
  • Driving and operation
  • Maintenance
  • Power unit
  • Petrol engine V6
  • Petrol engine V8
  • Petrol engine V12
  • Diesel engine OM603
  • Diesel engine OM606
  • Cooling system
  • Power supply and injection system
  • Control system HFM-SFI
  • Control system LH-SFI
  • Control systems ME-SFI
  • Diesel control system
  • Ignition system
  • Charge and launch system
  • Transmission
  • Mechanical gearbox 717.438
  • Mechanical gearbox 717.454
  • Automatic gearbox 722.5
  • Automatic gearbox 722.6
  • Clutch and drive shafts
  • Differential
  • Chassis
  • Brake system
  • Steering
  • Front suspension
  • Rear suspension
  • Body
  • Exterior (external elements)
  • Interior (internal elements)
  • Electrical equipment
  • Equipment and devices
  • Electrical circuits
W126 (1979-1991, petrol) 
  • Power unit
  • Engine repair
  • Ignition system
  • Lubrication system
  • Cooling system
  • Fuel system
  • Fuel injection system
  • Transmission
  • Clutch and cardan
  • Mechanical gearbox
  • Automatic gearbox
  • Chassis
  • Front suspension
  • Rear suspension
  • Steering
  • Brake system
  • Electrical equipment
  • Power devices
  • Electrical circuits
W116 (1972-1980, petrol) 
  • General information
  • Introduction to guide
  • Power unit
  • 8-cylinder V8 engine
  • 6-cylinder I6 engine
  • Cooling and lubrication system
  • Power system (carburetor)
  • Fuel injection system
  • Ignition system
  • Transmission
  • Clutch and cardan
  • Car gearbox
  • Chassis
  • Front suspension
  • Rear suspension
  • Steering
  • Brake system
  • Electrical equipment
  • Power devices
  • Electrical circuits
 
MercedesMan.ru © 2017–2026 · Mobile version · Read about Mercedes · Sitemap: EN BG BY UA RS HR RO PL SK HU · Feedback · Site search · Bookmark A-Class (W168) · C-Class (W201) · C-Class (W202) · C-Class (W203) · E-Class (W123) · E-Class (W124) · E-Class (W210) · G-Class (W463) · M-Class (W163) · S-Class (W116, petrol) · S-Class (W126, petrol) · S-Class (W140) · S-Class (W220) · Sprinter · Vito 1 · Vito 2 · Vario 814D ·
 
We only use cookies without which some of the site's features may not be available.