
Removing the front bumper
1. Remove the optional fan guard (if installed). To do this, turn the latches by 90°.
2. Place the vehicle on supports and disconnect the fog lamp connectors.
3. Unfasten the temperature sensor on the left side of the bumper.
4. Turn away fastening of wheel arch liners in the field of a bumper.
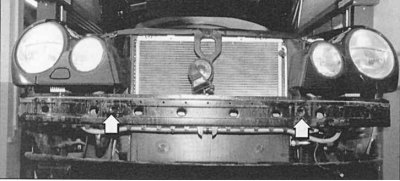
Pic. 11.17. When assembling, the bumper must be installed horizontally on the cross member (arrows) and tighten the bolts to 20 Nm
5. Turn away bolts at the left and on the right near an aperture of a radiator (pic. 11.17).

Pic. 11.18. Thanks to movable fasteners (arrow) clearance can be adjusted (5 mm) between bumper and body. Due to a parking error, it is these latches that are usually damaged
6. Remove the bumper forward. The side corners of the bumper are fixed to the body through a sliding latch (pic. 11.18 and 11.19).
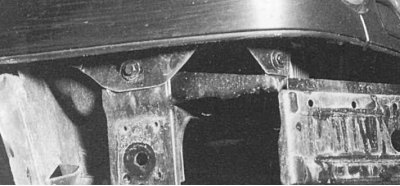
Pic. 11.19. On the side, the bumper is fixed in holders through the so-called sliding clamps
Removing the rear bumper
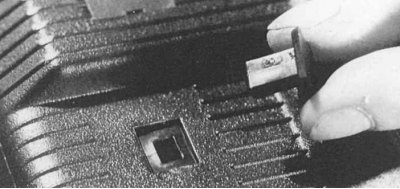
Pic. 11.20. To remove the luggage compartment upholstery, carefully remove the sliding dowels by inserting a screwdriver into them from the side
1. Remove an upholstery of a luggage carrier. You should start with plastic upholstery in the back (pic. 11.20).
2. Loosen all sliding keys with a thin-bladed screwdriver, slightly pushing their middle part. Carefully remove the studs and along the edge of the boot. Remove the plate on the right.
3. Turn away from both parties on two bolts which are approximately in 20 cm below back lanterns.
4. If installed, also remove the bolt in the center of the vehicle.
5. Turn out bolts of fastening of fender liner in the field of a bumper.

Pic. 11.21. During the subsequent installation of the rear bumper, make sure that the ends of the bumper are correctly installed in the mounting holes before tightening the mounting bolts (arrows)
6. Remove bumper back (pic. 11.21).