
Cars BMW Cars Volkswagen Cars Chevrolet Cars Land Rover Cars Lada Cars Honda Cars Peugeot
English Русский
Български
Беларускі
Український
Српски
Hrvatski
Română
Polski
Slovenský
Magyar
Bookmark News and articles Sitemap Feedback Site search
MercedesMan.ru


A-Class C-Class E-Class G-Class M-Class S-Class Others
W123 (1976-1985) W124 (1984-1995) W210 (1996-2002)
  • Main
  • E-Class
  • W210 (1996-2002)
  • Body
  • Doors and windows
  • Removal the door trim

Removal the door trim (Mercedes-Benz E-Class W210)

0

Sequence of works


1. Lower the window.
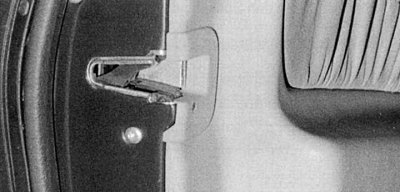
Fig. 11.27. Removing the lock trim

Fig. 11.27. Removing the lock trim


2. Unscrew the lock trim mounting bolt and remove the trim downwards (fig. 11.27).
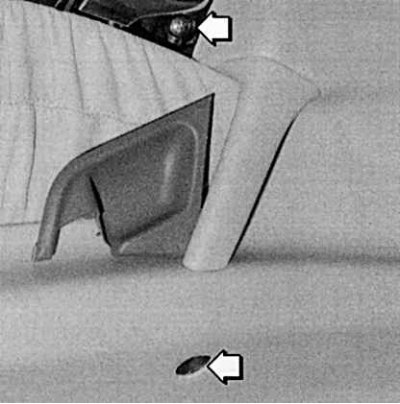
Fig. 11.28. The arrows show the bolts securing the door handle and armrest
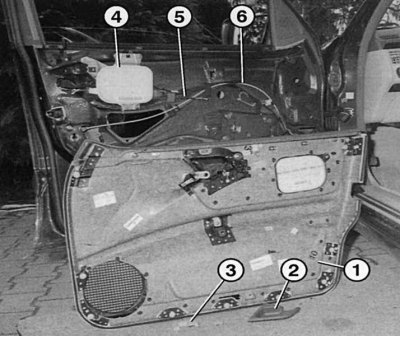
Fig. 11.28. The arrows show the bolts securing the door handle and armrest


Fig. 11.29. Front door with trim removed - insulating film already removed: 1 – door trim with…

Fig. 11.29. Front door with trim removed - insulating film already removed: 1 – door trim with clamps, speaker grille and door opening handle from the inside; 2 – door handle cup; 3 – door lock trim; 4 – side airbag; 5 – door opening drive rod; 6 – vacuum hose of the central locking system


3. Using a wide, suitable tool, pry up the cup 2 (fig. 11.29) door opening handles (fig. 11.28). Place the tool on top.

4. Remove the two cup bolts.

5. Remove the screw cover under the armrest, then remove the Phillips head screw.

6. Using a suitable object, carefully press the trim of door 1 along the perimeter. If possible, position the tool closer to the fasteners.

7. At the top of the glass opening sealing strip, press the trim upwards.

8. Remove the upholstery.

9. Remove the casing 3 of the lock mechanism and take out the mechanism.

10. If necessary, disconnect the electrical wiring contacts.

If the door trim is damaged


If the insulating film behind the door trim is damaged, it must be replaced. Otherwise, the trim will become damp and soft.

The outer and inner sealing strips of the door glass opening are fixed with metal brackets.
This article is available at: russian, bulgarian, belarusian, ukrainian, serbian, croatian, romanian, polish, slovak, hungarian
The article has been verified: Polyakov Zakhar Grigorievich
Share with friends:
◀ Previous
E-Class W210 / Doors and windows
Next ▶

Rear door adjustment
Removal the rear door
Front door adjustment
Removal the front door
Doors — General Information
Removal the door glass
Removal the outer door handle
Removal the door lock
Windshield and rear glass
Sunroof
More similar articles for repairing other models

☛ Door trim — removal and installation Mercedes W168 (1997-2004)
☛ Interior door trim — removal and installation Mercedes W202 (1993-2000)
☛ Removal and installation interior trim of door assemblies Mercedes W463 (1999-2019)
☛ Removal and installation interior trim panels of door assemblies Mercedes W163 (1997-2005)
☛ Removal and installation interior door trim panels Mercedes W140 (1991-1998)
☛ Side door adjustment Mercedes Vito 1 (1996-2003)
Link in different formats to this article
Comments and feedback from visitors
No comments yet


How much will 44 + 19 ?


W210 (1996-2002) 
  • General information
  • Vehicle description
  • Working conditions and tools
  • Car care
  • Diesel engines
  • Engine repair
  • Lubrication system
  • Cooling system
  • Injection system
  • Supply system
  • Exhaust system
  • Gasoline engines
  • Engine repair
  • Lubrication system
  • Cooling system
  • Control system
  • Power and exhaust system
  • Transmission
  • Clutch
  • Mechanical gearbox
  • Automatic gearbox
  • Drive shafts
  • Chassis
  • Car suspension
  • Steering
  • Tires and wheels
  • Brake system
  • Body
  • Exterior (external elements)
  • Interior (internal elements)
  • Doors and windows
  • Heating and ventilation
  • Electrical equipment
  • Equipment and devices
  • Power devices
  • Lighting and signaling
  • Electrical circuits
W124 (1984-1995) 
  • General information
  • Governing bodies
  • Driving and operation
  • Weekly care
  • Maintenance (gasoline)
  • Maintenance (diesel)
  • Troubleshooting
  • Power unit
  • I4 petrol engine
  • V6 petrol engine (SOHC)
  • V6 petrol engine (DOHC)
  • Diesel engines
  • Engine overhaul
  • Cooling system
  • Heating and ventilation
  • Fuel system (carburetor)
  • Injection system «Bosch CIS-E»
  • Injection system «Bosch HFM»
  • Diesel fuel system
  • Supply system
  • Starting and charging system
  • Ignition system (I4)
  • Ignition system (V6)
  • Preheating
  • Transmission
  • Clutch
  • Mechanical gearbox
  • Automatic gearbox
  • Drive shafts
  • Chassis
  • Brake system
  • Car suspension
  • Steering
  • Body
  • Exterior (external elements)
  • Interior (internal elements)
  • Doors, locks and windows
  • Electrical equipment
  • Equipment and devices
  • Switches
  • Headlights and lighting
  • Electrical circuits
W123 (1976-1985) 
  • General information
  • Introduction to the guide
  • Power unit
  • Engine device
  • Repair M102 engines
  • Repair M110 and M123 engines
  • Cooling and lubrication (M102)
  • Cooling (M110 and M123)
  • Ignition system
  • Power system «Stromberg»
  • Power system «Solex 4A1»
  • Fuel injection «K-Jetronic»
  • Fuel injection «L-Jetronic»
  • Transmission
  • Clutch
  • Mechanical gearbox
  • Automatic gearbox
  • Cardan and rear axle
  • Chassis
  • Front suspension
  • Rear suspension
  • Steering
  • Brake system
  • Body
  • Exterior (external elements)
  • Interior (internal elements)
  • Doors, locks and windows
  • Electrical equipment
  • Equipment and devices
  • Power devices
  • Electrical circuits
 
MercedesMan.ru © 2017–2026 · Mobile version · Read about Mercedes · Sitemap: EN BG BY UA RS HR RO PL SK HU · Feedback · Site search · Bookmark A-Class (W168) · C-Class (W201) · C-Class (W202) · C-Class (W203) · E-Class (W123) · E-Class (W124) · E-Class (W210) · G-Class (W463) · M-Class (W163) · S-Class (W116, petrol) · S-Class (W126, petrol) · S-Class (W140) · S-Class (W220) · Sprinter · Vito 1 · Vito 2 · Vario 814D ·
 
We only use cookies without which some of the site's features may not be available.