
Driver's door
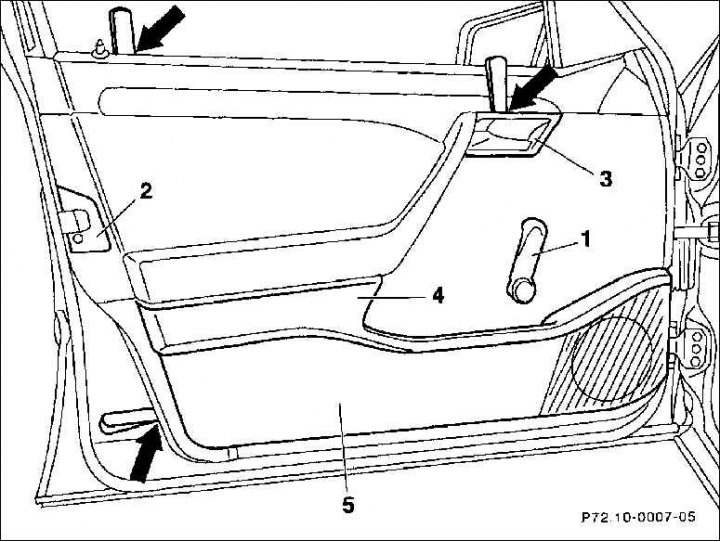
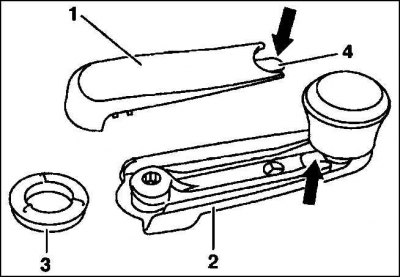
1. Power window handle; 2. Lock socket; 3. Recess for the handle; 4. Coating 5. Door lining
Note: Work must be carried out on the rear doors accordingly.
Removing
1. Unscrew the lock socket (2) screwdriver and remove it.
2. Lower the door glass completely using the handle.
3. Remove the power window handle by pressing the locking hook on the cover with a small screwdriver. Swing the cover down in the direction of the arrow and remove.
4. Remove the handle from the axle, remove the spacer washer.
5. hood (3) to operate the door from the inside, use your fingers or a screwdriver to disconnect from the inner door trim and remove.
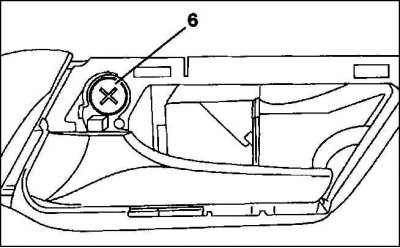
6. Remove the screw (6) on the door control mechanism from the inside.
7. Press Cover (4) under the armrest in the door pocket and remove the Phillips head screw.
8. Slightly detach the inner door skin from the door sheet in a circular fashion.
9. Press the door trim from the door sheet from the bottom side and from the side with a wide spatula or screwdriver, while disconnecting the spring clips. Start from the underside of the skin.
Attention! Lay with material so as not to scratch the varnish.
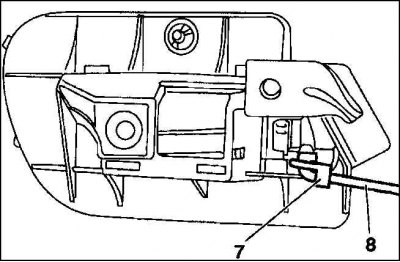
10. open stopper (7) mechanism for actuating the door from the inside and disconnect the mechanism (8). At "electrically adjustable driver's seat" instead of the mechanism, a flexible rod is mounted, disconnect it.
11. Disconnect the wire connector from the door trim.
12. Pull the inner door trim up over the door lock button and remove from the door sheet.
Installation
1. Before assembly, ensure that the sealing film is properly installed. Seal small damages of the film with adhesive tape, in case of large cracks, replace the film.
Attention! At the factory, the armrest holder is only riveted after the foil has been installed. When replacing the film, cut out this area and overlap or seal with adhesive tape.
2. Put on the wire connector.
3. Insert the door actuating mechanism from the inside and fix it.

4. Replace damaged spring clips. Install the inner lining from above above the door lock button, insert it into the sealing rail and, simultaneously with the spring clips, into the holes in the door sheet.
5. Use your fists to press the inner door trim in the area of the spring clips.
6. Screw in the Phillips screw below the armrest. Apply a cover.
7. Screw the door control from the inside with two screws. Apply the handle shell.
8. clearance washer (3) install the window lifter handles with a large diameter to the door trim.
9. Place the handle on the axle. With the window open, the handle should be directed obliquely forward upwards.
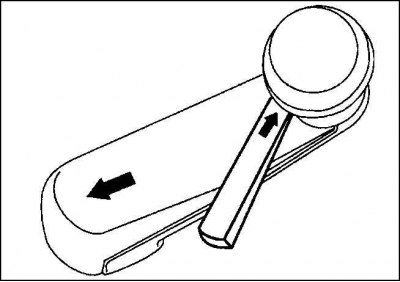
10. Push down the shell (1) on the handle (2), while making sure that the head of the shell fits into the groove on the shaft of the handle. Slide the cover forward until the locking hooks engage (arrow).
11. Raise the glass up with the handle.
12. Insert the trim for the door lock from above and secure from below with the screw.