
Cars BMW Cars Volkswagen Cars Chevrolet Cars Land Rover Cars Lada Cars Honda Cars Peugeot
English Русский
Български
Беларускі
Український
Српски
Hrvatski
Română
Polski
Slovenský
Magyar
Bookmark News and articles Sitemap Feedback Site search
MercedesMan.ru


A-Class C-Class E-Class G-Class M-Class S-Class Others
190 (W201) (1982-1993) W202 (1993-2000) W203 (2000-2007)
  • Main
  • C-Class
  • W202 (1993-2000)
  • Body
  • Doors and windows
  • Rear window lifter — removal and installation

Rear window lifter — removal and installation (Mercedes-Benz C-Class W202)

0
Contents: Removal ↡ Installation ↡
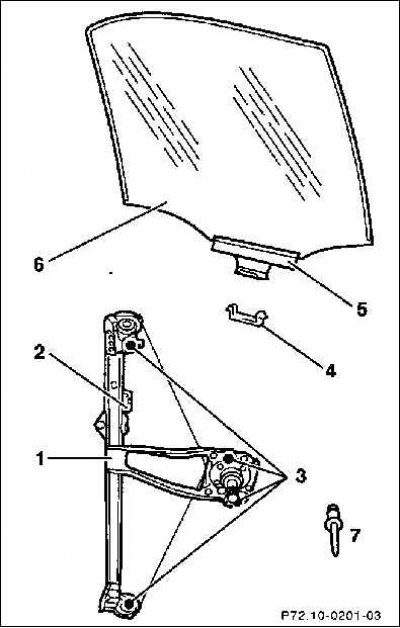
1. Window lifter; 2. Crawler; 3. Holes for fastening blind rivets; 4. Locking bracket; 5. Window…

1. Window lifter; 2. Crawler; 3. Holes for fastening blind rivets; 4. Locking bracket; 5. Window regulator bus; 6. Roll-down glass; 7. Blind rivet 4.8 mm


Removal


1. Remove the inner door trim.

2. Carefully remove the sealing film.

Attention! The film tears easily.


Article text obtained from the website: MercedesMan

3. Disconnect the retaining clip from the window regulator rail.

4. Pull the lowering glass with the window lifter rail downwards from the slider and move it upwards into the window rail. Secure the glass with a plastic or wooden wedge so that it does not fall out.

5. The window lifter is riveted. Drill out the four rivets with a 4.8 mm drill. Make sure that the drill does not penetrate the inner sheet metal of the door. Special pliers for hidden rivets are required for riveting.

6. Remove the window regulator from below. The electric window regulator is removed together with the motor. Disconnect the electric window regulator wire.

Installation


1. Insert the window regulator into the door and rivet it in place using blind rivet pliers. If you don't have pliers, you can secure the window regulator with screws and nuts. Before screwing in, coat the screws with a protective agent such as Loctite 270 or Omnifit.


2. Carefully lower the glass and install the locking bracket.

3. Connect the electrical wires.

4. Attach the sealing film, making sure there are no folds.

Attention! Do not damage the film – it must be perfectly sealed.


5. Install the interior door trim.
This article is available at: russian, bulgarian, belarusian, ukrainian, serbian, croatian, romanian, polish, slovak, hungarian
The article has been verified: Khromov Roman Mikhailovich
Share with friends:
◀ Previous
C-Class W202 / Doors and windows
Next ▶

Front window glass — adjustment
Front window lifter — removal and installation
Interior door trim — removal and installation
Door lock — removal and installation
Rear Door Handle — Removal and Installation
Front door glass — removal and installation
Window lift motor — removal and installation
More similar articles for repairing other models

☛ Rear window defroster Mercedes W168 (1997-2004)
☛ Removal and installation a mechanical door window lifter Mercedes W123 (1976-1985)
☛ Removal and installation rear ventilation flaps Mercedes W463 (1999-2019)
☛ Rear window wipers/washers (ML 430) Mercedes W163 (1997-2005)
☛ Rear window heating Mercedes W140 (1991-1998)
☛ Rear window heating Mercedes Vito 1 (1996-2003)
Link in different formats to this article
Comments and feedback from visitors
No comments yet


How much will 30 + 42 ?


W203 (2000-2007) 
  • General information
  • Introduction to guide
  • User manual
  • Maintenance
  • Power unit
  • Gasoline engines
  • Diesel engines
  • Cooling system
  • Ventilation and heating
  • Supply system
  • Injection system (gasoline)
  • Injection system (diesel)
  • Exhaust system
  • Ignition and control system
  • Charge and launch systems
  • Transmission
  • Mechanical gearbox
  • Automatic gearbox
  • Clutch and drive shafts
  • Differential
  • Chassis
  • Brake system
  • Car suspension
  • Steering
  • Body
  • Exterior (external elements)
  • Interior (internal elements)
  • Electrical equipment
  • Equipment and devices
  • Lighting system
  • Electrical diagrams (2000)
  • Electrical diagrams (since 2001)
W202 (1993-2000) 
  • General information
  • User manual
  • Driving a car
  • Car care
  • Maintenance
  • Power unit
  • Gasoline engines
  • Diesel engines
  • Lubrication system
  • Cooling system
  • Heating and ventilation
  • Ignition system
  • Fuel system
  • Injection system (gasoline)
  • Injection system (diesel)
  • Exhaust system
  • Transmission
  • Clutch
  • Car gearbox
  • Chassis
  • Suspension, wheels and tires
  • Steering
  • Brake system
  • Body
  • Exterior (external elements)
  • Interior (internal elements)
  • Doors and windows
  • Electrical equipment
  • Equipment and devices
  • Power devices
  • Lighting system
  • Electrical circuits
190 (W201) (1982-1993) 
  • General information
  • Introduction to the guide
  • Operation and care
  • Maintenance (gasoline)
  • Maintenance (diesel)
  • Troubleshooting
  • Power unit
  • Petrol engine I4
  • Petrol engine V6
  • Diesel engines
  • Engine overhaul
  • Cooling and heating
  • Power system (carburetor)
  • Injection system (gasoline)
  • Injection system (diesel)
  • Exhaust system
  • Charge and start system
  • Ignition system (I4)
  • Ignition system (V6)
  • Diesel heating system
  • Transmission
  • Clutch
  • Mechanical gearbox
  • Automatic gearbox
  • Cardan shaft and axle shafts
  • Chassis
  • Brake system
  • Car suspension
  • Steering
  • Body
  • Exterior (external elements)
  • Interior (internal elements)
  • Doors, locks and windows
  • Electrical equipment
  • Equipment and devices
  • Electrical circuits
 
MercedesMan.ru © 2017–2026 · Mobile version · Read about Mercedes · Sitemap: EN BG BY UA RS HR RO PL SK HU · Feedback · Site search · Bookmark A-Class (W168) · C-Class (W201) · C-Class (W202) · C-Class (W203) · E-Class (W123) · E-Class (W124) · E-Class (W210) · G-Class (W463) · M-Class (W163) · S-Class (W116, petrol) · S-Class (W126, petrol) · S-Class (W140) · S-Class (W220) · Sprinter · Vito 1 · Vito 2 · Vario 814D ·
 
We only use cookies without which some of the site's features may not be available.