
Driver's door
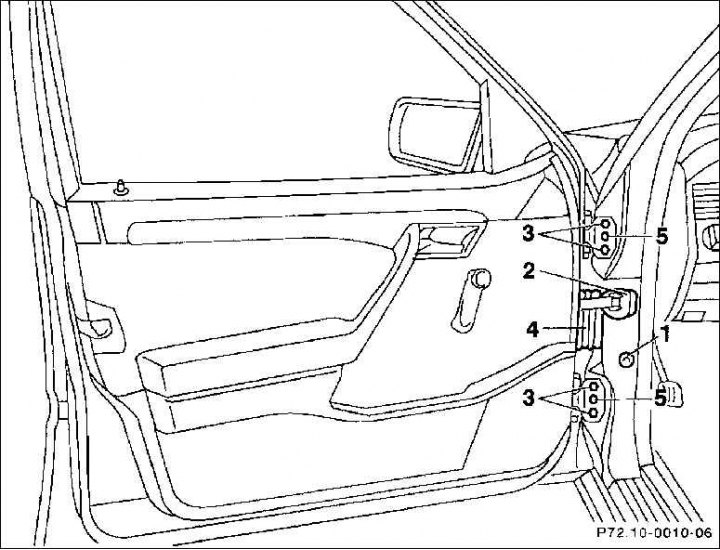
1. Coating; 2. Sealing gasket; 3. A-pillar bolts 4. Protective sleeve; 5. Centering bolt
Removing
1. Fully lower the driver's door window.
2. Press Cover (1) and using the special tool, by turning the inner square to the right, disconnect the blocking of the square plug connection of the door.
3. Remove the seal.
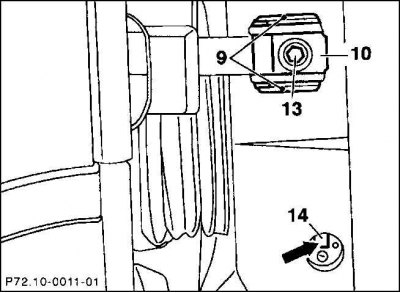
4. Remove the bolt (13) door brake (10). 14 - internal square in the bolt head.
5. Mark the position of the door hinges relative to the surface of their fit, for example, circle them with a scriber or mark them at the top and bottom. As a result, no adjustment of this door will be required during installation.
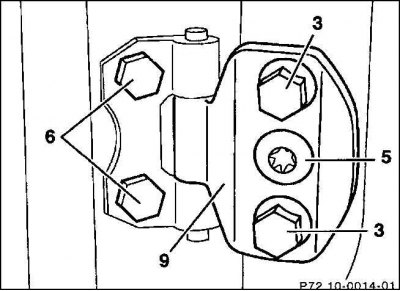
6. Remove the four hinge bolts (3) and together with an assistant, slightly disconnect the door from the door pillar.
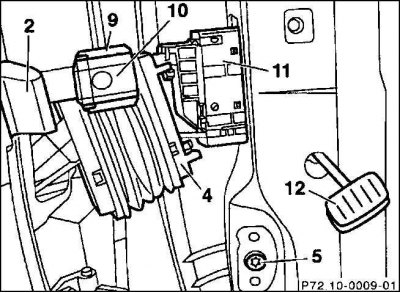
7. Detach protective sleeve (4) from the door pillar and remove the plug connection (11).
8. Remove the door, taking care not to damage the lacquer finish.
Installation
1. Insert plug connection (11) and close the stopper by turning outwards.
2. Fasten the protective sleeve with spring clips (4).
3. Install the door and fasten lightly with the fixing bolts.
4. So adjust the position of the door so that the hinges coincide with the markings.
5. Mount cover (1).
6. Tighten the bolt with a torque of 25 Nm (13) attaching the door brake to the door pillar.
7. Attach cover (1 and 2).
8. Adjust the door, tighten the centering bolt (5) with a torque of 25 Nm and hinge bolts (3) with a moment of 35 Nm.
Adjustment
If the door is not tight enough after disassembly, it should be adjusted.

1. Open the protective shell (7) door lock (8).
2. Adjustment is made by loosening the hinge bolts and moving the door. The hinges have holes larger than the diameter of the bolts, so the hinge can be moved.
3. Loosen hinge bolts to adjust joint dimensions (6) on the body without twisting them. Adjust the joint size by moving the door. So adjust the door so that the gap is parallel and of the same size with respect to the body parts located nearby.
4. Fitting the door to the contour of the body: if the door is not tight enough to the body when closed, loosen the hinge bolts (3) And (5) on the door and move the door accordingly. The rear door must protrude a maximum of 1 mm further inward from the front than the front door.
5. Protective shell door lock (7) screw in until it can be moved with light blows from a rubber mallet.
6. Adjust the protective shell of the door lock in the bottom area of the door. Close the door and align, as a result of this, the position of the protective shell of the door lock is also aligned. Then carefully open the door and tighten the protective shell screws. To better control movement, mark the position of the containment with a felt pen before loosening the screws. Tighten the screws securing the protective shell of the lock with a torque of 30 Nm.
7. Check that the door seals are properly seated on the roof edge of the vehicle. If the door is perfectly positioned in the closed position, tighten the hinge bolts.