
Cars BMW Cars Volkswagen Cars Chevrolet Cars Land Rover Cars Lada Cars Honda Cars Peugeot
English Русский
Български
Беларускі
Український
Српски
Hrvatski
Română
Polski
Slovenský
Magyar
Bookmark News and articles Sitemap Feedback Site search
MercedesMan.ru


A-Class C-Class E-Class G-Class M-Class S-Class Others
W168 (1997-2004)
  • Main
  • A-Class
  • W168 (1997-2004)
  • Body
  • Doors and windows
  • Door trim — removal and installation

Door trim — removal and installation (Mercedes-Benz A-Class W168)

0
Contents: Removal ↡ Installation ↡

Removal


1. Lower the door glass.

2. Remove the cover from the rear view mirror 1 (see illustration).
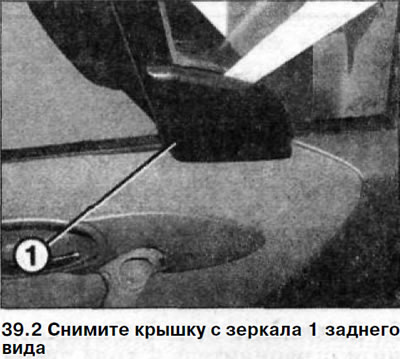
2. Remove the cover from the rear view mirror 1 (see illustration).


3. Cars manufactured before 2/01. Remove the lower and upper trims 2 from the door closing handle and unscrew the screws 3 located underneath them (see illustration).
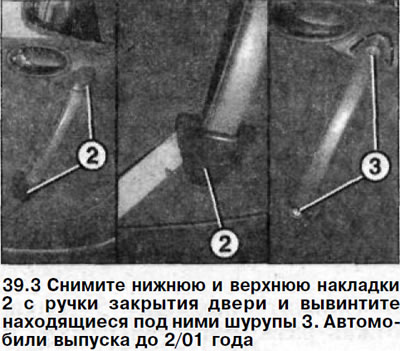
3. Cars manufactured before 2/01. Remove the lower and upper trims 2 from the door closing handle…


4. Cars manufactured since 01/03. Remove the cover from the armrest handle by hand or by prying it up with a plastic wedge, and then unscrew the screws located underneath it (see illustration).
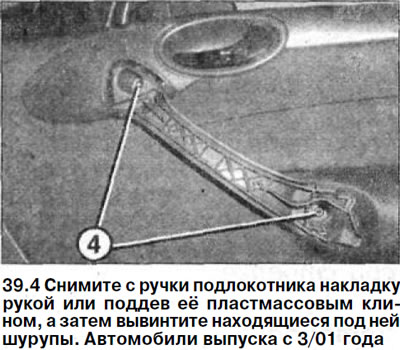
4. Cars manufactured since 01/03. Remove the cover from the armrest handle by hand or by prying it…


5. Remove the plug 5 on the airbag and unscrew the screw 6 located underneath it (see illustration).
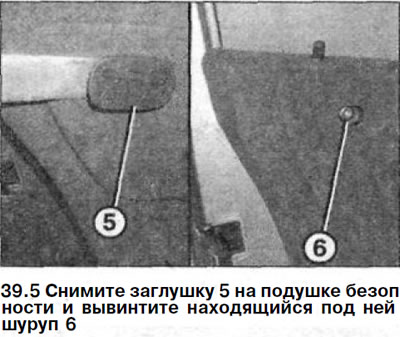


5. Remove the plug 5 on the airbag and unscrew the screw 6 located underneath it (see illustration).


6. Pry up the door trim at the bottom, front and back with a plastic wedge 7 or remove its fasteners with suitable pliers (see illustration). Install the wedge directly next to the retainer.
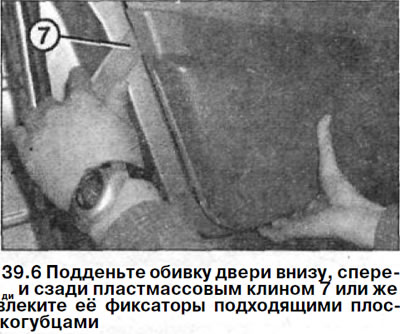
6. Pry up the door trim at the bottom, front and back with a plastic wedge 7 or remove its…
d

7. Release the top of the door trim from under the seal and remove it, disconnecting it from the inner insulation.

8. Disconnect the lock rod 8 from the trim 9, and then from the lever 10, pressing the white lock with a screwdriver (see illustration).
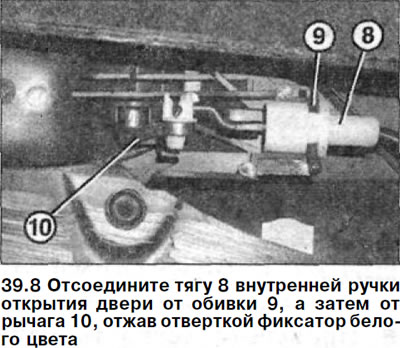
8. Disconnect the lock rod 8 from the trim 9, and then from the lever 10, pressing the white lock…


9. Release the high-tone speaker from the door trim.


(Original material on the website: MercedesMan)

10. Place the door trim on a thick lining.

11. Carefully remove the inner door seal 11 by cutting the adhesive layer with a knife (see illustration). Place the seal so that the adhesive layer does not come into contact with other objects and does not become contaminated.
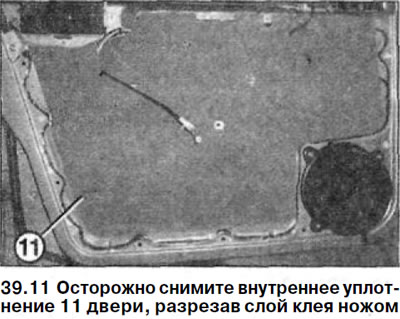
11. Carefully remove the inner door seal 11 by cutting the adhesive layer with a knife (see…


Installation


12. Carefully attach the inner seal to the door and glue it. If this seal is damaged, replace it with a new one. Repair minor damage to the seal with tape. If necessary, use an adhesive mass, such as, "Terostat 962".

13. Make sure all fasteners are in place. Replace damaged fasteners.

14. Secure the high-tone speaker to the door trim.

15. Attach the inner door opening handle rod to the lever, and then attach it to the back of the door trim.

16. Insert the top of the door trim under the seal, and secure the bottom with the clips and press down on the trim. If necessary, tap the trim clips installed in the holes with your hand.

17. Screw the screw into the hole on the airbag cover and close the hole with the plug.

18. Screw on the door closing handle and install the cover plate.


19. Replace the outside rearview mirror cover.

20. Raise the door glass.
This article is available at: russian, bulgarian, belarusian, ukrainian, serbian, croatian, romanian, polish, slovak, hungarian
The article has been verified: Lukyanov Nikita Ilyich
Share with friends:
◀ Previous
A-Class W168 / Doors and windows
Next ▶

Front door — removal and installation
Rear side door — window lift handle removal and installation
Front door window lifter — removal and installation
Window lifter motor — removal and installation
Door glass — removal and installation
External door handle — removal and installation
More similar articles for repairing other models

☛ Interior door trim — removal and installation Mercedes W202 (1993-2000)
☛ Removal and installation the interior door trim panel Mercedes W123 (1976-1985)
☛ Removal and installation interior trim of door assemblies Mercedes W463 (1999-2019)
☛ Removal and installation interior trim panels of door assemblies Mercedes W163 (1997-2005)
☛ Removal and installation interior door trim panels Mercedes W140 (1991-1998)
☛ Side door adjustment Mercedes Vito 1 (1996-2003)
Link in different formats to this article
Comments and feedback from visitors
No comments yet


How much will 15 + 50 ?


W168 (1997-2004) 
  • General information
  • User manual
  • Maintenance
  • Troubleshooting
  • Power unit
  • Engine repair
  • Cooling and heating
  • Injection system (gasoline)
  • Fuel system (diesel)
  • Fuel system
  • Exhaust system
  • Ignition system
  • Transmission
  • Clutch
  • Transmission
  • Chassis
  • Brake system
  • Suspension
  • Steering
  • Body
  • Interior (all models)
  • Interior (since 1997)
  • Interior (since 2001)
  • Exterior
  • Doors and windows
  • Electrical equipment
  • Equipment and devices
  • Power devices
  • Windshield wipers and washers
  • Headlights and lighting
  • Electrical circuits
 
MercedesMan.ru © 2017–2026 · Mobile version · Read about Mercedes · Sitemap: EN BG BY UA RS HR RO PL SK HU · Feedback · Site search · Bookmark A-Class (W168) · C-Class (W201) · C-Class (W202) · C-Class (W203) · E-Class (W123) · E-Class (W124) · E-Class (W210) · G-Class (W463) · M-Class (W163) · S-Class (W116, petrol) · S-Class (W126, petrol) · S-Class (W140) · S-Class (W220) · Sprinter · Vito 1 · Vito 2 · Vario 814D ·
 
We only use cookies without which some of the site's features may not be available.