
Eight-cylinder engines
Raise the front of the car.
Remove the compressor with mounting parts and, without disconnecting the pipelines, set aside.
Remove the fuel feed drive rod.
Loosen the screws securing the bottom half of the oil pan.
Remove the engine oil level gauge from the guide tube and remove the tube.
Remove the lower half of the oil pan as described above.
Loosen the bolts securing the upper half of the oil pan.
Loosen the two front engine mount bolts.
Loosen the lower part of the engine dampers.
Fasten the cable to the load-handling eyelets and, using a lifting device, lift the engine until the upper half of the oil sump can be freely removed from the engine.
The oil sump is installed in the reverse order. Glue new gaskets on the split surfaces of the oil sump with grease before installing.
Six-cylinder engines
The oil sump, together with a protective mudguard, is attached to the cylinder block with M6 bolts. The threads of the bolts are coated with an adhesive that prevents the bolts from loosening, and therefore, after each removal of the crankcase, the bolts must be replaced.
Disconnect the oil drain line from the oil sump.
Loosen the bolts securing the protective mudguard, as shown in fig. 107.
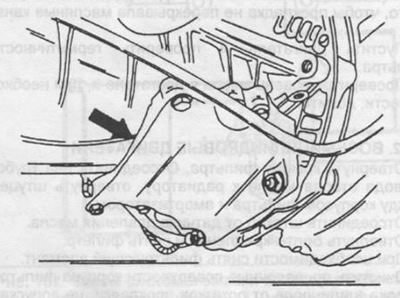
Pic. 107. The arrow shows the protective mudguard of the oil sump of a six-cylinder engine.
Turn the front wheels to the left as far as they will go.
Loosen the protective mudguard on the bottom half of the oil pan.
Remove damper (section 2.7).
Loosen the bottom mounting of the alternator.
Loosen the bolts securing the upper half of the oil sump and leave it hanging on the two bolts.
Unscrew the bolts securing the lower half of the oil sump and remove it.
Loosen the three oil pump mounting bolts.
Remove the guide tube for the oil level indicator from the mounting bracket and from the upper part of the oil sump.
On vehicles with air conditioning, remove the lower compressor mounting bracket.
Disconnect the fuel drive linkage.
Loosen the lower part of the engine shock absorbers and the bolts of the front engine mount.
Fasten the cable to the front lifting eye and use a lifting device to lift the engine until the upper half of the oil pan can be easily removed. Loosen the two bolts and remove the top half of the oil pan. Remove the oil seal from the groove in the rear of the crankcase.
Installation is carried out in the reverse order, taking into account the following points:
Before replacing the rear oil seal, read the instructions in section 3.8. Install the oil seal in the oil sump in the same way as recommended for installation in the cylinder block. Lubricate the seal with engine oil.
Apply sealant to the split surface of the oil sump and install the oil sump to the cylinder block. To fix the crankcase, tighten one mounting bolt from the front and rear sides. Install and tighten the bolts of the lower half of the oil pan, and then evenly tighten the bolts of the upper half of the oil pan.
Fix and install the remaining parts and assemblies and the assembled engine, fill in engine oil. Start the engine and check all connections for leaks.