Cars BMW Cars Volkswagen Cars Chevrolet Cars Land Rover Cars Lada Cars Honda Cars Peugeot
English Русский
Български
Беларускі
Український
Српски
Hrvatski
Română
Polski
Slovenský
Magyar
Bookmark News and articles Sitemap Feedback Site search
MercedesMan.ru


A-Class C-Class E-Class G-Class M-Class S-Class Others
W123 (1976-1985) W124 (1984-1995) W210 (1996-2002)
  • Main
  • E-Class
  • W210 (1996-2002)
  • Diesel engines
  • Injection system
  • Accelerator pedal drive

Accelerator pedal drive (Mercedes-Benz E-Class W210)

0
Contents: Adjusting the accelerator pedal drive ↡ Adjusting the full throttle on the…↡ Replacing the accelerator drive ↡
If the pedal simply "sticks", lubricate it and "loose up" it. After each engine wash, be sure to lubricate the pedal rod and drive. Adjust the fuel supply control and install the pressure control for models with an automatic transmission at a service station.

Adjusting the accelerator pedal drive


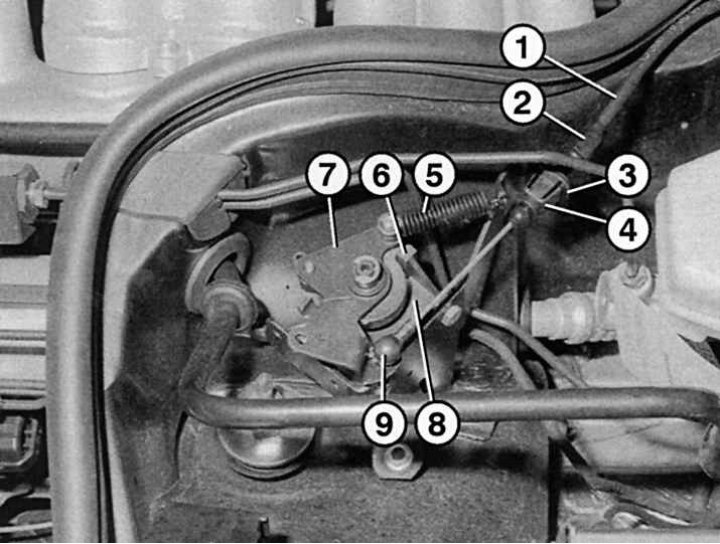
Fig. 4.82. Accelerator drive: 1 – pedal drive; 2 – adjusting nut; 3 – support socket; 4 – fixing…

Fig. 4.82. Accelerator drive: 1 – pedal drive; 2 – adjusting nut; 3 – support socket; 4 – fixing bracket; 5 – return spring; 6 – rocker arm limiter of the sensor lever; 7 – set value sensor lever; 8 – set value sensor; 9 – ball joint of rotation sensor


1. Open the hood. Check the sensor drive for free movement. If it does not operate properly, replace the corresponding parts (Fig. 4.82).


2. The sensor's rotary lever should fit freely against the limiter, and at the same time there should be no play on the accelerator pedal side.

3. Press the pedal until the pivot arm reaches the stop.

4. Turn the limiter in the opposite direction until it locks.

5. On vehicles with automatic transmission: press the accelerator pedal all the way down.

6. Use the adjusting nut to set the lever so that it fits freely against the limiter.

7. Release the pedal. Adjust the nut at the back of the pedal so that the lever rests on the stopper.

Adjusting the full throttle on the accelerator pedal


(Material based on data from the portal: mercedesman)


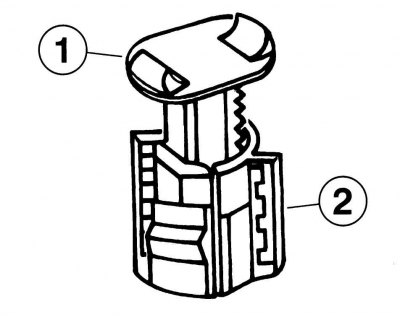
Fig. 4.83. Accelerator pedal stop: 1 - stop; 2 – limiter

Fig. 4.83. Accelerator pedal stop: 1 - stop; 2 – limiter


1. Turn to the left to release the full throttle stop 1 (Fig. 4.83) under the accelerator pedal and slightly loosen the limiter bolt 2.


2. Slowly press the accelerator pedal until the sensor pivot arm in the engine compartment rests on the limiter.

3. In this position, rotate the full throttle stop to the right until it locks with the pedal.

Replacing the accelerator drive


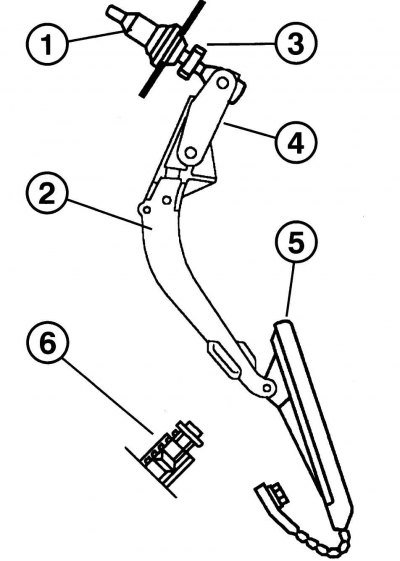
Fig. 4.84. Accelerator pedal parts: 1 – rubber tip, 2 – pedal lever, 3 – adjusting nut, 4 – lock, 5…

Fig. 4.84. Accelerator pedal parts: 1 – rubber tip, 2 – pedal lever, 3 – adjusting nut, 4 – lock, 5 – pedal, 6 – full throttle limiter (with automatic transmission – kick-down switch)


1. Remove the ball joint head from the set value sensor lever (Fig. 4.84).

2. Release the control cable holders.

3. Remove the trim around the pedals.

4. Remove the control cable from the accelerator pedal.

5. Pull the cable out from the outside of the cabin. Do not pull out the rubber cuff on the body.


6. Remove the cable from the engine compartment.

7. Before installing the cable, check the rubber parts and replace them if necessary.

8. Lubricate the cable and lever parts.

9. Put the cable back in place.
This article is available at: russian, bulgarian, belarusian, ukrainian, serbian, croatian, romanian, polish, slovak, hungarian
The article has been verified: Polyakov Zakhar Grigorievich
Share with friends:
◀ Previous
E-Class W210 / Injection system
Next ▶

Disassembling injectors
Removal injectors
Injection system maintenance
Engine shutdown
Possible turbocharger malfunctions, their causes and troubleshooting methods
Possible malfunctions of the diesel engine fuel system, their causes and methods of elimination
More similar articles for repairing other models

☛ Accelerator pedal stop — adjustment Mercedes W168 (1997-2004)
☛ Gearbox / final drive Mercedes W202 (1993-2000)
☛ Checking the condition of multi-rib belts for auxiliary drive units Mercedes W463 (1999-2019)
☛ Checking the condition of multi-rib belts for auxiliary drive units Mercedes W163 (1997-2005)
☛ Checking the condition of the ribbed belts of the serpentine drive of… Mercedes W140 (1991-1998)
☛ Clutch release drive using pedal Mercedes Vito 2 (2003-2014, diesel)
Link in different formats to this article
Comments and feedback from visitors
No comments yet


How much will 31 + 27 ?


W210 (1996-2002) 
  • General information
  • Vehicle description
  • Working conditions and tools
  • Car care
  • Diesel engines
  • Engine repair
  • Lubrication system
  • Cooling system
  • Injection system
  • Supply system
  • Exhaust system
  • Gasoline engines
  • Engine repair
  • Lubrication system
  • Cooling system
  • Control system
  • Power and exhaust system
  • Transmission
  • Clutch
  • Mechanical gearbox
  • Automatic gearbox
  • Drive shafts
  • Chassis
  • Car suspension
  • Steering
  • Tires and wheels
  • Brake system
  • Body
  • Exterior (external elements)
  • Interior (internal elements)
  • Doors and windows
  • Heating and ventilation
  • Electrical equipment
  • Equipment and devices
  • Power devices
  • Lighting and signaling
  • Electrical circuits
W124 (1984-1995) 
  • General information
  • Governing bodies
  • Driving and operation
  • Weekly care
  • Maintenance (gasoline)
  • Maintenance (diesel)
  • Troubleshooting
  • Power unit
  • I4 petrol engine
  • V6 petrol engine (SOHC)
  • V6 petrol engine (DOHC)
  • Diesel engines
  • Engine overhaul
  • Cooling system
  • Heating and ventilation
  • Fuel system (carburetor)
  • Injection system «Bosch CIS-E»
  • Injection system «Bosch HFM»
  • Diesel fuel system
  • Supply system
  • Starting and charging system
  • Ignition system (I4)
  • Ignition system (V6)
  • Preheating
  • Transmission
  • Clutch
  • Mechanical gearbox
  • Automatic gearbox
  • Drive shafts
  • Chassis
  • Brake system
  • Car suspension
  • Steering
  • Body
  • Exterior (external elements)
  • Interior (internal elements)
  • Doors, locks and windows
  • Electrical equipment
  • Equipment and devices
  • Switches
  • Headlights and lighting
  • Electrical circuits
W123 (1976-1985) 
  • General information
  • Introduction to the guide
  • Power unit
  • Engine device
  • Repair M102 engines
  • Repair M110 and M123 engines
  • Cooling and lubrication (M102)
  • Cooling (M110 and M123)
  • Ignition system
  • Power system «Stromberg»
  • Power system «Solex 4A1»
  • Fuel injection «K-Jetronic»
  • Fuel injection «L-Jetronic»
  • Transmission
  • Clutch
  • Mechanical gearbox
  • Automatic gearbox
  • Cardan and rear axle
  • Chassis
  • Front suspension
  • Rear suspension
  • Steering
  • Brake system
  • Body
  • Exterior (external elements)
  • Interior (internal elements)
  • Doors, locks and windows
  • Electrical equipment
  • Equipment and devices
  • Power devices
  • Electrical circuits
 
MercedesMan.ru © 2017–2026 · Mobile version · Read about Mercedes · Sitemap: EN BG BY UA RS HR RO PL SK HU · Feedback · Site search · Bookmark A-Class (W168) · C-Class (W201) · C-Class (W202) · C-Class (W203) · E-Class (W123) · E-Class (W124) · E-Class (W210) · G-Class (W463) · M-Class (W163) · S-Class (W116, petrol) · S-Class (W126, petrol) · S-Class (W140) · S-Class (W220) · Sprinter · Vito 1 · Vito 2 · Vario 814D ·
 
We only use cookies without which some of the site's features may not be available.