



Contents: Removal ↡ Installation ↡
To remove the gearbox, you need to lift the car as high as possible. Removing the gearbox requires a certain amount of experience. Therefore, only the basic provisions are described here, aimed at an experienced mechanic.
Removal
1. Disconnect the negative (-) battery cable with the ignition off. The cabin air filter box must be removed first.
Warning! Before disconnecting the cable, find out the radio receiver security code, if any, refer to Section Replacing the battery.
2. For safety reasons, insulate the terminal of the cable going to the negative pole of the battery to prevent accidental contact with the battery terminals.
3. Raise the vehicle and remove the lower trim, refer to Section Removal and installation the engine compartment cover from the bottom side.
Caution! Raise the gearbox slightly in the area of the rear engine/gearbox support using a garage jack and a wooden shim. Only then disconnect the rear engine/gearbox beam.
4. Place a support under the gearbox using a garage jack and a wooden block.
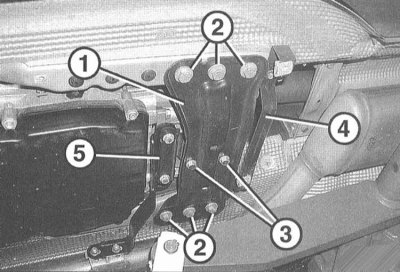
5. Remove the rear engine/gearbox beam (1) by unscrewing the mounting bolts (2) and (3).
6. Disconnect the engine compartment cover holder (4).
7. Disconnect the exhaust system bracket (5).
8. Remove the intake pipe (5).
9. Disconnect the rear muffler at the suspension in the area of the additional muffler, lower it a little and secure it in this position with wire.
10. Unscrew the ground strip from below between the gearbox and the body.
11. Remove the starter, refer to Section Removal and installation the starter.
12. Disconnect the speedometer inductive sensor connector.
13. Remove the propeller shaft, refer to the relevant section.
Attention! The driveshaft front flange remains on the driveshaft and not on the transmission.
14. Remove the gear shift rod cover from the gearbox and disconnect the rod from the gearbox.
15. Disconnect from the central block, having first removed the locking pin.
16. Disconnect the shift rod.
17. Disconnect the gearbox from the cylinder block.
18. Slowly lower the garage lift, lowering the gearbox slightly. Remove the gearbox horizontally back from the guide pins and remove it from the clutch.
19. Lower the gearbox.
Attention! Lower the gearbox only when the primary shaft of the gearbox has come out of the clutch disc, otherwise the clutch disc may be damaged.
Installation
1. Before installation, check the clutch, refer to Section Removal, installation and testing of the clutch.
2. Check the ease of movement of the clutch release bearing. If noise was heard from the clutch release bearing when disengaging the clutch before removal, replace the bearing.
Attention! In engines with a dual-mass flywheel, the splined connection of the clutch disc is nickel-plated. Therefore, the primary shaft of the gearbox does not need to be lubricated. A characteristic feature of the clutch disc for a dual-mass flywheel is the absence of damper springs.
3. Engines without dual mass flywheel: Clean the splined connection of the input shaft and lubricate with a thin layer of MoS2 grease, such as MOLYKOTE BR 2. Do not apply too much grease, otherwise the grease may get on the friction surfaces of the clutch, which will lead to clutch malfunctions. The required amount of grease corresponds to the size of a corn grain.
4. Raise the gearbox and insert it horizontally into the clutch. If the gearbox input shaft is not fixed in the clutch disc during installation, turn the shaft by hand from behind the flange for the cardan shaft.
5. Secure the gearbox to the engine with a torque of 40 Nm.
6. Install the starter, refer to Section Removal and installation the starter.
7. Connect the shift rod, having first lubricated the ball joint with a thin layer.
8. Connect to the central block and secure it with the locking pin.
9. Connect the shift rod to the gearbox and install the cover.
10. Connect the flanges of the propeller shaft and the gearbox. The tightening torques of the self-locking nuts of the propeller shaft flange to the gearbox are given in the Specifications.
11. Connect the speedometer inductive sensor connector.
12. Tighten the rear engine/transmission mount to the torques specified in the Specifications.
13. Secure the ground cable to the gearbox and body.
14. Secure the engine compartment cover holder (4).
15. Secure the exhaust pipe holder (5).
16. Reinstall the exhaust system, refer to Section Removal, installation of the exhaust system and leak testing.
17. Check the oil level in the gearbox, add oil if necessary, refer to Chapter Routine maintenance.
18. Check the gear shift adjustment, if necessary, adjust at a service station.
19. Install the lower engine compartment trim.
20. Lower the car onto its wheels.
21. Connect the negative (-) cable to the battery with the ignition off. Reinstall the cabin air filter box. Enter the radio code and set the clock.