
Cars BMW Cars Volkswagen Cars Chevrolet Cars Land Rover Cars Lada Cars Honda Cars Peugeot
English Русский
Български
Беларускі
Український
Српски
Hrvatski
Română
Polski
Slovenský
Magyar
Bookmark News and articles Sitemap Feedback Site search
MercedesMan.ru


A-Class C-Class E-Class G-Class M-Class S-Class Others
190 (W201) (1982-1993) W202 (1993-2000) W203 (2000-2007)
  • Main
  • C-Class
  • W203 (2000-2007)
  • Transmission
  • Clutch and drive shafts
  • Clutch — removal, inspection and installation

Clutch — removal, inspection and installation (Mercedes-Benz C-Class W203)

0
Contents: Removal ↡ Examination ↡ Installation ↡

Removal


1. Remove the manual transmission, refer to Section Removal and installation of gearbox.
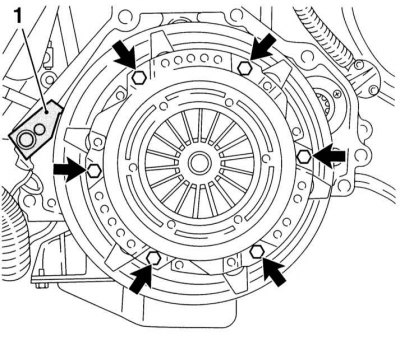
2. Loosen the Torx screws securing the clutch basket (arrows in the illustration) one after another…


2. Loosen the Torx screws securing the clutch basket (arrows in the illustration) one after another by 1 – 1Ѕ turns so as to relieve the disk. To prevent the flywheel from rotating when unscrewing the screws, hold it with a screwdriver or a clamp. Service stations use a special tool (1) for this purpose.

Caution: If the Torx screws are not loosened evenly, this may result in damage to the diaphragm springs.


3. Then unscrew the mounting screws completely.

Attention! Remember or write down the position of the driven clutch disc so that you can install it in its original position during assembly.


4. Remove the clutch basket and driven disc.

Caution! Do not allow the discs to fall when removing, otherwise problems with the clutch operation may occur after installation.


Examination


1. Check the pressure plate for overheating and grooves, replace if necessary.
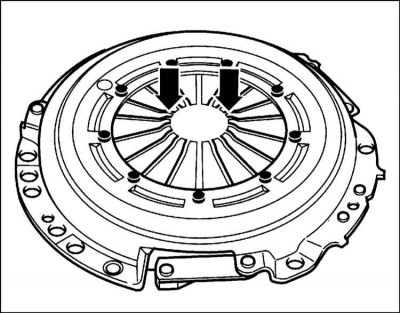
2. Check the wear of the diaphragm spring tongues and their height; if necessary, carefully bend…


2. Check the wear of the diaphragm spring tongues and their height; if necessary, carefully bend the ends of the springs.


Attention! Spring wear should not exceed 0.3 mm.


3. Check the connections of the pressure plate and basket for cracks, and the rivet connections for strength. Replace the basket with damaged or weak rivet connections.

4. Before installing the new clutch, remove the protective coating of the new clutch from the friction surfaces with solvent. Then clean the friction surfaces of the driven and pressure plates with coarse sandpaper.

5. Oily or mechanically damaged disc - replace.

6. Check the clutch release bearing in the gearbox housing for noise, leaks and wear, replace if necessary.

Installation
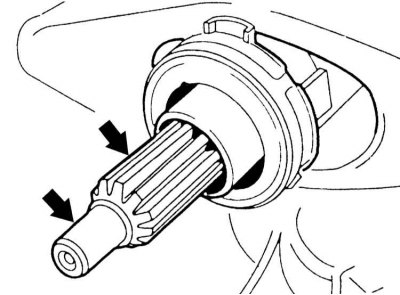


1. Clean the splined joints of the clutch disc and the gearbox input shaft and lubricate with a…


1. Clean the splined joints of the clutch disc and the gearbox input shaft and lubricate with a thin layer of MoS2 grease, for example, MOLYKOTE BR 2.

Caution! Do not apply too much grease, otherwise it may get on the friction surfaces of the clutch, which will lead to clutch malfunctions. The required amount of grease corresponds to the size of the corn grain.


In engines with a dual-mass flywheel, the splined connection is nickel-plated, which eliminates the need for lubrication. A dual-mass flywheel is characterized by the absence of damping springs.
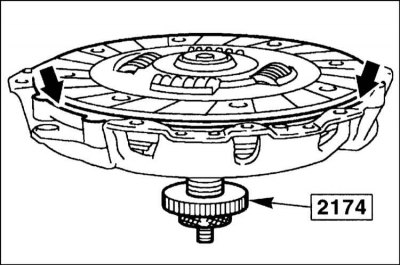


2. Center the clutch disc using a suitable drift, such as HAZET 2174 or the old secondary shaft of…


2. Center the clutch disc using a suitable drift, such as HAZET 2174 or the old secondary shaft of the gearbox. If the clutch disc is not centered, it will not be possible to insert the secondary shaft of the gearbox later.

3. Install the clutch basket with the centered clutch disc onto the corresponding pins in the flywheel.

4. Screw in the basket mounting screws by hand, then tighten them crosswise in several steps, each time by 1 - 1 ½ turn.

Caution! When tightening, make sure that the basket is pressed evenly against the flywheel. The tightening torque is specified in the Specifications.


5. Remove the centering punch.

6. Remove the flywheel locking tool if installed.

7. Install the manual transmission, refer to Section Removal and installation of gearbox.
This article is available at: russian, bulgarian, belarusian, ukrainian, serbian, croatian, romanian, polish, slovak, hungarian
The article has been verified: Rodionov Artyom Semyonovich
Share with friends:
◀ Previous
C-Class W203 / Clutch and drive shafts
Next ▶

Clutch design and description
Clutch and Drive Shaft Specifications
Bleeding the clutch drive, replacing the hydraulic fluid
Removal and installation the propeller shaft
Design and description of wheel drive shafts
Removal and installation wheel drive shafts
Disassembling drive shafts and replacing protective covers
More similar articles for repairing other models

☛ General description of the clutch Mercedes W168 (1997-2004)
☛ Checking the cooling fan drive clutch Mercedes W123 (1976-1985)
☛ Description of the clutch design Mercedes W163 (1997-2005)
☛ Overdrive clutch Mercedes W140 (1991-1998)
☛ Viscous fan clutch Mercedes Sprinter (1995-2000, diesel)
Link in different formats to this article
Comments and feedback from visitors
No comments yet


How much will 36 + 37 ?


W203 (2000-2007) 
  • General information
  • Introduction to guide
  • User manual
  • Maintenance
  • Power unit
  • Gasoline engines
  • Diesel engines
  • Cooling system
  • Ventilation and heating
  • Supply system
  • Injection system (gasoline)
  • Injection system (diesel)
  • Exhaust system
  • Ignition and control system
  • Charge and launch systems
  • Transmission
  • Mechanical gearbox
  • Automatic gearbox
  • Clutch and drive shafts
  • Differential
  • Chassis
  • Brake system
  • Car suspension
  • Steering
  • Body
  • Exterior (external elements)
  • Interior (internal elements)
  • Electrical equipment
  • Equipment and devices
  • Lighting system
  • Electrical diagrams (2000)
  • Electrical diagrams (since 2001)
W202 (1993-2000) 
  • General information
  • User manual
  • Driving a car
  • Car care
  • Maintenance
  • Power unit
  • Gasoline engines
  • Diesel engines
  • Lubrication system
  • Cooling system
  • Heating and ventilation
  • Ignition system
  • Fuel system
  • Injection system (gasoline)
  • Injection system (diesel)
  • Exhaust system
  • Transmission
  • Clutch
  • Car gearbox
  • Chassis
  • Suspension, wheels and tires
  • Steering
  • Brake system
  • Body
  • Exterior (external elements)
  • Interior (internal elements)
  • Doors and windows
  • Electrical equipment
  • Equipment and devices
  • Power devices
  • Lighting system
  • Electrical circuits
190 (W201) (1982-1993) 
  • General information
  • Introduction to the guide
  • Operation and care
  • Maintenance (gasoline)
  • Maintenance (diesel)
  • Troubleshooting
  • Power unit
  • Petrol engine I4
  • Petrol engine V6
  • Diesel engines
  • Engine overhaul
  • Cooling and heating
  • Power system (carburetor)
  • Injection system (gasoline)
  • Injection system (diesel)
  • Exhaust system
  • Charge and start system
  • Ignition system (I4)
  • Ignition system (V6)
  • Diesel heating system
  • Transmission
  • Clutch
  • Mechanical gearbox
  • Automatic gearbox
  • Cardan shaft and axle shafts
  • Chassis
  • Brake system
  • Car suspension
  • Steering
  • Body
  • Exterior (external elements)
  • Interior (internal elements)
  • Doors, locks and windows
  • Electrical equipment
  • Equipment and devices
  • Electrical circuits
 
MercedesMan.ru © 2017–2026 · Mobile version · Read about Mercedes · Sitemap: EN BG BY UA RS HR RO PL SK HU · Feedback · Site search · Bookmark A-Class (W168) · C-Class (W201) · C-Class (W202) · C-Class (W203) · E-Class (W123) · E-Class (W124) · E-Class (W210) · G-Class (W463) · M-Class (W163) · S-Class (W116, petrol) · S-Class (W126, petrol) · S-Class (W140) · S-Class (W220) · Sprinter · Vito 1 · Vito 2 · Vario 814D ·
 
We only use cookies without which some of the site's features may not be available.