
Cars BMW Cars Volkswagen Cars Chevrolet Cars Land Rover Cars Lada Cars Honda Cars Peugeot
English Русский
Български
Беларускі
Український
Српски
Hrvatski
Română
Polski
Slovenský
Magyar
Bookmark News and articles Sitemap Feedback Site search
MercedesMan.ru


A-Class C-Class E-Class G-Class M-Class S-Class Others
190 (W201) (1982-1993) W202 (1993-2000) W203 (2000-2007)
  • Main
  • C-Class
  • W203 (2000-2007)
  • Transmission
  • Clutch and drive shafts
  • Bleeding the clutch drive, replacing the hydraulic fluid

Bleeding the clutch drive, replacing the hydraulic fluid (Mercedes-Benz C-Class W203)

0
Contents: 6-speed manual transmission ↡ Security measures ↡ Removal air without using a special…↡ Removal air using a device ↡

6-speed manual transmission


Air must be removed from the clutch hydraulic system if the clutch pedal does not return or returns slowly, the clutch disengages poorly, or if the hydraulic system has been opened.

Security measures


Since the hydraulic clutch system works with brake fluid, it is necessary to familiarize yourself with the materials of Chapter Brake system.

Brake fluid is poisonous and damages the paintwork of your car.

Attention! During the process of air removal described here, some volume of air may remain in the system. A sign of this is scratching and incomplete disengagement of the clutch. In this case, air from the clutch hydraulic system must be immediately removed at a service station using a special device.


Removal air without using a special device


1. Check the level in the brake fluid reservoir, if necessary, add fluid to the system, refer to Chapter Routine maintenance.

Attention! Do not allow the liquid level in the tank to drop, constantly add liquid.


Note: The operation of lifting and installing the vehicle on stands is associated with danger! Therefore, before carrying out the operation, read Section Jacking and towing Introduction to the manual.


2. Raise and place the vehicle on stands.

3. Remove the bottom cover.
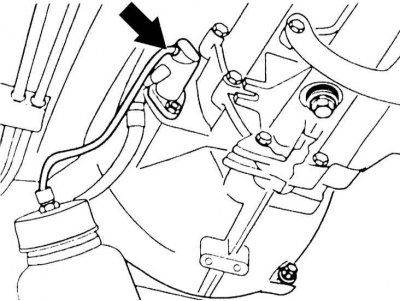
4. Remove the dust cap from the air bleed nipple (arrow on the working cylinder). Place a…


4. Remove the dust cap from the air bleed nipple (arrow on the working cylinder). Place a transparent hose on the fitting.


Note: The accompanying illustration is for informational purposes only and does not fully correspond to the model described.


5. Carefully rotate the nipple. Use a spanner to open it so as not to damage the hexagon of the nipple.

6. Place the free end of the hose in a container with brake fluid so that air does not enter the system during the bleeding process.

7. Ask an assistant to press the clutch pedal all the way down about 10 times and then leave the pedal depressed.

8. In this position, open the bleed screw, and the brake fluid will start to flow out. When there is no more air in the flowing fluid or if the fluid pressure drops, close the bleed screw.

Attention! Do not allow the fluid level in the tank to drop significantly, add new fluid all the time.


9. Release the clutch pedal and press it again 10 times. Keeping the pedal in this position, open the nipple. Repeat this procedure as many times as necessary until no air bubbles are visible in the hose. At the same time, constantly add new fluid to the reservoir.

Caution! If the brake fluid needs to be completely replaced, bleed the air until new fluid appears in the hose. This is indicated by a lighter color.


10. Close the nipple on the slave cylinder. Remove the hose and put on the dust cap.

11. Replace the bottom cover.

12. Fill the tank with liquid up to the MAX mark.

13. Check the operation of the brake system and clutch.

Removal air using a device


At the service station, air is removed from the clutch system, as a rule, using a special device. This device creates fluid pressure in the system. Below is a description of only the differences from the above-described method of removing air without using a device.


1. Connect the device to the brake fluid reservoir as described by the manufacturer.

2. Remove the dust cap from the air bleed nipple on the clutch slave cylinder. Attach a hose to the nipple. Place the end of the hose in a bottle of brake fluid.

3. Open the nipple and keep it open until air stops escaping, then close the nipple.

Caution! If the brake fluid needs to be completely replaced, bleed the air until new fluid appears in the hose. This is indicated by a lighter color.


4. Place the dust cap on the nipple.

5. Remove the air bleeder.

6. Fill the reservoir with brake fluid to the MAX mark and close the reservoir.
This article is available at: russian, bulgarian, belarusian, ukrainian, serbian, croatian, romanian, polish, slovak, hungarian
The article has been verified: Rodionov Artyom Semyonovich
Share with friends:
◀ Previous
C-Class W203 / Clutch and drive shafts
Next ▶

Clutch — removal, inspection and installation
Clutch design and description
Clutch and Drive Shaft Specifications
Removal and installation the propeller shaft
Design and description of wheel drive shafts
Removal and installation wheel drive shafts
Disassembling drive shafts and replacing protective covers
More similar articles for repairing other models

☛ Clutch drive — bleeding air and replacing fluid in the hydraulic drive Mercedes W168 (1997-2004)
☛ Bleeding the Clutch Hydraulic Drive Mercedes W123 (1976-1985)
☛ Bleeding air from the hydraulic circuit of the differential lock drive Mercedes W463 (1999-2019)
☛ Bleeding air from the clutch hydraulic circuit Mercedes W163 (1997-2005)
☛ Bleeding the hydraulic clutch drive Mercedes W126 (1979-1991, petrol)
☛ Bleeding the clutch hydraulic drive Mercedes Sprinter (1995-2000, diesel)
Link in different formats to this article
Comments and feedback from visitors
No comments yet


How much will 22 + 44 ?


W203 (2000-2007) 
  • General information
  • Introduction to guide
  • User manual
  • Maintenance
  • Power unit
  • Gasoline engines
  • Diesel engines
  • Cooling system
  • Ventilation and heating
  • Supply system
  • Injection system (gasoline)
  • Injection system (diesel)
  • Exhaust system
  • Ignition and control system
  • Charge and launch systems
  • Transmission
  • Mechanical gearbox
  • Automatic gearbox
  • Clutch and drive shafts
  • Differential
  • Chassis
  • Brake system
  • Car suspension
  • Steering
  • Body
  • Exterior (external elements)
  • Interior (internal elements)
  • Electrical equipment
  • Equipment and devices
  • Lighting system
  • Electrical diagrams (2000)
  • Electrical diagrams (since 2001)
W202 (1993-2000) 
  • General information
  • User manual
  • Driving a car
  • Car care
  • Maintenance
  • Power unit
  • Gasoline engines
  • Diesel engines
  • Lubrication system
  • Cooling system
  • Heating and ventilation
  • Ignition system
  • Fuel system
  • Injection system (gasoline)
  • Injection system (diesel)
  • Exhaust system
  • Transmission
  • Clutch
  • Car gearbox
  • Chassis
  • Suspension, wheels and tires
  • Steering
  • Brake system
  • Body
  • Exterior (external elements)
  • Interior (internal elements)
  • Doors and windows
  • Electrical equipment
  • Equipment and devices
  • Power devices
  • Lighting system
  • Electrical circuits
190 (W201) (1982-1993) 
  • General information
  • Introduction to the guide
  • Operation and care
  • Maintenance (gasoline)
  • Maintenance (diesel)
  • Troubleshooting
  • Power unit
  • Petrol engine I4
  • Petrol engine V6
  • Diesel engines
  • Engine overhaul
  • Cooling and heating
  • Power system (carburetor)
  • Injection system (gasoline)
  • Injection system (diesel)
  • Exhaust system
  • Charge and start system
  • Ignition system (I4)
  • Ignition system (V6)
  • Diesel heating system
  • Transmission
  • Clutch
  • Mechanical gearbox
  • Automatic gearbox
  • Cardan shaft and axle shafts
  • Chassis
  • Brake system
  • Car suspension
  • Steering
  • Body
  • Exterior (external elements)
  • Interior (internal elements)
  • Doors, locks and windows
  • Electrical equipment
  • Equipment and devices
  • Electrical circuits
 
MercedesMan.ru © 2017–2026 · Mobile version · Read about Mercedes · Sitemap: EN BG BY UA RS HR RO PL SK HU · Feedback · Site search · Bookmark A-Class (W168) · C-Class (W201) · C-Class (W202) · C-Class (W203) · E-Class (W123) · E-Class (W124) · E-Class (W210) · G-Class (W463) · M-Class (W163) · S-Class (W116, petrol) · S-Class (W126, petrol) · S-Class (W140) · S-Class (W220) · Sprinter · Vito 1 · Vito 2 · Vario 814D ·
 
We only use cookies without which some of the site's features may not be available.