
Cars BMW Cars Volkswagen Cars Chevrolet Cars Land Rover Cars Lada Cars Honda Cars Peugeot
English Русский
Български
Беларускі
Український
Српски
Hrvatski
Română
Polski
Slovenský
Magyar
Bookmark News and articles Sitemap Feedback Site search
MercedesMan.ru


A-Class C-Class E-Class G-Class M-Class S-Class Others
190 (W201) (1982-1993) W202 (1993-2000) W203 (2000-2007)
  • Main
  • C-Class
  • W203 (2000-2007)
  • Power unit
  • Exhaust system
  • Removal and installation of the exhaust system

Removal and installation of the exhaust system (Mercedes-Benz C-Class W203)

0
Contents: Removal ↡ Installation ↡

Removal


Attention!
  • When installing the exhaust system, make sure that the individual components of the system fit tightly together. Otherwise, incorrect results may be obtained when monitoring exhaust gases.
  • 6-cylinder engines have a dual-flow exhaust system with twin pipes. Work with this system is carried out in the same way as with the single-flow system described below.
  • The operation of lifting and installing the car on stands is associated with danger! Therefore, before carrying out the operation, read the Section Jacking and towing Introduction to the manual.


1. Raise and support the vehicle on stands.

2. Remove the lower engine compartment trim, refer to Section Removal and installation the engine compartment cover from the bottom side.

3. Spray all bolts and nuts of the exhaust system with rust remover. Wait for a while.

4. Petrol engine: Remove the lambda probe connectors from the holders and disconnect them.

5. Gasoline engine: Disconnect the intake pipe from the exhaust manifold.

6. Diesel engine: Disconnect the inlet pipe from the pre-catalytic converter by pressing the clamp.

7. Place wooden supports under the exhaust system or have an assistant support the system.
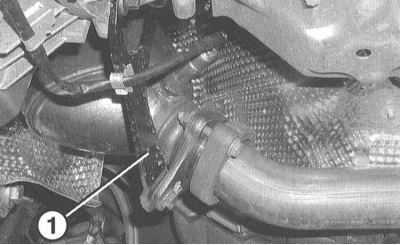
8. Disconnect the bracket (1) of the exhaust pipe. The illustration shows the 271 engine.

8. Disconnect the bracket (1) of the exhaust pipe. The illustration shows the 271 engine.


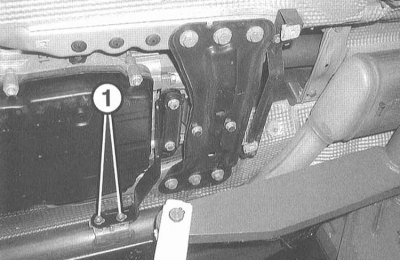
9. Unscrew the nuts (1) on the gearbox holder. Remove the threaded plate lying underneath. The…


9. Unscrew the nuts (1) on the gearbox holder. Remove the threaded plate lying underneath. The illustration shows the 611 engine.

10. 6-cylinder petrol engine 112: Disconnect the exhaust system bracket from the bottom of the vehicle.

11. Lower the exhaust system as a set and remove it.

12. If necessary, disconnect the catalytic converter and additional muffler.

Attention! The used catalytic converter contains valuable materials that can be recycled. Mercedes-Benz service stations accept used converters, and their residual value is taken into account when purchasing a new converter.


Installation


1. Check the rubber supports and holder for cracks and damage, replace if necessary.

2. If used parts are to be reinstalled, sand the pipe flanges to remove combustion products and rust. Be sure to use new sealing gaskets, bolts and nuts. To facilitate the process of loosening bolts and nuts, it is recommended to lubricate them with high-temperature copper paste before installation.

Caution! Do not allow high-temperature paste to enter the exhaust system before the catalytic converter. Liquid sealants are also not allowed, as the catalytic converter may be contaminated.


3. Gasoline engine: Install the exhaust pipe with a new gasket and secure it to the exhaust manifold without tightening it.

4. Diesel engine: Install the intake pipe with a new sealing cone onto the pre-catalytic converter and secure with a clamp.
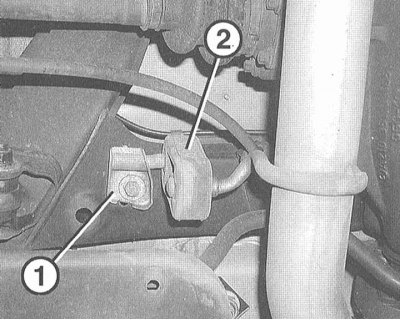
5. Install the exhaust system holder (1) with rubber supports (2) on the bottom of the car. Install…


5. Install the exhaust system holder (1) with rubber supports (2) on the bottom of the car. Install the exhaust pipe freely, without stretching it. The distance of the exhaust system elements to any part of the car should be at least 25 mm.

Article borrowed from the web portal MercedesMAN.ru
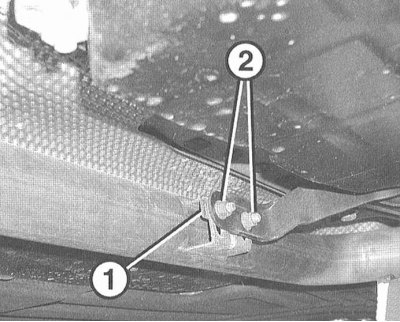
6. Install the threaded plate (1) of the exhaust pipe holder. Be sure to replace the nuts (2) on…


6. Install the threaded plate (1) of the exhaust pipe holder. Be sure to replace the nuts (2) on the exhaust pipe holder with new ones and tighten to a torque of 20 Nm.
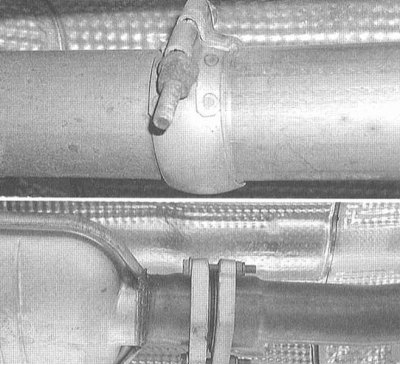


7. Tighten the connecting flanges and clamps of the inlet pipe to a torque of 20 Nm.


7. Tighten the connecting flanges and clamps of the inlet pipe to a torque of 20 Nm.

8. Petrol engine: Connect the lambda probe connectors and secure them to the holders.

9. Start the engine and check the exhaust system for leaks.

10. Install the engine compartment lower trim, refer to Section Removal and installation the engine compartment cover from the bottom side.

11. Lower the car onto its wheels.
This article is available at: russian, bulgarian, belarusian, ukrainian, serbian, croatian, romanian, polish, slovak, hungarian
The article has been verified: Rodionov Artyom Semyonovich
Share with friends:
◀ Previous
C-Class W203 / Exhaust system
Next ▶

Exhaust system — general information
Checking the tightness of the exhaust system
Emission Control Systems — General Information
Catalytic converter
Turbocharger — General Information and Precautions
Belt driven blown air compressor
More similar articles for repairing other models

☛ Exhaust system — visual inspection Mercedes W168 (1997-2004)
☛ Exhaust system — general description Mercedes W210 (1996-2002)
☛ Removal and installation of the exhaust system Mercedes W463 (1999-2019)
☛ Checking the condition of the exhaust system Mercedes W163 (1997-2005)
☛ Checking the condition of the exhaust system Mercedes W140 (1991-1998)
☛ Removal and installation of the exhaust system Mercedes Sprinter (1995-2000, diesel)
Link in different formats to this article
Comments and feedback from visitors
No comments yet


How much will 33 + 24 ?


W203 (2000-2007) 
  • General information
  • Introduction to guide
  • User manual
  • Maintenance
  • Power unit
  • Gasoline engines
  • Diesel engines
  • Cooling system
  • Ventilation and heating
  • Supply system
  • Injection system (gasoline)
  • Injection system (diesel)
  • Exhaust system
  • Ignition and control system
  • Charge and launch systems
  • Transmission
  • Mechanical gearbox
  • Automatic gearbox
  • Clutch and drive shafts
  • Differential
  • Chassis
  • Brake system
  • Car suspension
  • Steering
  • Body
  • Exterior (external elements)
  • Interior (internal elements)
  • Electrical equipment
  • Equipment and devices
  • Lighting system
  • Electrical diagrams (2000)
  • Electrical diagrams (since 2001)
W202 (1993-2000) 
  • General information
  • User manual
  • Driving a car
  • Car care
  • Maintenance
  • Power unit
  • Gasoline engines
  • Diesel engines
  • Lubrication system
  • Cooling system
  • Heating and ventilation
  • Ignition system
  • Fuel system
  • Injection system (gasoline)
  • Injection system (diesel)
  • Exhaust system
  • Transmission
  • Clutch
  • Car gearbox
  • Chassis
  • Suspension, wheels and tires
  • Steering
  • Brake system
  • Body
  • Exterior (external elements)
  • Interior (internal elements)
  • Doors and windows
  • Electrical equipment
  • Equipment and devices
  • Power devices
  • Lighting system
  • Electrical circuits
190 (W201) (1982-1993) 
  • General information
  • Introduction to the guide
  • Operation and care
  • Maintenance (gasoline)
  • Maintenance (diesel)
  • Troubleshooting
  • Power unit
  • Petrol engine I4
  • Petrol engine V6
  • Diesel engines
  • Engine overhaul
  • Cooling and heating
  • Power system (carburetor)
  • Injection system (gasoline)
  • Injection system (diesel)
  • Exhaust system
  • Charge and start system
  • Ignition system (I4)
  • Ignition system (V6)
  • Diesel heating system
  • Transmission
  • Clutch
  • Mechanical gearbox
  • Automatic gearbox
  • Cardan shaft and axle shafts
  • Chassis
  • Brake system
  • Car suspension
  • Steering
  • Body
  • Exterior (external elements)
  • Interior (internal elements)
  • Doors, locks and windows
  • Electrical equipment
  • Equipment and devices
  • Electrical circuits
 
MercedesMan.ru © 2017–2026 · Mobile version · Read about Mercedes · Sitemap: EN BG BY UA RS HR RO PL SK HU · Feedback · Site search · Bookmark A-Class (W168) · C-Class (W201) · C-Class (W202) · C-Class (W203) · E-Class (W123) · E-Class (W124) · E-Class (W210) · G-Class (W463) · M-Class (W163) · S-Class (W116, petrol) · S-Class (W126, petrol) · S-Class (W140) · S-Class (W220) · Sprinter · Vito 1 · Vito 2 · Vario 814D ·
 
We only use cookies without which some of the site's features may not be available.