
Removing
1. Remove engine top covers, refer to appropriate section.
2. Remove the nozzles, refer to Section Removal and installation of nozzles.
3. Remove the cylinder head cover, refer to the appropriate section.
4. Set the piston of the first cylinder to the TDC position.
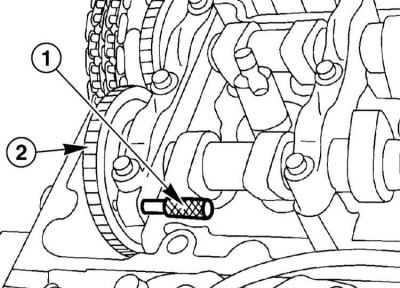
5. Lock the intake camshaft. To do this, insert the locking pin (1) through the cover of the first bearing of the camshafts into the hole in the sprocket of the intake valve shaft (2).
6. Remove the chain tensioner, refer to the appropriate section.
7. Remove the front cover, refer to the relevant section.
8. Remove the top slide rail, refer to the appropriate section.
9. Mark the camshaft sprocket in relation to the chain.
Note. If the camshaft should not rotate during subsequent work, connect the sprocket and chain with a cable connector.
10. Disconnect the sprocket from the exhaust camshaft and remove it. When doing this, remember about the guide pins. Remove the sprocket along with the chain.
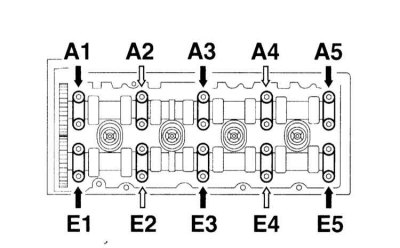
11. Engine 611: Remove the camshaft bearing caps:
- Turn away bolts of fastening of covers E1, E3, E5, and also A1, A3 and A5. At the same time, pay attention to the marking of the covers for subsequent installation.
- Loosen the bolts securing the bearing caps E2, E4 and A2, A4 in several steps, one turn each time, so as to relieve the camshaft back pressure. Make sure that the camshafts do not warp when loosening the bolts. Completely turn out bolts and remove covers.
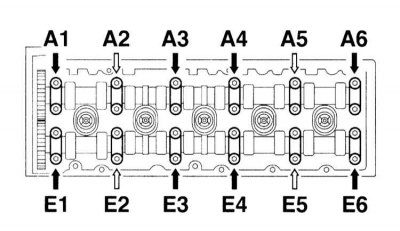
12. Engine 612: Remove the camshaft bearing caps as follows:
- Turn away bolts of fastening of covers E1, E3, E4, E6, and also A1, A3, A4 and A6. At the same time, pay attention to the marking of the covers for subsequent installation.
- Loosen the bolts securing the bearing caps E2, E5 and A2, A5 in several steps, one turn each time, so as to relieve the camshaft back pressure. Make sure that the camshafts do not warp when loosening the bolts. Completely turn out bolts and remove covers.
13. Remove the intake and exhaust camshafts.
Installation
1. Lubricate the tappet and camshaft bearing journals with clean engine oil. Check the ease of movement of the pushers.
2. Install the intake and exhaust camshafts and align them with the thrust bearing. In this case, pay attention to the location of the shafts. Shafts are marked at the point of contact with the thrust bearing.
- 01 Intake camshaft.
- 00 Exhaust camshaft.
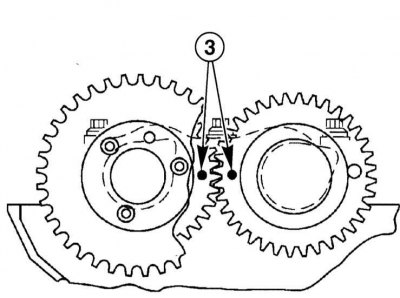
3. Install the camshafts so that the holes (3) in the sprockets of the camshafts were opposite each other and the markings of the camshaft and the bearing cover coincided.
Attention! Camshafts are very sensitive to overvoltages and can break. Therefore, make sure that the installation does not lead to any overload of the shafts.
4. Turn the crankshaft in the opposite direction to the position of the piston of the first cylinder 30°before TDC.
5. Install the bearing caps according to their markings.
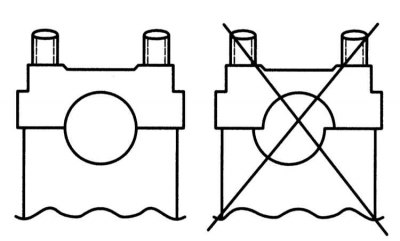
Attention! Bearing caps are asymmetrical. Make sure they are not moved.
6. Engine 611: Attach the camshaft bearing caps as follows:
- Tighten bolts of fastening of covers E2, E4; and A2, A4 in several steps, each time for one turn. Tighten the caps to 9Nm. Make sure that the camshafts do not warp when tightening the bolts.
- Wrap the bearing caps E1, E2, E5, as well as A1, A3, A5 with a torque of 9Nm.
7. Engine 612: Attach the camshaft bearing caps as follows:
- Tighten bolts of fastening of covers E2, E5; and A2, A5 in several steps, each time for one turn. Tighten the caps to 9Nm. Make sure that the camshafts do not warp when tightening the bolts.
- Tighten the bearing caps E1, E3, E4, E6 and A1, A3, A4, A6 with a torque of 9 Nm.
8. Set the piston of the first cylinder to the TDC position.
9. Lock the intake camshaft. To do this, insert the locking pin through the first bearing cap into the hole in the intake valve shaft sprocket.
10. Install the sprocket with the chain on the intake camshaft, paying attention to the guide pin.
11. Fasten the sprocket with new bolts to a torque of 18Nm. Cut and remove the cable connector if necessary.
12. Install the top rail, refer to the appropriate section.
13. Install the chain tensioner with a new O-ring, refer to the appropriate section.
17. Install engine top covers, refer to appropriate section.