
Fuel distribution line with injectors
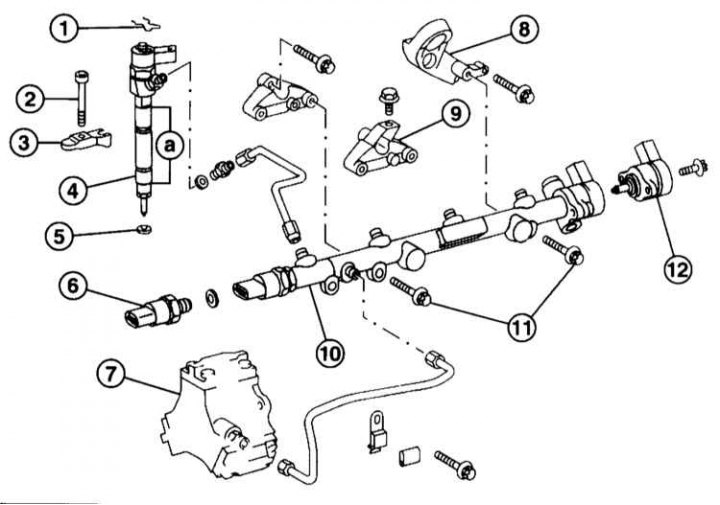
1 - Retaining spring; 2 - Screw, 7Nm + 90°; 3 - Coupling collar; 4 - Nozzle; 5 - O-ring; 6 - Pressure sensor, 22Nm, engine 611 to factory No. 86512: 20Nm; 7 - injection pump; 8 - Holder, fuel distribution line to cylinder head; 9 - Holder, fuel line to cylinder head; 10 - Fuel distribution line; 11 - Bolt; 12 - Pressure control valve, tightening torque: 1st stroke 3Nm, 2nd stroke 5Nm; A - When installing the nozzle, lubricate with a thin layer of special grease only in this range.
Removing
Note. The removal of one injector is described, the procedure for other injectors is similar.
1. Remove the engine top covers, refer to Section Removal and installation of the top cover of the engine.
2. Disconnect the injector connector.
3. Remove the injection line leading to the injector. When loosening the union nut, hold the nozzle with a wrench.
Attention! Do not deform pipelines during removal. After removing the pipeline, close the ends. Make sure that dirt does not get into the pipelines. Check the connecting cones of the injection pipelines. Replace the pipeline if there are dents.
4. Push in the retaining clip at the drain piping connection and disconnect the piping.
Attention! The retaining clip remains on the nozzle. If the bracket is removed, it will need to be replaced with a new one.
5. Remove the Torx screw on the tie strap.
6. Remove the nozzle from the threaded adapter together with the clamping collar using a suitable screwdriver.
Note. The firmly seated nozzle can be removed using an impact puller and a suitable grip. If the puller rests against the cylinder head, unscrew the cylinder head cover bolts or remove the injector with a threaded adapter.
Attention! When removed with a threaded adapter, the nozzle must be replaced as a set.
7. Clean the nozzle rod and nozzles with a wire brush, while cleaning the working part of the nozzle only with a highly absorbent cloth. Before cleaning the mounting shaft, close the nozzle hole in the shaft with a pin. Clean the mounting shaft first with a highly absorbent cloth, then with a round and cylindrical brush, then blow through and close. Then clean again with a highly absorbent cloth and close. After cleaning, remove the pin from the nozzle hole.
Note. Clean the nozzle shaft only by hand (do not use a drill for this). The nozzle must not be disassembled.
Installation
1. Apply a thin layer of special grease to the nozzle rod in the area «A», e.g. MERCEDES-BENZ 001 989 42 51 10.
Attention! Grease must not get on the working part of the nozzle and on the sealing ring.
2. Reinstall the nozzle with a new O-ring and tie-down strap.
3. Install a new Torx screw without tightening it.
Attention! The screw should turn easily. Otherwise, the thread must be passed with a lerkoy.
4. Turn away bolts of fastening of a fuel distributive highway. This is necessary to install the injection piping without additional effort.
5. Fasten the injection pipe to the nozzle with a union nut without tightening the nuts.
6. Tighten the fuel distribution line mounting bolts to 14Nm.
7. Tighten the new Torx screw of the clamping collar with a torque of 7 Nm. Then tighten the screw by 90° (½ turn).
8. Tighten the union nuts of the injection pipeline, holding the nozzle from turning. Tightening torque for new nut: 20Nm, for new nut: 25Nm.
Attention! Never exceed the tightening torque. Otherwise, the threaded fitting will not be unscrewed the next time it is unscrewed.
9. Replace the drain piping and secure it with a wire tie.
10. Connect the injector connector.
11. Install the engine top covers, refer to Section Removal and installation of the top cover of the engine.