



Contents: Wheel replacement ↡ Anti-skid chains ↡ Tire care ↡ Tire cleaning ↡ Tire storage ↡ Tire running-in ↡ Wheels - balancing ↡
Wheel replacement
When changing wheels, it is not advisable to change the direction of rotation of the tires. For some tires, the direction of rotation is indicated by an arrow on the sidewall and must be followed.
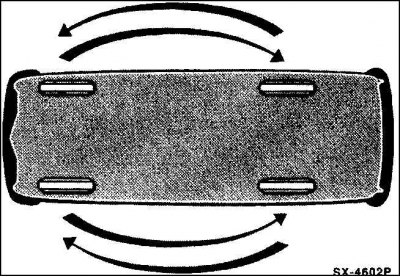
It is recommended to replace the front wheels with the rear wheels every 10,000 km. Thanks to this, all 4 wheels will have the same service life and the same wear.
Tighten the wheel bolts only with a torque wrench. This ensures that they are tightened evenly.
Replace tires not individually, but at least on one axle. In this case, install tires with a greater profile depth at the rear.
Caution! When replacing or removing tubeless tires, for safety reasons, it is essential to replace the rubber valve.
Remove any rust on the rim mating surface with a wire brush. To protect the wheel from corrosion, lightly lubricate the disc wheel seat on the hub at the front and rear with bearing grease each time it is removed.
1. Pry off the wheel cap with a screwdriver or remove it by hand, depending on the design.
2. Before removing, mark the position of the wheel relative to the hub with chalk or a felt-tip pen so that when re-installing the wheel, you can install it in the same position.
3. Light metal rims are protected from corrosion by a clear varnish coating. When replacing a wheel, try not to damage it; if necessary, improve the coating.
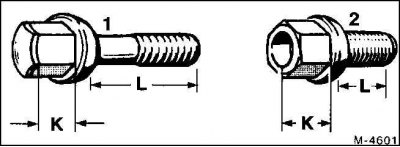
Attention! Bolts 1 (length L = 40 mm, K = 13.5 mm) are intended only for disc wheels made of light metal, bolts 2 (length L = 21 mm, K = 10.5 mm) are used only for steel disc wheels. If light metal rims are additionally mounted and a steel disc wheel is supplied as a spare wheel, it is recommended to have the corresponding bolts for the spare wheel in the tool kit.
4. Clean dirty threads with a wire brush. Do not lubricate bolts with oil or grease.
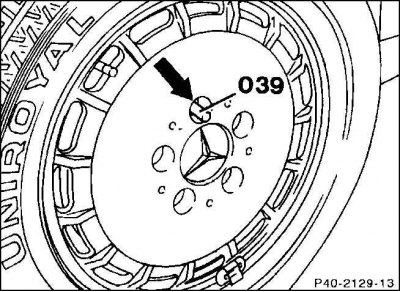
5. Before installing the light metal disc wheel, screw the mounting sleeve supplied with the spare wheel into the upper threaded hole.
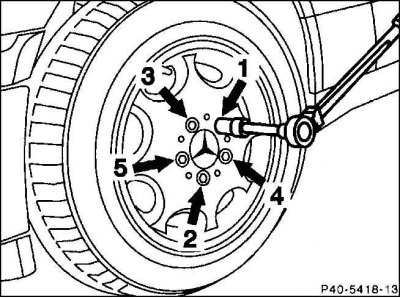
6. Tighten the wheel bolts crosswise in several passes.
Caution! If the bolts are tightened one-sided or not tight enough, the wheel or hub may be overtightened.
7. Tightening torque: 110 Nm for steel and light metal rims.
8. Put the wheel cover back on. When installing, put the cover on so that the valve fits more firmly into the slot provided for it. Steel rims should only be used with wheel covers installed to avoid damaging the tire valves.
9. For new wheels, tighten the wheel bolts after approximately 100 - 500 km to a torque of 110 Nm.
Anti-skid chains
The use of snow chains is permitted only on the rear axle. Remove wheel caps before fitting snow chains. Use only snow chains approved by Mercedes.
For vehicles with the ASR anti-slip system, use the anti-skid chain switch. When adjusting the vehicle height, set the vehicle to the highest ground clearance. Drive with anti-skid chains at a speed of no more than 50 km/h. Remove the anti-skid chains on snow-covered and ice-free roads.
Tire care
It is known that tires have a so-called "memory", and their unskilled use, for example, fast or frequent driving over stone curbs or rail edges, often manifests itself much later as their damage.
Tire cleaning
If possible, do not clean tires with a steam jet from a steam jet pump. If the nozzle of the steam jet pump is held too close to the tire surface, chaotic parabolic destruction of the rubber layer occurs within a few seconds. A tire cleaned in this way must be replaced for safety reasons.
(Material created based on the website: MERCEDESMAN.ru)
Tires that have been in contact with oil or grease for a long time are also subject to replacement. The tires swell at the contact points first, and then return to their normal shape and appear undamaged. However, their load-bearing capacity is reduced.
Tire storage
Tires should be stored in a cool, dark and dry place. They should not come into contact with oil and grease.
Store tires lying down or mounted on rims in a garage or basement.
Before removing the wheels, increase the air pressure in the tires slightly (about 0.3–0.5 bar).
For winter tires, use their own rims, as remounting tires to other rims is associated with additional costs.
Tire running-in
New tyres have a particularly slippery surface. Therefore, new tyres - this also applies to the new spare wheel - should be run in. During this running in, the surface of the tyres becomes rough as a result of initial wear. The first 300 km with new tyres should be driven especially carefully, especially in wet weather.
Wheels - balancing
Each time the tyres are remounted, the wheels must be rebalanced to compensate for the different weight distribution and unevenness of the material.
During the ride, the imbalance manifests itself through vibration and rumbling. The steering wheel then begins to shake slightly.
Typically, steering wheel vibration only occurs within a certain speed range and disappears when shifting to lower or higher gears.
This type of imbalance can cause damage to axle joints, steering gear and shock absorbers over time. Be sure to balance your wheels every 20,000 km and after each tire repair, as the distribution of mass and material changes as tires wear and repair.
Incorrect tire wear
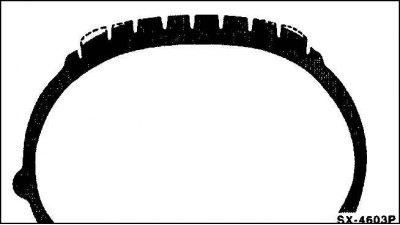
On the front wheels, slightly greater wear of the tire shoulders compared to the center of the tread is normal. Moreover, due to the slope of the road, the wear of the tire shoulders directed toward the center of the road is much more pronounced (left wheel: outside, right wheel: inside).
Uneven wear is usually caused by too little or too much air pressure in the tires, but can also be caused by improper wheel alignment or imbalance, or by a faulty shock absorber or rim.
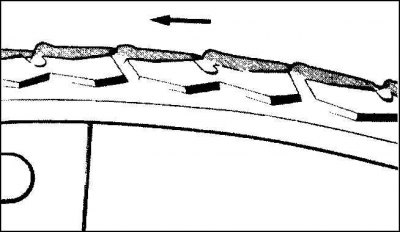
Saw-tooth wear of the tire profile is usually caused by overloading the vehicle.
First of all, pay attention to the correct air pressure in the tires, and check their condition at least every four weeks.
Check the air pressure only on cold tires. The tire pressure increases as they heat up during fast driving. However, do not deflate hot tires.
If the air pressure in the tires is too high, the center of the tread wears more because the high internal pressure causes the tire to be more bulged in the middle of the tread.
When the air pressure in the tires is too low, the tread wears more on the shoulders of the tire and the middle of the tread becomes convex inward. This results in greater wear on the shoulders of the tires.
Incorrect wheel alignment and wheel imbalance provide a typical picture of tire wear.