
Preparatory operations
1. Disconnect the hydraulic pump connector.
2. Turn on the ignition and shift gears in the entire range until the pressure in the gear shift hydraulic system is completely reduced.
3. Disconnect the negative cable from the battery.
4. Drain hydraulic oil.
5. Remove dirt around the gearbox oil drain plug.
6. Unscrew the drain plug (14) and drain the gearbox oil.
7. Remove the gearbox.
Gearbox disassembly
8. Remove guide pins (16).
9. Fix the gearbox on the stand.
10. Remove the flange (2) cardan shaft.
11. Remove the output shaft speed sensor (see paragraphs. 12-14).
12. Disconnect the connector (1) sensor (pic. VN 4.011).
13. Remove the screw (2).
14. Remove the sensor (3).
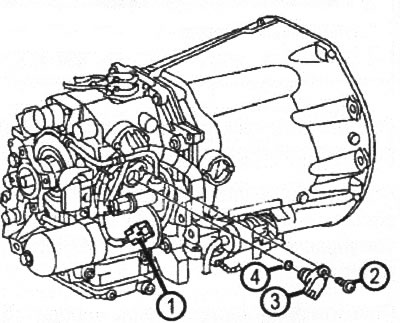
VN 4.011. Removal and installation of the output shaft speed sensor: 1. Speed sensor connector; 2. Screw; 3. Speed sensor; 4. O-ring
15. Remove the oil reservoir (see paragraphs. 16-19).
16. Disconnect the ventilation tube (2) (pic. VN 4.012) from the ventilation pipe (3).
17. Rotate the vent (3) 45°to the right and remove it.
18. Disconnect the connector (5) pressure sensor.
19. Remove the clamp (6).
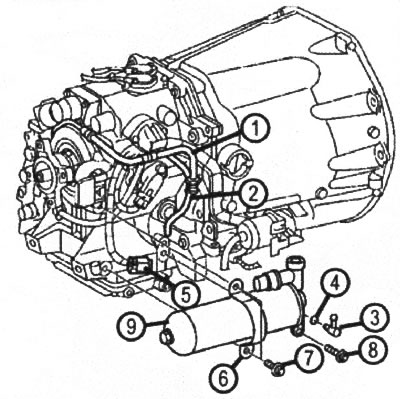
VN 4.012. Removal and installation of an oil receiver: 1. Pipeline; 2. Ventilation tube; 3. Ventilation pipe; 4. O-ring; 5. Hydraulic pressure sensor connector; 6. Collar; 7. Screw; 8. Screw; 9. Oil receiver
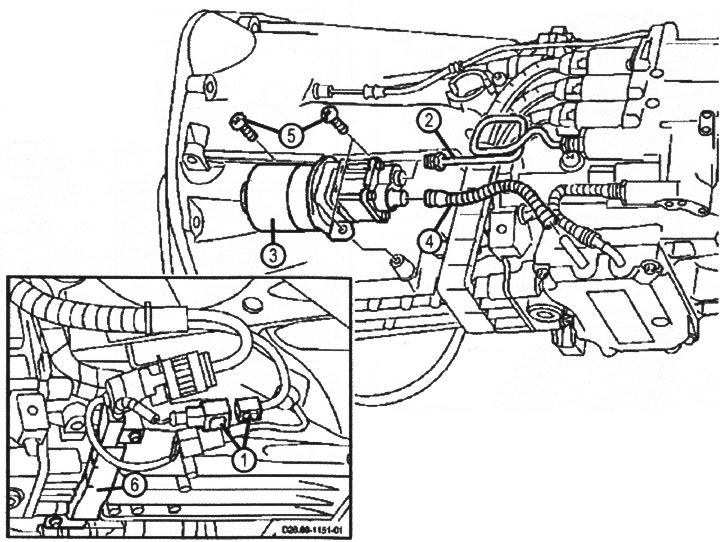
VN 4.013 Removal and installation of the hydraulic pump of the gearbox control drive: 1. Hydraulic pump power connector; 2. Outlet pipeline; 3. Hydraulic pump; 4. Receiving tube (oil inlet to the pump); 5. Screw
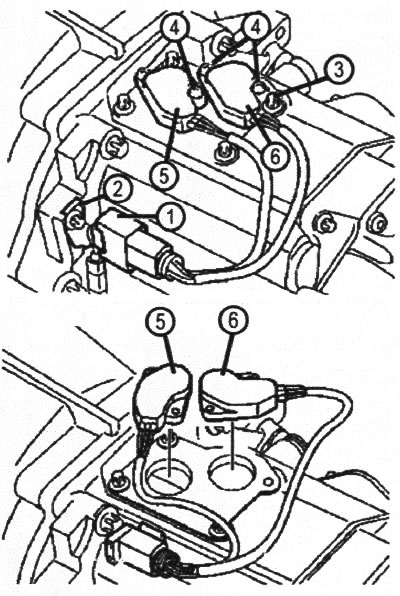
VN 4.014 Removing and installing angle sensors 1. Connector for angle sensors; 2. Bracket; 3. Screw; 4. Screw; 5. The sensor of the angle of rotation of the main shaft of the switching mechanism; 6. Gear sensor
20. Remove the hydraulic pump (see paragraphs. 21-24) (pic. VN 4.013).
21. Disconnect the connector (1).
22. Disconnect the pressure tube (2) from hydraulic pump (3).
23. Loosen the screws (5).
24. Disconnect the inlet tube (4).
25. Remove steering angle sensors (see paragraphs. 26-30).
26. Disconnect the connector (1) sensors (pic. VN 4.014).
27. Remove the rear right screw (3) fixing the mounting plate of the sensors.
28. Loosen the screws (4).
29. Rotate the sensor (5) approximately 45°to the right and remove it.
30. Rotate the sensor (6) approximately 45°to the left and remove it.
31. Remove the mounting plate (2) angle sensors (pic. VN 4.015).
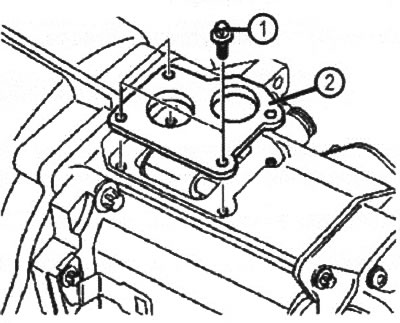
VN 4.015 Mounting plate for angle sensors: 1. Screw; 2. Mounting plate for angle sensors
32. Remove the hydraulic block (see paragraphs. 33-40)
33. Disconnect the pressure pipe from the oil receiver (pressure accumulator).
34. Remove the screw (3) (pic. VN 4.016) and remove the connecting sleeve (2) from the main drive shaft (1).
35. Disconnect the pipeline (4) control of the clutch mechanism from the hydraulic unit (5) (pic. VM 4.017).
36. Disconnect connectors (6) solenoid valves.
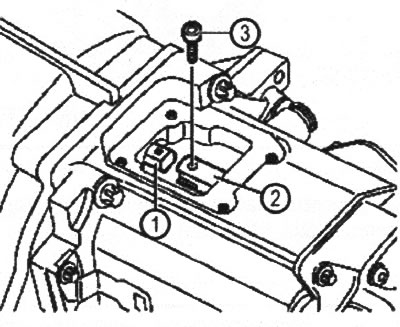
VN 4.016: 1. Main drive shaft; 2. Connecting sleeve; 3. Screw
37. Remove the return line (7) from the hydraulic block.
38. Disconnect the pressure pipe (8) from the hydraulic block (5).
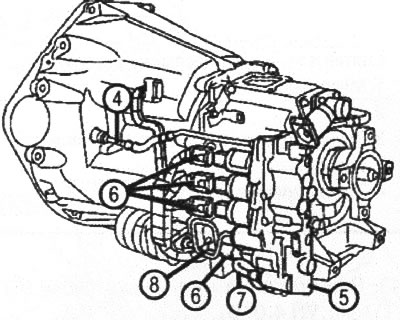
VN 4.017 Removing and installing the hydraulic unit: 4. Clutch control pressure tube; 5. Hydraulic gearbox control unit; 6. Sockets of electromagnetic valves of the hydraulic block; 7. Return tube; 8. Pressure tube
39. Loosen the screws (9) And (10) (pic. VN 4.018).
40. Raise the hydraulic unit using the lever (carefully) and extract it. The location of the lever is indicated by the arrow.
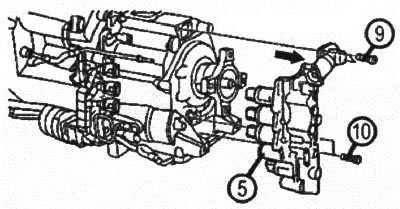
VN 4.018
41. Disconnect the pressure tube (11) from the hydraulic block (pic. VN 4.019).
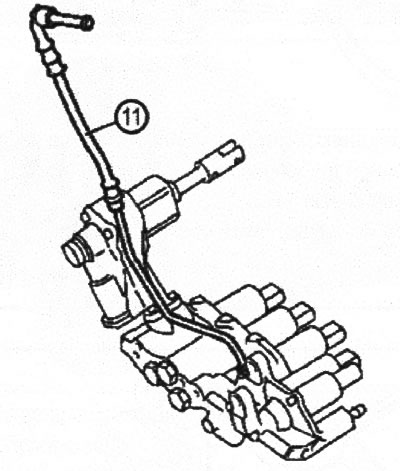
VN 4.019
42. Remove the hydraulic oil reservoir (pic. VN 4.020).
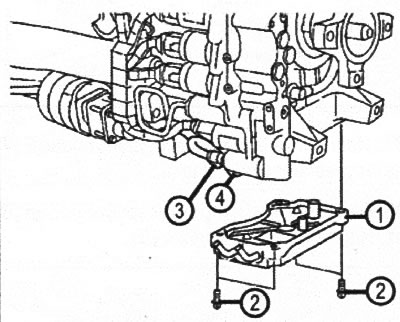
VN 4.020 Removing and installing oil reservoir: 1. Oil reservoir; 2. Screw; 3. Oil supply pipe to the hydraulic pump; 4. Oil return pipe
43. Remove ventilation tubes (6) And (7) (pic. VN 4.010).
44. Remove the vent pipe (15) and ventilation manifold (4).
45. Remove the reverse gear lock (3).
46. Remove bracket (8).
47. Disconnect the wiring harness (19).
48. Remove bracket (18).
49. Remove the clutch control mechanism (pic. VN 4.021).
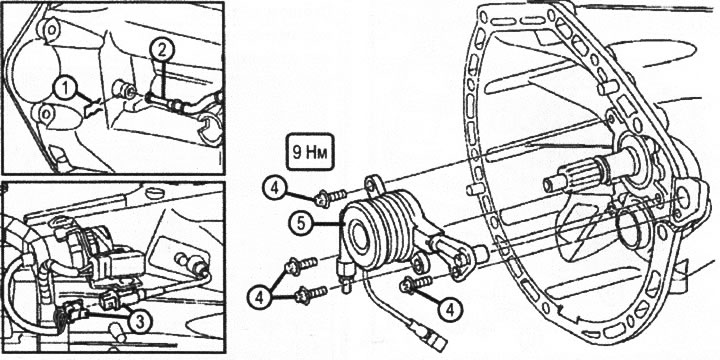
VN 4.021 Removing and installing clutch control mechanism:1. Retainer; 2. Control tube; 3. Clutch control position sensor connector; 4. Screws; 5. Clutch control mechanism
50. Remove the rear of the gearbox housing (pic. VN 4.022)
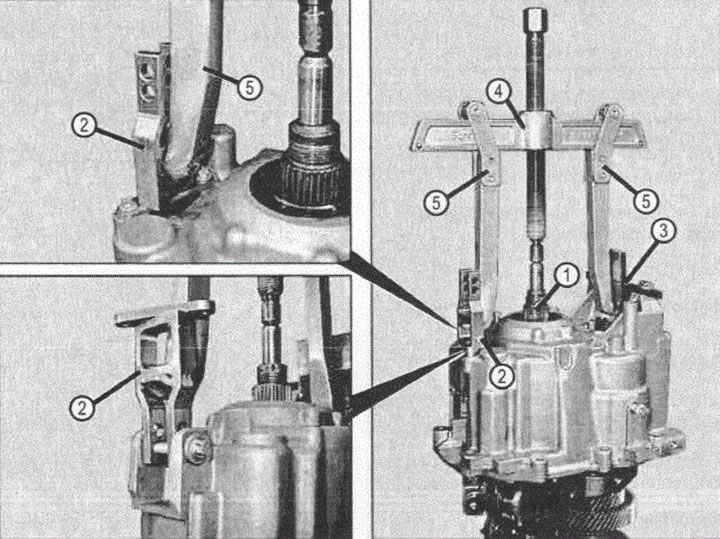
VN 4.022 Removing the rear of the gearbox housing: 1. Output shaft; 2.3. Special puller kit; 4. Universal puller; 5. Special grips
51. Remove the main shaft (1) gear change mechanism (pic. VN 4.023).
52. Remove 4 screws (2) fastening of the mechanism of a gear change.
53. Install the mounting plate (7) to primary (4) and intermediate (5) shafts
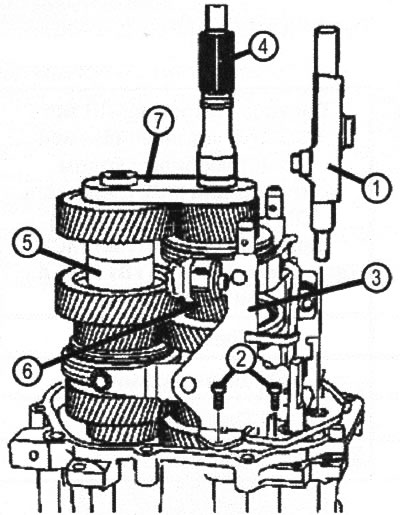
VN 4.023 Removing the gearshift main shaft: 1. The main shaft of the gear shift mechanism; 2. Screws; 3. Gear change mechanism; 4. Gearbox input shaft; 5. Intermediate shaft; 6. Main shaft; 7. Mounting plate
54. Remove the gearshift mechanism (3).
55. Remove the input shaft (7), intermediate shaft (5) and main shaft (6) (pic. VN 4.024).
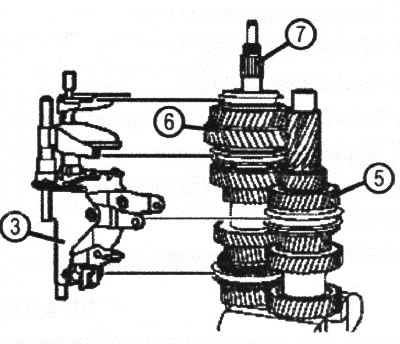
VN 4.024 Gearbox disassembly: 3. Gear change mechanism; 5. Intermediate shaft; 6. Main shaft; 7. Primary shaft
Gearbox assembly
56. Install the main, intermediate shafts with a gear shift mechanism.
57. Establish a back part of the case of a check point.
58. Install bracket (18) (pic. VN 4.010).
59. Fix the wiring harness (19).
60. Install bracket (8).
61. Enter fixative (3) reverse gear into the hole until it stops.
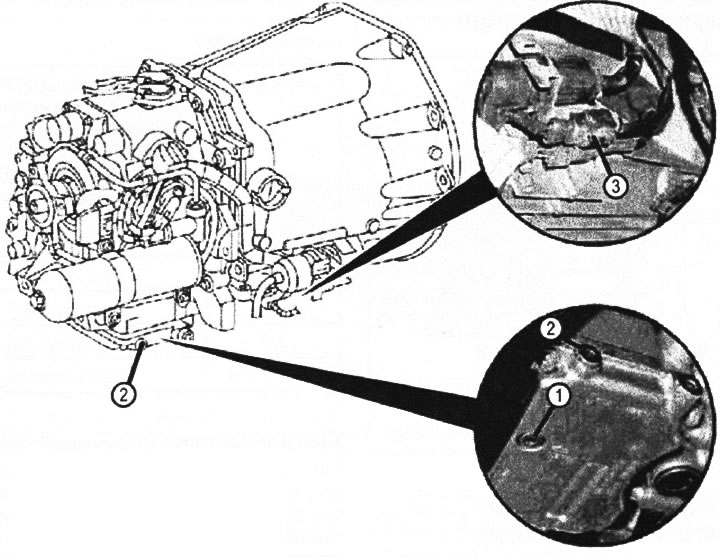
VN 4.025 Checking the oil level in the gearbox: 1. Drain plug; 2. Oil filter plug; 3. Two-pin connector (Х22/18)
62. Install ventilation ducts (15), (4), (6), (7).
63. Install the clutch release mechanism.
64. Install the oil reservoir.
65. Install the hydraulic block.
66. Establish a plate of fastening of gauges of an angle of rotation.
67. Install steering angle sensors (pic. VN 4.014). For this sensor (6), previously rotated by 90°, insert into place and fix it by turning to the right. Sensor (5), previously rotated 45°to the right, insert it into place and rotate it to the left. tighten screw (3), located in the right rear corner of the mounting plate of the steering angle sensors.
68. Connect the connectors (1) sensors and attach them to the bracket (4) (pic. VN 4.014).
69. Install hydraulic pump.
70. Install the speed sensor.
71. Replace the plug (1) (pic. VN 4.025) oil drain holes.
72. Unscrew the oil filter plug (2).
73. Fill in gear oil. The oil level should be 10mm below the edge of the oil fill hole.
74. Install the oil filter plug (2).
75. Install the oil reservoir (pressure accumulator).
76. Install dowel pins.
77. Install the checkpoint.