
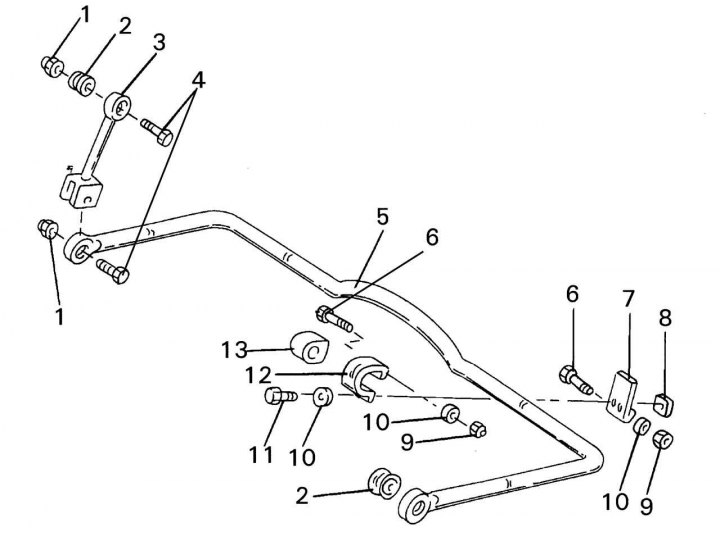
Pic. 255. Mounting rear anti-roll bar: 1 - nut M12; 2, 13 - silent blocks; 3 — stabilizer bar; 4 - bolt M12, 90–95 Nm; 5 - stabilizer bar; 6 - bolt M8, 20–25 Nm; 7 - holder; 8 - square nut; 9 - nut M8; 10 - washer; 11 - bolt M8; 12 - mounting bracket
On fig. 255 shows the mounting of the rear stabilizer to the rear axle. Stabilizer struts are used to attach it to the chassis. To remove the stabilizer, place the vehicle securely on supports. Removing the rear anti-roll bar should be done as follows:
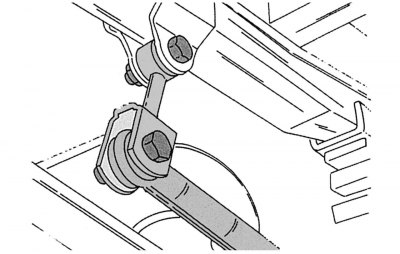
Pic. 256. Stabilizer mount
- on both sides, unscrew the stabilizer struts from above. This connection is shown in fig. 256. Unscrew nut 1 and bolt 4 (see fig. 255);
- unscrew nuts 8 of mounting brackets 12 and remove bolts 6;
- remove the stabilizer bar 5 together with the brackets;
- unscrew nuts 9 of holders 7 and remove bolt 6. Remove holder;
- remove bracket 12 from silent block 13 and remove both parts from the stabilizer bar;
- unscrew racks 3 from stabilizer tips.
If it is necessary to replace the silent blocks, press out the old ones and press in the new ones. Silent blocks 2 in the stabilizer struts and the stabilizer itself can be replaced. When installing new ones, moisten them with soapy water to facilitate installation.
When installing, proceed as follows:
- screw the racks to the stabilizer;
- install the silent block 13 on the stabilizer bar and slide the bracket on it from the side. If necessary, apply talcum powder to the silent block;
- attach the holder plate 7 to the bracket and tighten the fastening bolts;
- attach the holder bar with uprights to the attachment points on the chassis;
- set the stabilizer in the center and tighten the bolts of the racks from above and below to a torque of 90–95 Nm;
- tighten the mounting bracket connection with a torque of 20–25 Nm.