
Cars BMW Cars Volkswagen Cars Chevrolet Cars Land Rover Cars Lada Cars Honda Cars Peugeot
English Русский
Български
Беларускі
Український
Српски
Hrvatski
Română
Polski
Slovenský
Magyar
Bookmark News and articles Sitemap Feedback Site search
MercedesMan.ru


A-Class C-Class E-Class G-Class M-Class S-Class Others
W116 (1972-1980, petrol) W126 (1979-1991, petrol) W140 (1991-1998) W220 (1998-2005)
  • Main
  • S-Class
  • W126 (1979-1991)
  • Power unit
  • Engine repair
  • Checking pistons and connecting rods

Checking pistons and connecting rods (Mercedes-Benz S-Class W126)

0
Clean and inspect all parts. If any parts show signs of chipping, scratching or wear, they must be replaced with new ones. The piston pin seating locations must be selected so that the pin can easily move in the connecting rod at room temperature. The piston pins of individual cylinders must not be replaced.

Clean and inspect all parts. If any parts show signs of chipping, scratching or wear, they must be…


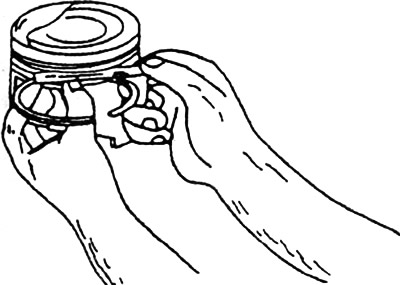
Measure the clearance by the height of the piston rings in the piston grooves, then insert the piston rings in order into the corresponding grooves.
Measure the clearance by the height of the piston rings in the piston grooves, then insert the…


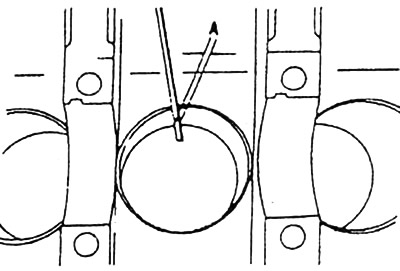
Insert the rings one by one into the cylinder hole.

Using the removed piston, move the ring down approximately 20 mm. Now it sits in the hole precisely.

Insert a flat feeler gauge into the gap between the two ends of the ring to measure the gap in the ring lock. When replacing only the piston rings, this gap should be measured at the lower end of the hole, since in this position it is the smallest.


Connecting rods that are used again must be checked for bending and distortion. A connecting rod that has overheated due to bearing damage (it turns blue) must not be reused. Connecting rods with a machined connecting rod bushing are supplied as spare parts. The connecting rod bolt hole must also be checked. To do this, place the connecting rod cap on the connecting rod bolts. If the cap moves downwards under its own weight, the connecting rod must be replaced. When assembling pistons and connecting rods, pay attention to the following:
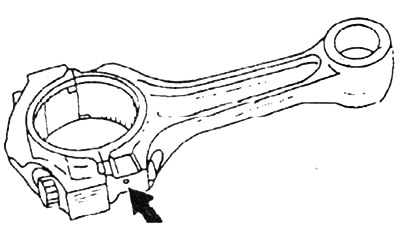
Connecting rods that are used again must be checked for bending and distortion. A connecting rod…


Mark the relative positions of the connecting rods and connecting rod bearing caps with a center punch (1 point - 1st cylinder, etc.). The crank pin must not have any transverse scratches or nicks.

Lubricate the piston pins and piston holes before pressing in.

The ends (locks) of the piston rings should be placed evenly around the circumference of the piston.

Install the pistons on the connecting rods so that the arrow points in the direction of travel.
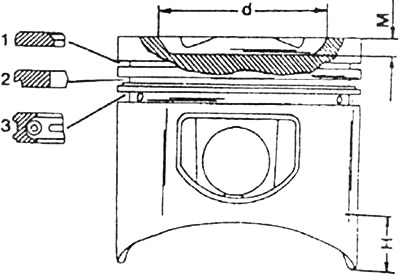
V8 engine piston: 1. Rectangular compression ring with internal chamfer and chrome-plated friction…

V8 engine piston: 1. Rectangular compression ring with internal chamfer and chrome-plated friction surface. 2. Conical compression ring with chronographed friction surface. 3. Oil scraper box ring with round spring and chrome-plated friction surface. H - Piston measurement point.
The dimensions d and M are not the same for different engines.
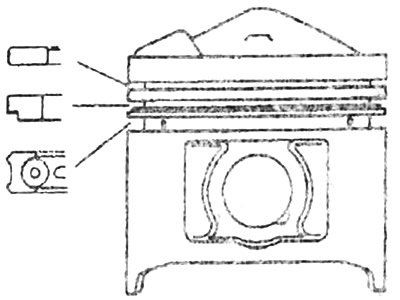


Piston of 6-cylinder engines: 1. Rectangular compression ring with molybdenum coating. 2. Conical…

Piston of 6-cylinder engines: 1. Rectangular compression ring with molybdenum coating. 2. Conical compression ring with molybdenum coating. 3. Oil scraper ring with round spring and molybdenum coating.
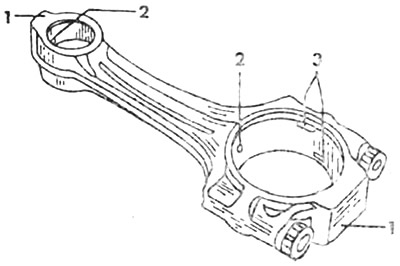

Connecting rod: 1. Connecting rod and connecting rod cap. 2. Hole for supplying bearing shell. 3.…

Connecting rod: 1. Connecting rod and connecting rod cap. 2. Hole for supplying bearing shell. 3. Grooves for fastening bearing shells.
This article is available at: russian, bulgarian, belarusian, ukrainian, serbian, croatian, romanian, polish, slovak, hungarian
The article has been verified: Burova Vera Semenovna
Share with friends:
◀ Previous
S-Class W126 / Engine repair
Next ▶

Cylinder head assembly
Installing the valve guide bushing
Checking cylinder head parts
Disassembling the cylinder head
Engine assembly
Cylinder block (crankcase)
Crankshaft and flywheel
Camshaft and Drive Mechanism — General Information
Checking camshafts
Checking the valve timing
More similar articles for repairing other models

☛ Checking the engine oil level using a dipstick Mercedes W168 (1997-2004)
☛ Pistons and connecting rods — installation and checking clearance in… Mercedes 190 (W201) (1982-1993)
☛ Removal connecting rods and pistons Mercedes W123 (1976-1985)
☛ Checking the concentricity of the seating of the connecting flanges… Mercedes W463 (1999-2019)
☛ Checking fluid levels, leak control Mercedes W163 (1997-2005)
☛ Checking pistons and connecting rods Mercedes Sprinter (1995-2000, diesel)
Link in different formats to this article
Comments and feedback from visitors
No comments yet


How much will 47 + 40 ?


W220 (1998-2005) 
  • General information
  • Introduction to guide
  • User manual
  • Maintenance
  • Power unit
  • Engine repair
  • Cooling and heating systems
  • Power and exhaust systems
  • Ignition and control system
  • Charge and launch systems
  • Transmission
  • Automatic gearbox
  • Drive shafts
  • Chassis
  • Brake system
  • Front suspension
  • Rear suspension
  • Steering
  • Body
  • Body elements
  • Electrical equipment
  • Equipment and devices
  • Electrical circuits
W140 (1991-1998) 
  • User manual
  • Controls and instruments
  • Driving and operation
  • Maintenance
  • Power unit
  • Petrol engine V6
  • Petrol engine V8
  • Petrol engine V12
  • Diesel engine OM603
  • Diesel engine OM606
  • Cooling system
  • Power supply and injection system
  • Control system HFM-SFI
  • Control system LH-SFI
  • Control systems ME-SFI
  • Diesel control system
  • Ignition system
  • Charge and launch system
  • Transmission
  • Mechanical gearbox 717.438
  • Mechanical gearbox 717.454
  • Automatic gearbox 722.5
  • Automatic gearbox 722.6
  • Clutch and drive shafts
  • Differential
  • Chassis
  • Brake system
  • Steering
  • Front suspension
  • Rear suspension
  • Body
  • Exterior (external elements)
  • Interior (internal elements)
  • Electrical equipment
  • Equipment and devices
  • Electrical circuits
W126 (1979-1991, petrol) 
  • Power unit
  • Engine repair
  • Ignition system
  • Lubrication system
  • Cooling system
  • Fuel system
  • Fuel injection system
  • Transmission
  • Clutch and cardan
  • Mechanical gearbox
  • Automatic gearbox
  • Chassis
  • Front suspension
  • Rear suspension
  • Steering
  • Brake system
  • Electrical equipment
  • Power devices
  • Electrical circuits
W116 (1972-1980, petrol) 
  • General information
  • Introduction to guide
  • Power unit
  • 8-cylinder V8 engine
  • 6-cylinder I6 engine
  • Cooling and lubrication system
  • Power system (carburetor)
  • Fuel injection system
  • Ignition system
  • Transmission
  • Clutch and cardan
  • Car gearbox
  • Chassis
  • Front suspension
  • Rear suspension
  • Steering
  • Brake system
  • Electrical equipment
  • Power devices
  • Electrical circuits
 
MercedesMan.ru © 2017–2026 · Mobile version · Read about Mercedes · Sitemap: EN BG BY UA RS HR RO PL SK HU · Feedback · Site search · Bookmark A-Class (W168) · C-Class (W201) · C-Class (W202) · C-Class (W203) · E-Class (W123) · E-Class (W124) · E-Class (W210) · G-Class (W463) · M-Class (W163) · S-Class (W116, petrol) · S-Class (W126, petrol) · S-Class (W140) · S-Class (W220) · Sprinter · Vito 1 · Vito 2 · Vario 814D ·
 
We only use cookies without which some of the site's features may not be available.