
Cars BMW Cars Volkswagen Cars Chevrolet Cars Land Rover Cars Lada Cars Honda Cars Peugeot
English Русский
Български
Беларускі
Український
Српски
Hrvatski
Română
Polski
Slovenský
Magyar
Bookmark News and articles Sitemap Feedback Site search
MercedesMan.ru


A-Class C-Class E-Class G-Class M-Class S-Class Others
W123 (1976-1985) W124 (1984-1995) W210 (1996-2002)
  • Main
  • E-Class
  • W210 (1996-2002)
  • General information
  • Working conditions and tools
  • Lifting a car with a jack

Lifting a car with a jack (Mercedes-Benz E-Class W210)

0
Contents: Support posts ↡ Using a jack ↡
Mercedes comes with a screw jack, which allows you to lift the car to the desired height. If you need to increase the height of the car, you can put a beam, board, etc. between the base of the jack and the floor. However, it is always recommended to put a small board under the base of the jack so that its footrest does not sink into the floor (ground) under the weight of the car.

Warning! The jack is only used to lift the vehicle for a short time and is not a reliable and safe support for long-term repairs.


Support posts
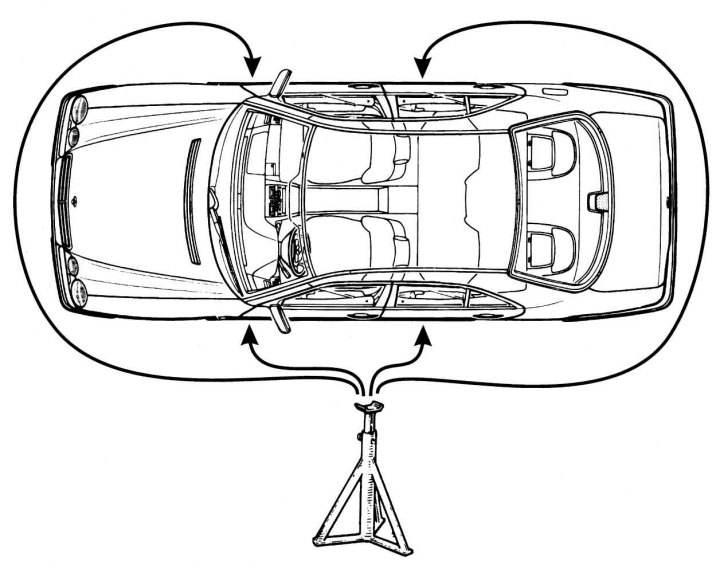


Fig. 2.22. Locations for installation of support posts

Fig. 2.22. Locations for installation of support posts


To ensure safety when working with a partially raised vehicle, support stands of different sizes are used. For most jobs, two such stands are sufficient. When purchasing stands, pay attention to the size of the base; it is desirable that it is not too small to transfer pressure to the ground. The locations of the support stands on the vehicle are shown in Fig. 2.22.

Please note that when installing the rack, it should rest exactly against the rubber pad of the corresponding threshold to avoid damaging it. A dry board or hard rubber can be used as an additional intermediate spacer.


Attention! It is important that one of the three legs of the stand is extended towards the body, otherwise when the car rocks, the stand may shift and tip over.


The pin used to adjust the height of the rack must be pushed into the hole until it stops and secured with a pin.

Using a jack


1. The car must be on solid ground. Open the trunk before starting work.

2. Apply the parking brake and place wedges under the wheels of the car (if there are none, use suitable objects: a block, brick, etc.). You cannot rely only on the parking brake, since it must be released for some work.

3. Using a screwdriver, remove the plastic plug from the receptacle under the door sill.

4. The jack is located under the spare tire in the trunk. To get the jack into working condition, first use the handle to unscrew it until it touches the ground, and then adjust it so that it stands vertically under the lifting point.
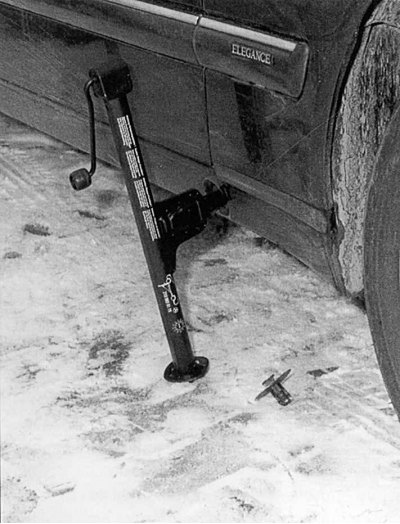
Fig. 2.23. Lifting a car using a car jack

Fig. 2.23. Lifting a car using a car jack


5. Install the car jack only in the special sockets of the door sills (Fig. 2.23). In this case, the jack bracket should be pushed all the way into the receiving socket.
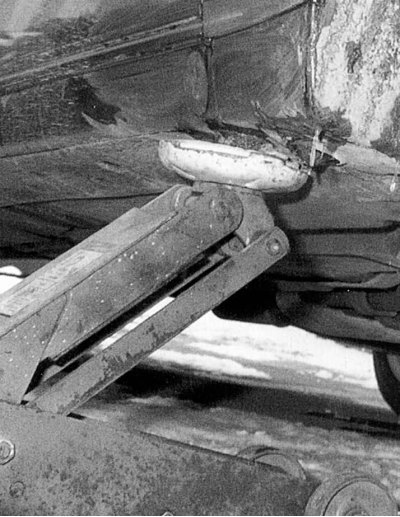


Fig. 2.24. Lifting a car using a garage jack

Fig. 2.24. Lifting a car using a garage jack


6. When lifting a car with a garage jack, the jack's lifting support should be placed against the bottom only through a rubber cushion or a wooden block (Fig. 2.24) to avoid damaging the bottom.

7. Pay attention to the position of the support stand legs when lifting your car. The support stand is installed securely if one of its legs is directed outward and the other two are directed towards the middle of the car. Otherwise, when lifting the car, the support stand on the other side will shift to the side.
This article is available at: russian, bulgarian, belarusian, ukrainian, serbian, croatian, romanian, polish, slovak, hungarian
The article has been verified: Polyakov Zakhar Grigorievich
Share with friends:
◀ Previous
E-Class W210 / Working conditions and tools
Next ▶

Safety precautions when repairing a car
Special tool for car repair
Essential tool for car repair
Purchase of spare parts
Auto mechanic's workplace
Techniques of a mechanic
Submitting a car for repair
More similar articles for repairing other models

☛ Lifting the car with a jack and placing it on supports Mercedes 190 (W201) (1982-1993)
☛ Jacking up with a standard jack when changing wheels Mercedes W463 (1999-2019)
☛ Correct lifting of the car Mercedes W116 (1972-1980, petrol)
Link in different formats to this article
Comments and feedback from visitors
No comments yet


How much will 45 + 30 ?


W210 (1996-2002) 
  • General information
  • Vehicle description
  • Working conditions and tools
  • Car care
  • Diesel engines
  • Engine repair
  • Lubrication system
  • Cooling system
  • Injection system
  • Supply system
  • Exhaust system
  • Gasoline engines
  • Engine repair
  • Lubrication system
  • Cooling system
  • Control system
  • Power and exhaust system
  • Transmission
  • Clutch
  • Mechanical gearbox
  • Automatic gearbox
  • Drive shafts
  • Chassis
  • Car suspension
  • Steering
  • Tires and wheels
  • Brake system
  • Body
  • Exterior (external elements)
  • Interior (internal elements)
  • Doors and windows
  • Heating and ventilation
  • Electrical equipment
  • Equipment and devices
  • Power devices
  • Lighting and signaling
  • Electrical circuits
W124 (1984-1995) 
  • General information
  • Governing bodies
  • Driving and operation
  • Weekly care
  • Maintenance (gasoline)
  • Maintenance (diesel)
  • Troubleshooting
  • Power unit
  • I4 petrol engine
  • V6 petrol engine (SOHC)
  • V6 petrol engine (DOHC)
  • Diesel engines
  • Engine overhaul
  • Cooling system
  • Heating and ventilation
  • Fuel system (carburetor)
  • Injection system «Bosch CIS-E»
  • Injection system «Bosch HFM»
  • Diesel fuel system
  • Supply system
  • Starting and charging system
  • Ignition system (I4)
  • Ignition system (V6)
  • Preheating
  • Transmission
  • Clutch
  • Mechanical gearbox
  • Automatic gearbox
  • Drive shafts
  • Chassis
  • Brake system
  • Car suspension
  • Steering
  • Body
  • Exterior (external elements)
  • Interior (internal elements)
  • Doors, locks and windows
  • Electrical equipment
  • Equipment and devices
  • Switches
  • Headlights and lighting
  • Electrical circuits
W123 (1976-1985) 
  • General information
  • Introduction to the guide
  • Power unit
  • Engine device
  • Repair M102 engines
  • Repair M110 and M123 engines
  • Cooling and lubrication (M102)
  • Cooling (M110 and M123)
  • Ignition system
  • Power system «Stromberg»
  • Power system «Solex 4A1»
  • Fuel injection «K-Jetronic»
  • Fuel injection «L-Jetronic»
  • Transmission
  • Clutch
  • Mechanical gearbox
  • Automatic gearbox
  • Cardan and rear axle
  • Chassis
  • Front suspension
  • Rear suspension
  • Steering
  • Brake system
  • Body
  • Exterior (external elements)
  • Interior (internal elements)
  • Doors, locks and windows
  • Electrical equipment
  • Equipment and devices
  • Power devices
  • Electrical circuits
 
MercedesMan.ru © 2017–2026 · Mobile version · Read about Mercedes · Sitemap: EN BG BY UA RS HR RO PL SK HU · Feedback · Site search · Bookmark A-Class (W168) · C-Class (W201) · C-Class (W202) · C-Class (W203) · E-Class (W123) · E-Class (W124) · E-Class (W210) · G-Class (W463) · M-Class (W163) · S-Class (W116, petrol) · S-Class (W126, petrol) · S-Class (W140) · S-Class (W220) · Sprinter · Vito 1 · Vito 2 · Vario 814D ·
 
We only use cookies without which some of the site's features may not be available.