
Camshaft front O-ring
1. Remove the radiator fan shroud and place it on the fan impeller.
2. Press fixing brackets and remove a casing of the distributor of ignition. Disconnect the central high-voltage wire from the ignition distributor cover. Unscrew the three screws, remove the cover and, without disconnecting the high-voltage wires from it, move the distributor cover to the side.
3. Unscrew the three screws and remove the distributor rotor.
4. Unscrew the central bolt and remove the distributor rotor drive (see fig. Unscrewing the central bolt to remove the distributor rotor drive).
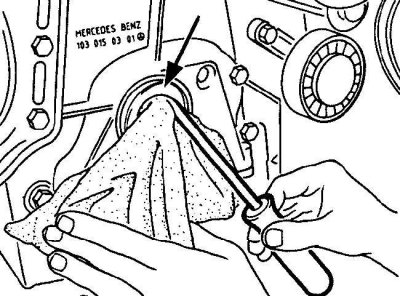
5. Drill two small holes into the O-ring, located at diametrically opposite ends of the seal. Screw two self-tapping screws into the drilled holes in the O-ring and using pliers, pull out the O-ring from the screw heads.
6. Clean the sealing ring seat.
7. To protect the sealing edges of the sealing ring when installing it, wrap the end of the camshaft with adhesive tape.
8. Using a tubular mandrel of the correct diameter, install a new O-ring.
9. Remove the adhesive tape from the front end of the camshaft.
10. Further installation is carried out in the reverse order of removal.
Front crankshaft sealing ring
Removal of a forward sealing ring of a cranked shaft
1. Remove the crankshaft pulley/vibration damper and hub.
2. Measure the installation depth of the O-ring.
3. Using a screwdriver blade, remove the O-ring from the socket (see fig. Removal of a forward sealing ring of a cranked shaft).
4. Alternatively, drill two small holes into the o-ring at diametrically opposite ends of the o-ring.
5. Insert two self-tapping screws into the drilled holes in the O-ring and use pliers to pull the O-ring out past the screw heads.
6. Clean the sealing ring seat.
7. To protect the working edges of the sealing ring when installing it, wrap the end of the crankshaft with adhesive tape.
8. Dip a new o-ring in clean engine oil and, using an appropriately sized drift, install the o-ring into the seat to the previously measured depth.
9. Remove the adhesive tape from the end of the crankshaft.
10. Install the crankshaft pulley/vibration damper and hub.
Rear crankshaft sealing ring
1. Remove flywheel/drive plate.
2. Measure the installation depth of the O-ring. Using the blade of a screwdriver as a lever, remove the O-ring from the socket.
3. Alternatively, drill two small holes into the O-ring at diametrically opposite ends of the seal. Insert two self-tapping screws into the drilled holes in the O-ring and use pliers to pull the O-ring out past the screw heads.
4. Check the condition of the surface of the crankshaft in contact with the O-ring. If there is severe wear, the crankshaft must be replaced.
5. Clean the O-ring seat and the surface of the crankshaft in contact with the O-ring.
6. To protect the working edges of the sealing ring from damage during its installation, wrap the end of the crankshaft with adhesive tape.
7. Dip a new o-ring in clean engine oil and, using an appropriately sized drift, install the o-ring into the seat to the previously measured depth.
8. Remove the adhesive tape from the end of the crankshaft.
9. Install flywheel/drive plate.