Cars BMW Cars Volkswagen Cars Chevrolet Cars Land Rover Cars Lada Cars Honda Cars Peugeot
English Русский
Български
Беларускі
Український
Српски
Hrvatski
Română
Polski
Slovenský
Magyar
Bookmark News and articles Sitemap Feedback Site search
MercedesMan.ru


A-Class C-Class E-Class G-Class M-Class S-Class Others
190 (W201) (1982-1993) W202 (1993-2000) W203 (2000-2007)
  • Main
  • C-Class
  • W202 (1993-2000)
  • Power unit
  • Lubrication system
  • Oil pan (diesel 2.0) — removal and installation

Oil pan (diesel 2.0) — removal and installation (Mercedes-Benz C-Class W202)

0
Contents: Removal ↡ Installation ↡

2.0L Diesel Engine
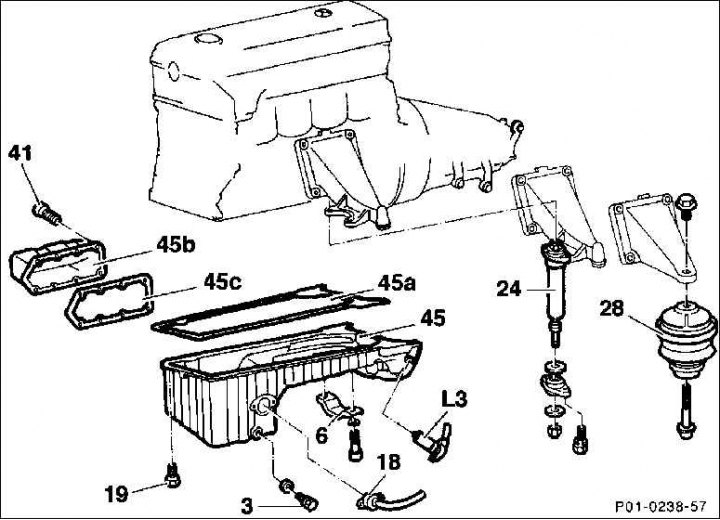


3. Oil drain plug

3. Oil drain plug
6. Engine stop (type 201)
24. Engine shock absorber (type 201)


Removal


1. Remove the lower engine compartment cover.

2. Remove the anti-roll bar.

3. Disconnect the left steering link and the right steering shock absorber.

4. Drain the engine oil.

5. Disconnect the battery ground (–) cable.

Attention! This will erase the radio's anti-theft code.

Attention! This will erase the radio's anti-theft code.


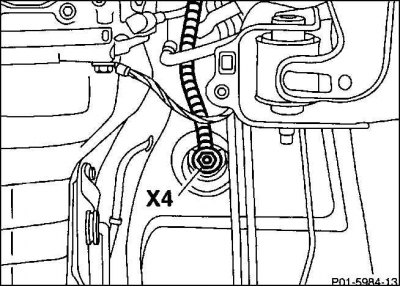
6. Disconnect the positive X4 cable from its connection to the underside of the car on the left side and place it on top of the engine.

7. Remove the fan shroud and place it on top of the fan.
7. Remove the fan shroud and place it on top of the fan.


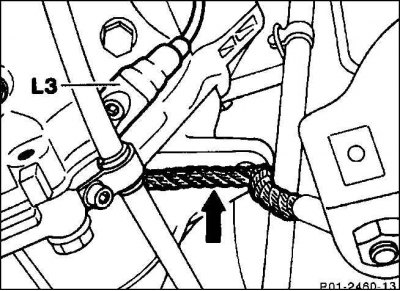
8. Unscrew the speed sensor (L3).


9. Disconnect the ground wire between the starter and the body (arrow).

10. Remove the oil level sensor plug.

11. Disassemble the intermediate steering arm.

12. Automatic transmission: Separate the oil lines in the connecting parts from the oil hoses, after clamping the oil lines with hose clamps. Cover the connecting elements with small plastic bags to prevent dirt from getting into them.
12. Automatic transmission: Separate the oil lines in the connecting parts from the oil hoses,…


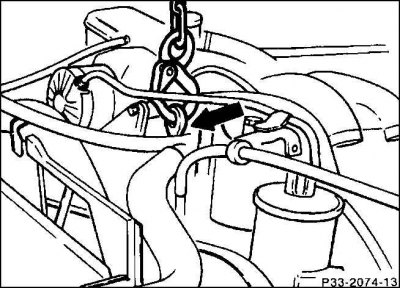
13. Attach the engine to the front eye (arrow) with a suitable cable or chain and lift it with a crane. If you do not have a crane, insert a suitable rod into the cable, lift the engine slightly and support it on stands.
13. Attach the engine to the front eye (arrow) with a suitable cable or chain and lift it with a…


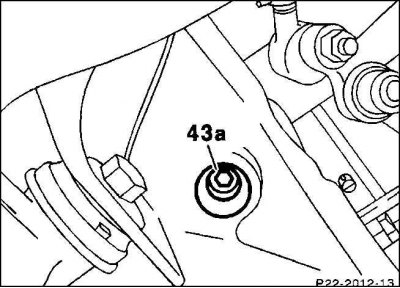
14. Remove the Allen bolt from the side member from below for the left front engine mount.
14. Remove the Allen bolt from the side member from below for the left front engine mount.


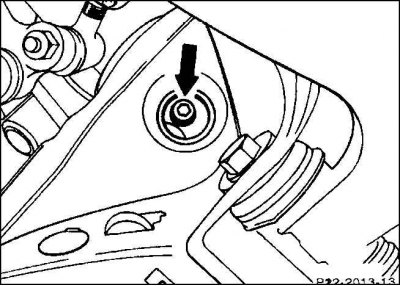
15. Remove the Allen bolt from the bottom of the side member of the right front engine mount.


16. Raise the engine as high as possible.

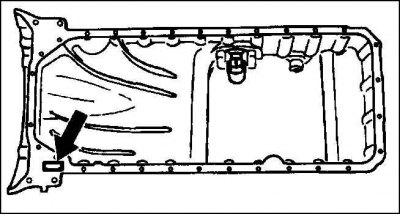
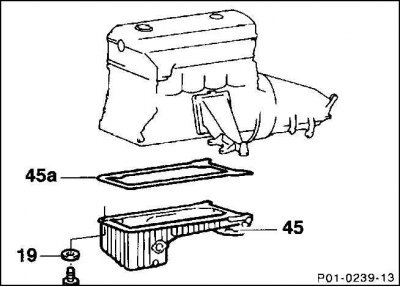
17. Oil pan with flanged side section: unscrew the side section and remove together with the sealing gasket.
17. Oil pan with flanged side section: unscrew the side section and remove together with the…


18. Unscrew the oil pan mounting bolts (19) and remove the oil pan (45) forward, looking in the direction of travel. If necessary, turn the crankshaft slightly.

19. Remove the sealing gasket (45a), thoroughly clean the sealing surfaces of the sump and crankcase.

Installation


1. Negative battery cable. Install the oil pan with a new sealing gasket, aligning it with the rear surface of the transmission, and tighten the mounting bolts evenly by hand. Then tighten the bolts alternately to the following torques:
  • M 6 - 10 Nm.;
  • M 8 - 25 Nm.;
  • M 10 - 40 Nm.

M 10 - 40 Nm.


Caution: On vehicles with automatic transmission, ensure that the calibrated groove on the oil pan interface fits into the engine block relief sleeve.


2. If removed: Install the side section of the oil pan with a new sealing gasket and tighten to 10 Nm.

3. Lower the engine.

4. Install the front engine mount mounting bolts and tighten to 30 Nm.

5. Automatic transmission: connect oil lines, remove hose clamps.

6. Install the intermediate steering arm.

7. Install the oil level sensor plug.

8. Screw on the speed sensor.

9. Screw the ground cable between the starter and the body.

10. Install and secure the fan shroud with clamps.

11. Connect the positive cable (X4).

12. Attach the left steering rod and the right steering shock absorber.

13. Install the stabilizer.

14. Install the lower engine compartment cover.

15. Fill with engine oil.

16. Connect the battery ground wire.

17. Set the clock

18. Set the radio anti-theft code.

19. Warm up the engine and check the oil pan for leaks.

20. Automatic transmission: check the oil level.
This article is available at: russian, bulgarian, belarusian, ukrainian, serbian, croatian, romanian, polish, slovak, hungarian
The article has been verified: Khromov Roman Mikhailovich
Share with friends:
◀ Previous
C-Class W202 / Lubrication system
Next ▶

Oil pan (petrol engine) — removal and installation
Oil pressure reducing valve — removal and installation
Oil circulation circuit (diesel)
Oil consumption
Oil application area/viscosity class
Oil pan (diesel 2.2/2.5) — removal and installation
Oil level indicator — removal and installation
Oil/coolant heat exchanger
Diagnosing faults in the oil circulation circuit
More similar articles for repairing other models

☛ How a diesel engine works Mercedes W168 (1997-2004)
☛ Removal and installation of diesel engines Mercedes W124 (1984-1995)
☛ Replacing glow plugs (diesel models) Mercedes W463 (1999-2019)
☛ Diesel Engine Fuel System — General Information Mercedes W163 (1997-2005)
☛ Diesel Engine Fuel Injection System — General Information Mercedes W140 (1991-1998)
☛ General description of the diesel fuel injection system Mercedes Sprinter (1995-2000, diesel)
Link in different formats to this article
Comments and feedback from visitors
No comments yet


How much will 31 + 29 ?


W203 (2000-2007) 
  • General information
  • Introduction to guide
  • User manual
  • Maintenance
  • Power unit
  • Gasoline engines
  • Diesel engines
  • Cooling system
  • Ventilation and heating
  • Supply system
  • Injection system (gasoline)
  • Injection system (diesel)
  • Exhaust system
  • Ignition and control system
  • Charge and launch systems
  • Transmission
  • Mechanical gearbox
  • Automatic gearbox
  • Clutch and drive shafts
  • Differential
  • Chassis
  • Brake system
  • Car suspension
  • Steering
  • Body
  • Exterior (external elements)
  • Interior (internal elements)
  • Electrical equipment
  • Equipment and devices
  • Lighting system
  • Electrical diagrams (2000)
  • Electrical diagrams (since 2001)
W202 (1993-2000) 
  • General information
  • User manual
  • Driving a car
  • Car care
  • Maintenance
  • Power unit
  • Gasoline engines
  • Diesel engines
  • Lubrication system
  • Cooling system
  • Heating and ventilation
  • Ignition system
  • Fuel system
  • Injection system (gasoline)
  • Injection system (diesel)
  • Exhaust system
  • Transmission
  • Clutch
  • Car gearbox
  • Chassis
  • Suspension, wheels and tires
  • Steering
  • Brake system
  • Body
  • Exterior (external elements)
  • Interior (internal elements)
  • Doors and windows
  • Electrical equipment
  • Equipment and devices
  • Power devices
  • Lighting system
  • Electrical circuits
190 (W201) (1982-1993) 
  • General information
  • Introduction to the guide
  • Operation and care
  • Maintenance (gasoline)
  • Maintenance (diesel)
  • Troubleshooting
  • Power unit
  • Petrol engine I4
  • Petrol engine V6
  • Diesel engines
  • Engine overhaul
  • Cooling and heating
  • Power system (carburetor)
  • Injection system (gasoline)
  • Injection system (diesel)
  • Exhaust system
  • Charge and start system
  • Ignition system (I4)
  • Ignition system (V6)
  • Diesel heating system
  • Transmission
  • Clutch
  • Mechanical gearbox
  • Automatic gearbox
  • Cardan shaft and axle shafts
  • Chassis
  • Brake system
  • Car suspension
  • Steering
  • Body
  • Exterior (external elements)
  • Interior (internal elements)
  • Doors, locks and windows
  • Electrical equipment
  • Equipment and devices
  • Electrical circuits
 
MercedesMan.ru © 2017–2026 · Mobile version · Read about Mercedes · Sitemap: EN BG BY UA RS HR RO PL SK HU · Feedback · Site search · Bookmark A-Class (W168) · C-Class (W201) · C-Class (W202) · C-Class (W203) · E-Class (W123) · E-Class (W124) · E-Class (W210) · G-Class (W463) · M-Class (W163) · S-Class (W116, petrol) · S-Class (W126, petrol) · S-Class (W140) · S-Class (W220) · Sprinter · Vito 1 · Vito 2 · Vario 814D ·
 
We only use cookies without which some of the site's features may not be available.