



Contents: Removal ↡ Installation ↡
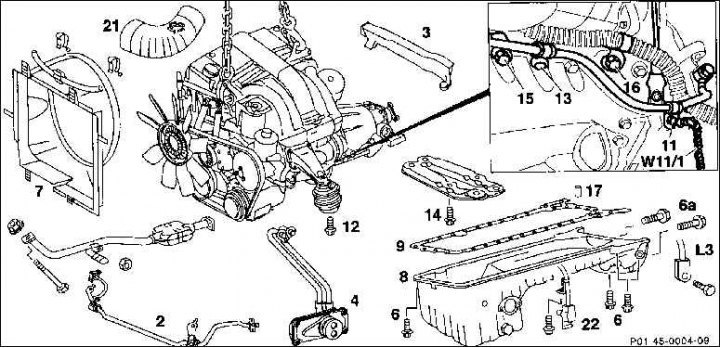
Removal
1. Disconnect the battery ground (–) cable.
Attention! This will erase the radio's anti-theft code.
2. Remove the fan shroud (7) and place it on top of the fan.
3. Remove the air hose (21) by detaching the securing clamp.
4. Disconnect the cable channel (3) from the front wall of the body.
5. Remove the lower engine compartment cover.
6. Drain the coolant.
7. Drain the engine oil.
8. Unscrew the front exhaust pipe from the manifold.
9. Unscrew the exhaust pipe holder brackets from the gearbox.
10. Remove the oil/coolant heat exchanger (4).
11. Remove the stabilizer.
12. Disconnect the coolant hoses from the cylinder head and coolant pump housing, after loosening and removing the fastening clamps.
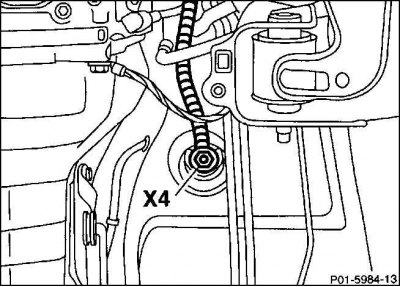
13. Disconnect the positive cable (X4) from its connection to the bottom of the vehicle and place it on the engine.
14. Unscrew the speed sensor.
15. Disconnect the oil level sensor plug (22).
16. Unscrew the lower bolts (14) of the engine mount at the rear.
17. Remove the lower engine mount bolts (12) from the front.
18. Automatic transmission: Unscrew the transmission oil line bracket (11/13) from the transmission cover.
19. Support the engine by the front and rear lugs.
20. Unscrew the mounting bolts (6/6a) of the oil pan. If necessary, unscrew the holder (10) of the oil level sensor electrical wire (543), as well as the ground wire (w11/1) from the gearbox cap (for automatic transmission: gearbox electrical wire kit (15/16)).
21. Raise the engine as horizontally as possible.
22. Remove the oil pan (8) in the direction of travel from below to the front. If necessary, turn the crankshaft slightly. In the case of an automatic transmission, move the gearbox oil lines slightly to the side. Make sure that the adjusting sleeve (17) does not fall out.
23. Thoroughly clean the sealing surfaces of the oil pan and crankcase.
Installation
1. Check if there is an adjusting sleeve (17) in the engine block.
2. Secure the new sealing gasket (9) to the engine block using a sealant such as Omnifit-FD.
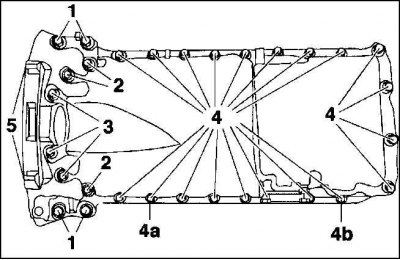
3. Position the oil pan, aligning it with the transmission mating surface, and tighten the bolts evenly by hand. Then tighten the bolts alternately to the following torques:
- 1. Bolt M 8 x 40 - 25 Nm.
- 2. Bolt M 6 x 35 - 10 Nm.
- 3. Bolt M 6 x 85 - 10 Nm.
- 4. Bolt M 6 x 20 - 10 Nm.
- 5. Bolt M 10 x 40 - 40 Nm.
- 4a. Bolt M 6 x 20 (with internal hexagon) - 10 Nm.
- 4b. Bolt M 6 x 75 (with internal hexagon) - 10 Nm.
- 4a and 4b - only with automatic transmission
Caution: If the oil pan is not oriented in the direction of the gearbox, this may subsequently lead to noise.
3. Lower the engine.
4. Install the oil level sensor plug.
5. Screw on the speed sensor.
6. Connect the positive cable to the lower left side of the vehicle.
7. Place the coolant hoses onto the cylinder head and coolant pump housing and secure with clamps.
8. Install the stabilizer.
9. Install the oil/coolant heat exchanger.
10. Bolt the front exhaust pipe to the manifold, to the exhaust pipe holder bracket on the transmission.
11. Install the lower engine compartment cover.
[Article borrowed from the web portal www.mercedesman.ru]
12. Install the fan shroud, adjust and secure with clamps.
13. Place the air hose on and secure with a screw clamp.
14. Fill with engine oil.
15. Fill with coolant.
16. Connect the battery ground (–).
17. Set the clock.
18. Set the radio anti-theft code.
19.Start the engine and check the oil pan for leaks.