
Cars BMW Cars Volkswagen Cars Chevrolet Cars Land Rover Cars Lada Cars Honda Cars Peugeot
English Русский
Български
Беларускі
Український
Српски
Hrvatski
Română
Polski
Slovenský
Magyar
Bookmark News and articles Sitemap Feedback Site search
MercedesMan.ru


A-Class C-Class E-Class G-Class M-Class S-Class Others
190 (W201) (1982-1993) W202 (1993-2000) W203 (2000-2007)
  • Main
  • C-Class
  • W202 (1993-2000)
  • Power unit
  • Lubrication system
  • Oil level indicator — removal and installation

Oil level indicator — removal and installation (Mercedes-Benz C-Class W202)

0
Contents: Petrol and diesel engines ↡ Diesel engine ↡

Petrol and diesel engines
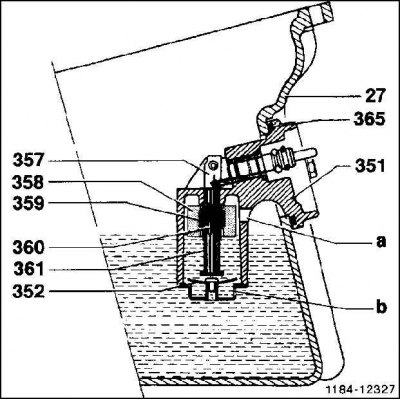


27. Oil pan; 351. Oil level sensor; 352. Bimetallic latching disc; 358. Float; 359. Magnet; 360.…

27. Oil pan; 351. Oil level sensor; 352. Bimetallic latching disc; 358. Float; 359. Magnet; 360. Reed – contact (reed contact, reed switch); 365. O-ring; a – Ventilation hole with a diameter of 8 mm; b – Drain hole diameter 4 mm


The oil level indicator consists of an oil level sensor, which is installed on the drain plug in the oil pan, and a control lamp on the instrument panel. The indicator monitors the oil level in the oil pan, starting from an oil temperature of +60°C. As soon as the ignition is turned on, the control lamp lights up for functional control and goes out after the engine starts to rotate.

The oil level in the oil pan is reproduced by means of a float (358). When the oil level is low (in the area of the lower mark of the oil dipstick) with the help of a magnet (359) the reed switch in the float opens. Thanks to this, the electronics in the communication panel receives a signal and the lamp lights up.

When the oil level is low, depending on the driving style, the indicator light will first come on briefly and then remain on continuously.


In order to avoid false alarms in various driving situations, such as sharp turns, a delay line is built into the electronic circuit. It allows the control lamp to light only after the low oil level signal has been issued for 60 seconds.

To avoid false indication when the engine is cold (thick oil slowly pours into the oil pan) the oil level sensor is equipped with a bimetallic snap-on disc (352). It prevents the float chamber from running idle through the drain hole (b) at low temperatures.

The bimetallic latching disc opens at a temperature of approximately +60°C and closes at a temperature of approximately +30°C.

When changing the oil, the float chamber is filled with oil through the vent hole (a). This eliminates subsequent false indication. The oil level indicator is installed so that the control lamp lights up shortly before reaching the "min" level on the dipstick (safety reserve). Thanks to this, you can add oil not immediately, but at the next convenient opportunity, for example, when refueling.

Diesel engine


Removal


1. Remove the lower engine compartment cover.

2. Drain the engine oil.

3. Remove the plug (1) of the oil level sensor.
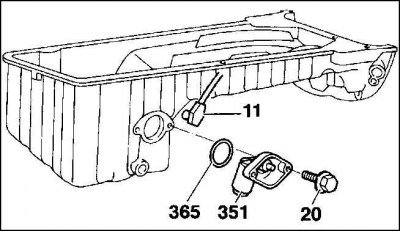
3. Remove the plug (1) of the oil level sensor.


4. Remove the bolts (20). Turn the oil level sensor (351) and remove it from the oil pan.


Installation


1. Install the oil level sensor with a new O-ring and tighten to a torque of 10 Nm.

2. Put on the plug.

3. Install the lower engine compartment cover.

4. Fill with engine oil.

5. Warm up the engine and check the oil level sensor for leaks.
This article is available at: russian, bulgarian, belarusian, ukrainian, serbian, croatian, romanian, polish, slovak, hungarian
The article has been verified: Khromov Roman Mikhailovich
Share with friends:
◀ Previous
C-Class W202 / Lubrication system
Next ▶

Oil pan (diesel 2.2/2.5) — removal and installation
Oil pan (diesel 2.0) — removal and installation
Oil pan (petrol engine) — removal and installation
Oil pressure reducing valve — removal and installation
Oil circulation circuit (diesel)
Oil/coolant heat exchanger
Diagnosing faults in the oil circulation circuit
More similar articles for repairing other models

☛ Checking the engine oil level using a dipstick Mercedes W168 (1997-2004)
☛ Coolant level indicator Mercedes W210 (1996-2002)
☛ Instrument cluster, gauges, control lamps and indicator lights Mercedes W463 (1999-2019)
☛ Instrument cluster, gauges and control lamps and indicator lights Mercedes W163 (1997-2005)
☛ Instrument cluster, gauges and control lamps and indicator lights Mercedes W140 (1991-1998)
☛ Fuel level indicator Mercedes Sprinter (1995-2000, diesel)
Link in different formats to this article
Comments and feedback from visitors
No comments yet


How much will 18 + 19 ?


W203 (2000-2007) 
  • General information
  • Introduction to guide
  • User manual
  • Maintenance
  • Power unit
  • Gasoline engines
  • Diesel engines
  • Cooling system
  • Ventilation and heating
  • Supply system
  • Injection system (gasoline)
  • Injection system (diesel)
  • Exhaust system
  • Ignition and control system
  • Charge and launch systems
  • Transmission
  • Mechanical gearbox
  • Automatic gearbox
  • Clutch and drive shafts
  • Differential
  • Chassis
  • Brake system
  • Car suspension
  • Steering
  • Body
  • Exterior (external elements)
  • Interior (internal elements)
  • Electrical equipment
  • Equipment and devices
  • Lighting system
  • Electrical diagrams (2000)
  • Electrical diagrams (since 2001)
W202 (1993-2000) 
  • General information
  • User manual
  • Driving a car
  • Car care
  • Maintenance
  • Power unit
  • Gasoline engines
  • Diesel engines
  • Lubrication system
  • Cooling system
  • Heating and ventilation
  • Ignition system
  • Fuel system
  • Injection system (gasoline)
  • Injection system (diesel)
  • Exhaust system
  • Transmission
  • Clutch
  • Car gearbox
  • Chassis
  • Suspension, wheels and tires
  • Steering
  • Brake system
  • Body
  • Exterior (external elements)
  • Interior (internal elements)
  • Doors and windows
  • Electrical equipment
  • Equipment and devices
  • Power devices
  • Lighting system
  • Electrical circuits
190 (W201) (1982-1993) 
  • General information
  • Introduction to the guide
  • Operation and care
  • Maintenance (gasoline)
  • Maintenance (diesel)
  • Troubleshooting
  • Power unit
  • Petrol engine I4
  • Petrol engine V6
  • Diesel engines
  • Engine overhaul
  • Cooling and heating
  • Power system (carburetor)
  • Injection system (gasoline)
  • Injection system (diesel)
  • Exhaust system
  • Charge and start system
  • Ignition system (I4)
  • Ignition system (V6)
  • Diesel heating system
  • Transmission
  • Clutch
  • Mechanical gearbox
  • Automatic gearbox
  • Cardan shaft and axle shafts
  • Chassis
  • Brake system
  • Car suspension
  • Steering
  • Body
  • Exterior (external elements)
  • Interior (internal elements)
  • Doors, locks and windows
  • Electrical equipment
  • Equipment and devices
  • Electrical circuits
 
MercedesMan.ru © 2017–2026 · Mobile version · Read about Mercedes · Sitemap: EN BG BY UA RS HR RO PL SK HU · Feedback · Site search · Bookmark A-Class (W168) · C-Class (W201) · C-Class (W202) · C-Class (W203) · E-Class (W123) · E-Class (W124) · E-Class (W210) · G-Class (W463) · M-Class (W163) · S-Class (W116, petrol) · S-Class (W126, petrol) · S-Class (W140) · S-Class (W220) · Sprinter · Vito 1 · Vito 2 · Vario 814D ·
 
We only use cookies without which some of the site's features may not be available.