
Cars BMW Cars Volkswagen Cars Chevrolet Cars Land Rover Cars Lada Cars Honda Cars Peugeot
English Русский
Български
Беларускі
Український
Српски
Hrvatski
Română
Polski
Slovenský
Magyar
Bookmark News and articles Sitemap Feedback Site search
MercedesMan.ru


A-Class C-Class E-Class G-Class M-Class S-Class Others
190 (W201) (1982-1993) W202 (1993-2000) W203 (2000-2007)
  • Main
  • C-Class
  • W201 (1982-1993)
  • Power unit
  • Injection system (gasoline)
  • Intake manifold — removal and installation

Intake manifold — removal and installation (Mercedes-Benz C-Class W201)

0
Contents: Removal ↡ Installation ↡

Removal


1. Disconnect the negative battery terminal.

2. Contact paragraph 2 and depressurize the power supply system.

3. Contact paragraph 7 and disconnect the throttle cable from the throttle guide lever. On automatic transmission models, disconnect the pressure control cable from the linkage. On cruise control models, disconnect the throttle control linkage at the throttle actuator assembly.

4. Loosen the bolts securing the wiring harness bracket to the intake manifold after releasing the wires from it.

5. Remove the air cleaner.

6. Contact paragraph 10 and follow these steps:
  • a) Remove the cold start valve from the intake manifold.
  • b) Remove the air flow/fuel distribution sensor assembly.
  • c) Remove the throttle body.

7. On 6-cylinder models with cruise control, remove the bolts and throttle actuator assembly and support bracket from the manifold.

Article obtained from this portal: MERCEDESMAN

8. Where provided, on 4-cylinder engines, disconnect the hoses from the idle air distributor; carefully label each hose to avoid confusion during assembly.

9. Loosen the union nut and disconnect the brake booster vacuum hose from the intake manifold. Release the hose from the bracket.

10. Where provided, on 4-cylinder engines, unbolt and remove the engine lift bracket from the manifold.

11. Disconnect the remaining plugs and vacuum hoses from the intake manifold, labeling each one to avoid confusion during installation.

12. Loosen the bolts and remove the support struts from the bottom of the manifold (see fig. 11.12). Check that nothing else is preventing the manifold from being removed.
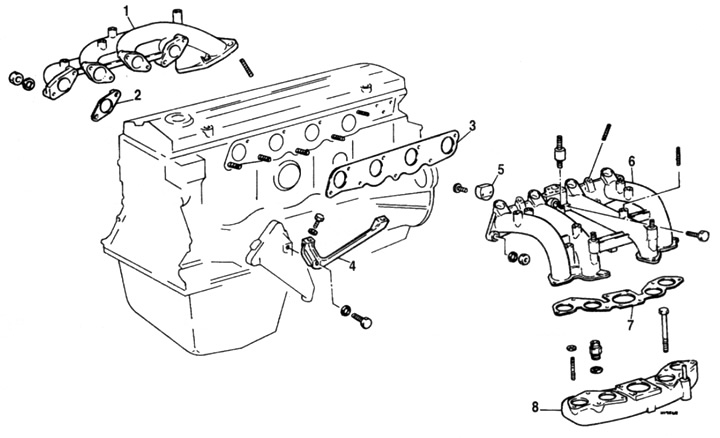


Fig. 11.12. Intake and exhaust manifold parts - 4-cylinder engine

Fig. 11.12. Intake and exhaust manifold parts - 4-cylinder engine
1 Exhaust manifold
2, 3, 7 Gasket
4 Support stand
5 Lid
6 Upper half of the intake manifold
8 Lower half of the intake manifold


13. Loosen and remove the mounting nuts and bolts. Then lift the intake manifold off the cylinder head. Remove the gasket.

14. Where provided, if desired, after unscrewing the mounting bolts, the upper and lower parts of the manifold can be separated. Note that when assembling, a new gasket must be installed between the two parts (on 4-cylinder engines, the gasket is also installed on the throttle body).

15. Carefully clean the mating surfaces of the cylinder head and manifold to avoid scratching them. Remove all traces of the old gasket. If a leak is suspected, check both surfaces for warpage using a metal ruler and feeler gauge (see Chapter 2).

Installation


16. Installation is carried out in reverse order, taking into account the following points:
  • a) Before installing a new gasket on the cylinder head studs, make sure that both mating surfaces are completely clean.
  • b) Contact paragraph 7 and adjust the throttle cable.
  • c) On models with automatic transmission, refer to Chapter 7B and adjust the operation of the pressure control cable.
  • d) Start the engine and check for leaks around the manifold.
  • d) Check and, if necessary, adjust the idle speed as described in Chapter 1A.
This article is available at: russian, bulgarian, belarusian, ukrainian, serbian, croatian, romanian, polish, slovak, hungarian
The article has been verified: Lukyanov Nikita Ilyich
Share with friends:
◀ Previous
C-Class 190 (W201) / Injection system (gasoline)
Next ▶

Bosch KE-Jetronic Fuel Injection System Parts — Removal and Installation
Throttle body — removal and installation
Fuel accumulator — removal and installation
Throttle Cable — Removal, Installation and Adjustment
Gas tank — removal and installation
 
More similar articles for repairing other models

☛ Intake manifold — removal and installation Mercedes W168 (1997-2004)
☛ Removal and installation the intake manifold and exhaust manifold Mercedes W123 (1976-1985)
☛ Removal and installation air intake tract components Mercedes W463 (1999-2019)
☛ Removal and installation the intake manifold Mercedes W163 (1997-2005)
☛ Removal and installation the intake manifold with resonator Mercedes W140 (1991-1998)
☛ Removal and installation the intake manifold Mercedes Sprinter (1995-2000, diesel)
Link in different formats to this article
Comments and feedback from visitors
No comments yet


How much will 17 + 50 ?


W203 (2000-2007) 
  • General information
  • Introduction to guide
  • User manual
  • Maintenance
  • Power unit
  • Gasoline engines
  • Diesel engines
  • Cooling system
  • Ventilation and heating
  • Supply system
  • Injection system (gasoline)
  • Injection system (diesel)
  • Exhaust system
  • Ignition and control system
  • Charge and launch systems
  • Transmission
  • Mechanical gearbox
  • Automatic gearbox
  • Clutch and drive shafts
  • Differential
  • Chassis
  • Brake system
  • Car suspension
  • Steering
  • Body
  • Exterior (external elements)
  • Interior (internal elements)
  • Electrical equipment
  • Equipment and devices
  • Lighting system
  • Electrical diagrams (2000)
  • Electrical diagrams (since 2001)
W202 (1993-2000) 
  • General information
  • User manual
  • Driving a car
  • Car care
  • Maintenance
  • Power unit
  • Gasoline engines
  • Diesel engines
  • Lubrication system
  • Cooling system
  • Heating and ventilation
  • Ignition system
  • Fuel system
  • Injection system (gasoline)
  • Injection system (diesel)
  • Exhaust system
  • Transmission
  • Clutch
  • Car gearbox
  • Chassis
  • Suspension, wheels and tires
  • Steering
  • Brake system
  • Body
  • Exterior (external elements)
  • Interior (internal elements)
  • Doors and windows
  • Electrical equipment
  • Equipment and devices
  • Power devices
  • Lighting system
  • Electrical circuits
190 (W201) (1982-1993) 
  • General information
  • Introduction to the guide
  • Operation and care
  • Maintenance (gasoline)
  • Maintenance (diesel)
  • Troubleshooting
  • Power unit
  • Petrol engine I4
  • Petrol engine V6
  • Diesel engines
  • Engine overhaul
  • Cooling and heating
  • Power system (carburetor)
  • Injection system (gasoline)
  • Injection system (diesel)
  • Exhaust system
  • Charge and start system
  • Ignition system (I4)
  • Ignition system (V6)
  • Diesel heating system
  • Transmission
  • Clutch
  • Mechanical gearbox
  • Automatic gearbox
  • Cardan shaft and axle shafts
  • Chassis
  • Brake system
  • Car suspension
  • Steering
  • Body
  • Exterior (external elements)
  • Interior (internal elements)
  • Doors, locks and windows
  • Electrical equipment
  • Equipment and devices
  • Electrical circuits
 
MercedesMan.ru © 2017–2026 · Mobile version · Read about Mercedes · Sitemap: EN BG BY UA RS HR RO PL SK HU · Feedback · Site search · Bookmark A-Class (W168) · C-Class (W201) · C-Class (W202) · C-Class (W203) · E-Class (W123) · E-Class (W124) · E-Class (W210) · G-Class (W463) · M-Class (W163) · S-Class (W116, petrol) · S-Class (W126, petrol) · S-Class (W140) · S-Class (W220) · Sprinter · Vito 1 · Vito 2 · Vario 814D ·
 
We only use cookies without which some of the site's features may not be available.