



Contents: Removal ↡ Installation ↡
Removal


Warning! Make sure that there are no switched-on electrical appliances, hot objects, open sources of fire, heat or radio waves in the room during work. Ensure good ventilation of the workplace, as fuel vapors are toxic. The fuel system is under pressure. When disconnecting its elements, fuel may splash - collect it with a rag. Perform work in protective glasses.
1. Disconnect the cable from the negative terminal of the battery.
Caution! When you disconnect the wire from the negative terminal of the battery, the codes entered in the memory devices, such as the radio code, are erased.
2. If the fuel tank is full, pump out about 8 liters of fuel from it using a squeeze bulb by lowering the hose into the filler neck.
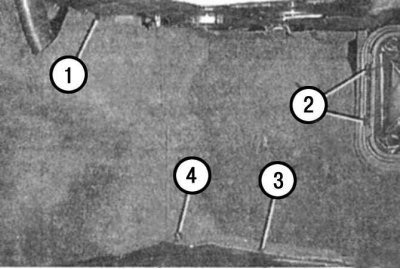
Fig. 5.45. Removing the trim in the luggage compartment: 1, 3 – clamp; 2 – ski bag; 4 – screw
3. Remove the trim in the luggage compartment near the wall separating the luggage compartment from the passenger compartment. To do this, disconnect clamp 3 (Fig. 5.45), unscrew the screw.
4. If there is a ski bag 2, detach it and slide it up. Do the same on the other side of the car.
Note: Do not disconnect clamp 1.
For T-model:
5. Remove the luggage compartment floor covering.
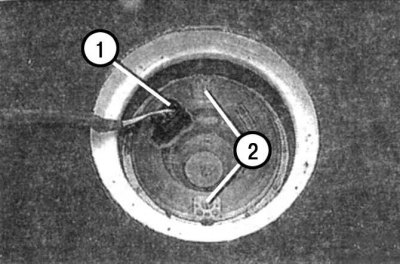
Fig. 5.46. Removing the fuel level sensor: 1-pin connector; 2 – groove
6. Disconnect contact connector 1 (Fig. 5.46) from the fuel level sensor.
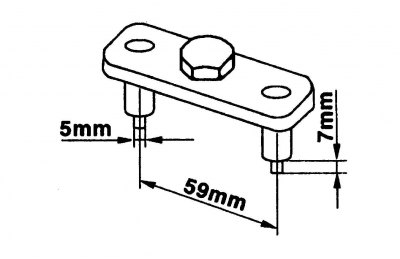
Fig. 5.47. Sketch of the key for unscrewing the fuel level sensor cover
7. Unscrew the fuel level sensor by turning the cover to the left.
Material created based on the website [MercedesMan.ru]
Note: Auto repair shops use a special key to perform this operation. However, you can make such a key yourself. A sketch of the key is shown in Fig. 5.47.
8. Remove the fuel level sensor together with the sealing ring.
Installation
9. Install the sensor with a new sealing ring, lubricating it with engine oil.
10. Tighten the cap using the special key.
11. Connect the connector 1.
12. Install the luggage compartment trim.