
Cars BMW Cars Volkswagen Cars Chevrolet Cars Land Rover Cars Lada Cars Honda Cars Peugeot
English Русский
Български
Беларускі
Український
Српски
Hrvatski
Română
Polski
Slovenský
Magyar
Bookmark News and articles Sitemap Feedback Site search
MercedesMan.ru


A-Class C-Class E-Class G-Class M-Class S-Class Others
190 (W201) (1982-1993) W202 (1993-2000) W203 (2000-2007)
  • Main
  • C-Class
  • W203 (2000-2007)
  • General information
  • Maintenance
  • Replacing the fuel filter

Replacing the fuel filter (Mercedes-Benz C-Class W203)

0
Contents: Petrol engines ↡ Diesel engine ↡
Warning! Gasoline and diesel fuel are highly flammable, so special precautions must be taken when working with any components of the fuel system. Do not smoke or approach the work area with an open flame or unprotected portable lamp. Do not carry out such work in garages equipped with heating devices that operate on natural gas (such as water heaters, dryers, etc.). The work area must be well ventilated. If gasoline comes into contact with your skin, wash it off immediately with soap and water. Wear safety glasses and keep a fire extinguisher handy when performing any work on the fuel system.


Petrol engines


The fuel filter is located in front of the rear suspension, on the left side under the car, near the bottom.

Removal


1. Disconnect the negative (-) battery cable with the ignition off. The cabin air filter box must be removed first.

Before disconnecting the cable, find out the radio receiver's security code, if any, refer to Section Replacing the battery.

2. Release the pressure in the fuel tank by briefly removing the tank cap.

Attention! The operation of lifting and installing the car on stands is associated with danger! Therefore, before carrying out the operation, read the Section Jacking and towing Introduction to the Manual.


3. Raise and place the vehicle on stands.

4. Remove the bottom trim on the left rear enough to access the fuel filter.

5. Remove the fuel hose screen located in front of the filter.

6. To facilitate subsequent assembly, mark the fuel hoses with tape.


7. Clamp the fuel hoses with clamps, such as HAYET-4590.

8. Remove the screw on the filter holder.

9. Remove the fuel hose clamps.

10. Disconnect the fuel hoses, place a container under the leaking fuel and wipe it with a thick cloth that absorbs fuel well.

11. Remove the fuel filter.

Installation


1. Install the new fuel filter.

2. Connect the hoses to the fuel filter according to the marks. Secure the hoses with clamps.

3. Secure the filter with the holder.

4. Reinstall the fuel hose screen.

5. Reinstall the left rear bottom trim.

6. Lower the car onto its wheels.

7. Connect the negative (-) cable to the battery with the ignition off. Reinstall the cabin air filter box. Enter the radio code and set the clock.

Diesel engine


The fuel filter is located in the engine compartment on the left side next to the engine.

Removal


1. Disconnect the negative (-) battery cable with the ignition off. The cabin air filter box must be removed first.

Before disconnecting the cable, find out the radio receiver's security code, if any, refer to Section Replacing the battery.

2. Remove the top engine cover, refer to Section Removal and installation the top engine cover.

Caution! Place a container or a thick cloth underneath the leaking fuel.
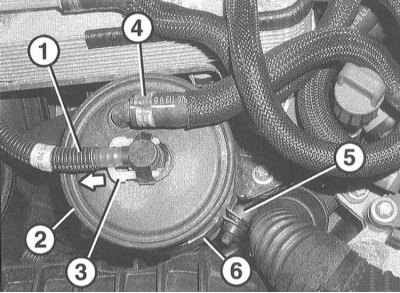

3. Disconnect the fuel hose (1) leading to the high-pressure fuel pump (HPFP) at the fuel filter…


3. Disconnect the fuel hose (1) leading to the high-pressure fuel pump (HPFP) at the fuel filter (2). To do this, press the locking clamp (3) until it stops (in the direction of the arrow), setting it to the open position, and remove the connecting element.


Attention! After this, immediately return the clamp to the closed position. It should not remain in the open position for a long time.


4. Release the fuel hose clamp (4) and slide it back. Remove the fuel hose.

5. Loosen the screw (5) on the clamp (6) and remove the fuel filter.

Installation


1. Install the new fuel filter into the clamp and tighten it to a torque of 8 Nm.

(Article obtained from this portal mercedesman)

2. Place the fuel hose on the filter and secure it with a clamp.

3. Check the sealing ring on the transparent fuel line connector for cracks or any damage. Check the position of the locking clamp. If the locking clamp has been in the open position for a long time, the fuel line must be replaced with a new one.

4. Put the fuel line on the filter. Check the reliability of its fastening by moving it in different directions.

5. Connect the negative (-) cable to the battery with the ignition off. Reinstall the cabin air filter box. Enter the radio code and set the clock.

6. Engine 611.962, starting with No.257722, and engine 612.962: Bleed the low pressure fuel circuit, refer to Section Bleeding air from the low pressure fuel circuit.

7. Reinstall the engine top cover, refer to Section Removal and installation the top engine cover.

8. Start the engine and visually check the fuel system for leaks.
This article is available at: russian, bulgarian, belarusian, ukrainian, serbian, croatian, romanian, polish, slovak, hungarian
The article has been verified: Rodionov Artyom Semyonovich
Share with friends:
◀ Previous
C-Class W203 / Maintenance
Next ▶

Replacing the engine air filter element
Checking and replacing spark plugs, condition of high-voltage wires
Checking the flexible coupling of the cardan shaft
Replacing brake fluid
Checking, cleaning and lubricating the coupling device
 
More similar articles for repairing other models

☛ Fuel filter — removal and installation Mercedes W168 (1997-2004)
☛ Replacing the needle valve and setting the fuel level in the float… Mercedes W123 (1976-1985)
☛ Checking the fuel system, replacing the fuel filter Mercedes W463 (1999-2019)
☛ Checking the fuel system, replacing the fuel filter Mercedes W163 (1997-2005)
☛ Checking the fuel system, replacing the fuel filter Mercedes W140 (1991-1998)
☛ Replacing the fuel filter Mercedes Vito 1 (1996-2003)
Link in different formats to this article
Comments and feedback from visitors
No comments yet


How much will 49 + 32 ?


W203 (2000-2007) 
  • General information
  • Introduction to guide
  • User manual
  • Maintenance
  • Power unit
  • Gasoline engines
  • Diesel engines
  • Cooling system
  • Ventilation and heating
  • Supply system
  • Injection system (gasoline)
  • Injection system (diesel)
  • Exhaust system
  • Ignition and control system
  • Charge and launch systems
  • Transmission
  • Mechanical gearbox
  • Automatic gearbox
  • Clutch and drive shafts
  • Differential
  • Chassis
  • Brake system
  • Car suspension
  • Steering
  • Body
  • Exterior (external elements)
  • Interior (internal elements)
  • Electrical equipment
  • Equipment and devices
  • Lighting system
  • Electrical diagrams (2000)
  • Electrical diagrams (since 2001)
W202 (1993-2000) 
  • General information
  • User manual
  • Driving a car
  • Car care
  • Maintenance
  • Power unit
  • Gasoline engines
  • Diesel engines
  • Lubrication system
  • Cooling system
  • Heating and ventilation
  • Ignition system
  • Fuel system
  • Injection system (gasoline)
  • Injection system (diesel)
  • Exhaust system
  • Transmission
  • Clutch
  • Car gearbox
  • Chassis
  • Suspension, wheels and tires
  • Steering
  • Brake system
  • Body
  • Exterior (external elements)
  • Interior (internal elements)
  • Doors and windows
  • Electrical equipment
  • Equipment and devices
  • Power devices
  • Lighting system
  • Electrical circuits
190 (W201) (1982-1993) 
  • General information
  • Introduction to the guide
  • Operation and care
  • Maintenance (gasoline)
  • Maintenance (diesel)
  • Troubleshooting
  • Power unit
  • Petrol engine I4
  • Petrol engine V6
  • Diesel engines
  • Engine overhaul
  • Cooling and heating
  • Power system (carburetor)
  • Injection system (gasoline)
  • Injection system (diesel)
  • Exhaust system
  • Charge and start system
  • Ignition system (I4)
  • Ignition system (V6)
  • Diesel heating system
  • Transmission
  • Clutch
  • Mechanical gearbox
  • Automatic gearbox
  • Cardan shaft and axle shafts
  • Chassis
  • Brake system
  • Car suspension
  • Steering
  • Body
  • Exterior (external elements)
  • Interior (internal elements)
  • Doors, locks and windows
  • Electrical equipment
  • Equipment and devices
  • Electrical circuits
 
MercedesMan.ru © 2017–2026 · Mobile version · Read about Mercedes · Sitemap: EN BG BY UA RS HR RO PL SK HU · Feedback · Site search · Bookmark A-Class (W168) · C-Class (W201) · C-Class (W202) · C-Class (W203) · E-Class (W123) · E-Class (W124) · E-Class (W210) · G-Class (W463) · M-Class (W163) · S-Class (W116, petrol) · S-Class (W126, petrol) · S-Class (W140) · S-Class (W220) · Sprinter · Vito 1 · Vito 2 · Vario 814D ·
 
We only use cookies without which some of the site's features may not be available.