Cars BMW Cars Volkswagen Cars Chevrolet Cars Land Rover Cars Lada Cars Honda Cars Peugeot
English Русский
Български
Беларускі
Український
Српски
Hrvatski
Română
Polski
Slovenský
Magyar
Bookmark News and articles Sitemap Feedback Site search
MercedesMan.ru


A-Class C-Class E-Class G-Class M-Class S-Class Others
190 (W201) (1982-1993) W202 (1993-2000) W203 (2000-2007)
  • Main
  • C-Class
  • W203 (2000-2007)
  • General information
  • Maintenance
  • Replacing brake fluid

Replacing brake fluid (Mercedes-Benz C-Class W203)

0
To carry out the work you will need:
  • Open-end wrench for unscrewing the air bleed nipple.
  • Transparent plastic hose with an internal diameter of 6 mm and a container for collecting brake fluid.
  • The required amount of brake fluid corresponding to the specification.

Note: Do not reuse used brake fluid. Old brake fluid is significantly darker than fresh fluid. This makes it easy to distinguish between the two.


Security measures


Brake fluid absorbs moisture through the pores of the brake hoses and the reservoir ventilation hole. As a result, the boiling point of the fluid decreases during operation. Under heavy load on the brakes, this can even lead to vaporization, which reduces the effectiveness of the brakes.

Brake fluid should be replaced every 2 years, preferably in spring. If you frequently drive in mountainous areas, the fluid should be replaced more often.

At the service station, air is usually removed from the brake system using a special device. However, this can be done without using the specified device. In this case, the brake system is bled using the brake pedal. This requires the participation of an assistant.

If the fluid level drops sharply during the process of removing air from the brake system, air is sucked in and enters the ABS pump. In this case, air must be removed at a service station using a special device. When replacing any brake hose, air must also be removed from the system at a service station. Until this is done, the car cannot be used.

Air removal sequence:
  • 1. Rear right support;
  • 2. Rear left support;
  • 3. Front right support;
  • 4. Front left support.

Please note the safety precautions when handling brake fluid, refer to the materials Chapters 9.
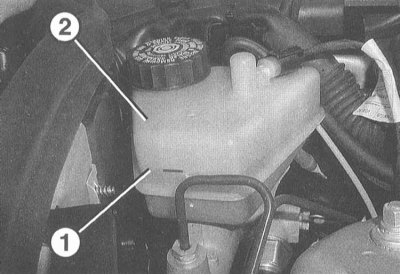


1. Using a bulb, remove the brake fluid from the reservoir, leaving a layer of liquid approximately…


1. Using a bulb, remove the brake fluid from the reservoir, leaving a layer of liquid approximately 10 mm thick at the bottom of the reservoir. Do not remove all the liquid from the reservoir, otherwise air will enter the brake system.

2. Fill the expansion tank with new brake fluid up to the MAX mark.

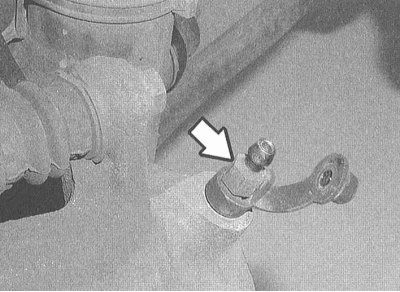
3. Open the air bleed nipple carefully so as not to twist it. It is recommended to treat the nipple with a rust remover 2 hours before bleeding. If the nipple does not open, the operation of bleeding the air from the brake system should be entrusted to a workshop.
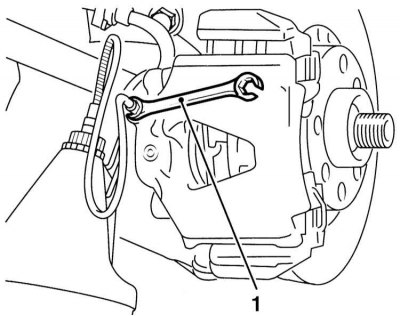
4. On the right rear disc brake caliper, attach a clean transparent hose to the air bleed nipple…

4. On the right rear disc brake caliper, attach a clean transparent hose to the air bleed nipple and insert it into a suitable container.


5. Ask an assistant to repeatedly press the brake pedal until the resistance to pressing the pedal becomes noticeable. Press the pedal and open the air bleed nipple. Close the nipple after the brake pedal rests on the floor of the car body. Remove your foot from the pedal. Repeat this process, pump out approximately 400-500 ml of old brake fluid.

6. Close the air bleed nipple and fill the expansion reservoir with new brake fluid.

7. In the same way, pump out the old brake fluid from the other calipers or wheel brake cylinders, following the sequence indicated above.

Attention! The drained brake fluid must be clean and without air bubbles in any case. Approximately 400-500 cm³ of old brake fluid must be pumped out of each brake caliper.


8. Dispose of old brake fluid at a special collection point for used fuels and lubricants.

9. Press the brake pedal and check the free travel. It should not exceed 1/3 of the pedal travel.

10. Fill the brake fluid reservoir to the previously existing level.

11. Screw the cap onto the tank.

Perform a reliability check:
  • Are the brake lines and hoses secured?
  • Are the brake hoses in the holders?
  • Are the air bleed nipples tightened?
  • Is there enough fluid in the system?

12. With the engine running, check the tightness of the system. To do this, press the brake pedal about 10 times with a force of 200-300 N (corresponds to 20-30 kg). The brake pedal should not go back. Check all connections for leaks.

13. Finally, check the brakes on a road with light traffic. To do this, you need to make at least one strong braking, checking the ABS operation (a sign of ABS operation is pulsation of the brake pedal when braking).


Note: Watch out for traffic behind you. The ABS effect is best seen on unpaved roads.


Brake fluid should not be disposed of with household waste or anywhere else. Local authorities should provide information on brake fluid collection points.
This article is available at: russian, bulgarian, belarusian, ukrainian, serbian, croatian, romanian, polish, slovak, hungarian
The article has been verified: Rodionov Artyom Semyonovich
Share with friends:
◀ Previous
C-Class W203 / Maintenance
Next ▶

Checking, cleaning and lubricating the coupling device
Replacing the cabin air filter element / carbon air filter
Tele-Aid Emergency Call System Battery Replacement
Checking battery condition, care and charging
Checking the condition, adjusting and replacing windshield wiper blades
Checking the flexible coupling of the cardan shaft
Checking and replacing spark plugs, condition of high-voltage wires
Replacing the engine air filter element
Replacing the fuel filter
More similar articles for repairing other models

☛ Brake fluid — checking the level Mercedes W168 (1997-2004)
☛ Replacing brake fluid Mercedes W123 (1976-1985)
☛ Replacing brake fluid Mercedes W463 (1999-2019)
☛ Replacing brake fluid Mercedes W163 (1997-2005)
☛ Replacing brake fluid Mercedes W140 (1991-1998)
☛ Replacing brake fluid Mercedes Sprinter (1995-2000, diesel)
Link in different formats to this article
Comments and feedback from visitors
No comments yet


How much will 37 + 34 ?


W203 (2000-2007) 
  • General information
  • Introduction to guide
  • User manual
  • Maintenance
  • Power unit
  • Gasoline engines
  • Diesel engines
  • Cooling system
  • Ventilation and heating
  • Supply system
  • Injection system (gasoline)
  • Injection system (diesel)
  • Exhaust system
  • Ignition and control system
  • Charge and launch systems
  • Transmission
  • Mechanical gearbox
  • Automatic gearbox
  • Clutch and drive shafts
  • Differential
  • Chassis
  • Brake system
  • Car suspension
  • Steering
  • Body
  • Exterior (external elements)
  • Interior (internal elements)
  • Electrical equipment
  • Equipment and devices
  • Lighting system
  • Electrical diagrams (2000)
  • Electrical diagrams (since 2001)
W202 (1993-2000) 
  • General information
  • User manual
  • Driving a car
  • Car care
  • Maintenance
  • Power unit
  • Gasoline engines
  • Diesel engines
  • Lubrication system
  • Cooling system
  • Heating and ventilation
  • Ignition system
  • Fuel system
  • Injection system (gasoline)
  • Injection system (diesel)
  • Exhaust system
  • Transmission
  • Clutch
  • Car gearbox
  • Chassis
  • Suspension, wheels and tires
  • Steering
  • Brake system
  • Body
  • Exterior (external elements)
  • Interior (internal elements)
  • Doors and windows
  • Electrical equipment
  • Equipment and devices
  • Power devices
  • Lighting system
  • Electrical circuits
190 (W201) (1982-1993) 
  • General information
  • Introduction to the guide
  • Operation and care
  • Maintenance (gasoline)
  • Maintenance (diesel)
  • Troubleshooting
  • Power unit
  • Petrol engine I4
  • Petrol engine V6
  • Diesel engines
  • Engine overhaul
  • Cooling and heating
  • Power system (carburetor)
  • Injection system (gasoline)
  • Injection system (diesel)
  • Exhaust system
  • Charge and start system
  • Ignition system (I4)
  • Ignition system (V6)
  • Diesel heating system
  • Transmission
  • Clutch
  • Mechanical gearbox
  • Automatic gearbox
  • Cardan shaft and axle shafts
  • Chassis
  • Brake system
  • Car suspension
  • Steering
  • Body
  • Exterior (external elements)
  • Interior (internal elements)
  • Doors, locks and windows
  • Electrical equipment
  • Equipment and devices
  • Electrical circuits
 
MercedesMan.ru © 2017–2026 · Mobile version · Read about Mercedes · Sitemap: EN BG BY UA RS HR RO PL SK HU · Feedback · Site search · Bookmark A-Class (W168) · C-Class (W201) · C-Class (W202) · C-Class (W203) · E-Class (W123) · E-Class (W124) · E-Class (W210) · G-Class (W463) · M-Class (W163) · S-Class (W116, petrol) · S-Class (W126, petrol) · S-Class (W140) · S-Class (W220) · Sprinter · Vito 1 · Vito 2 · Vario 814D ·
 
We only use cookies without which some of the site's features may not be available.